
News Items in Prestia
News Items in Prestia
Permissions: Who can create, approve and publish news items?
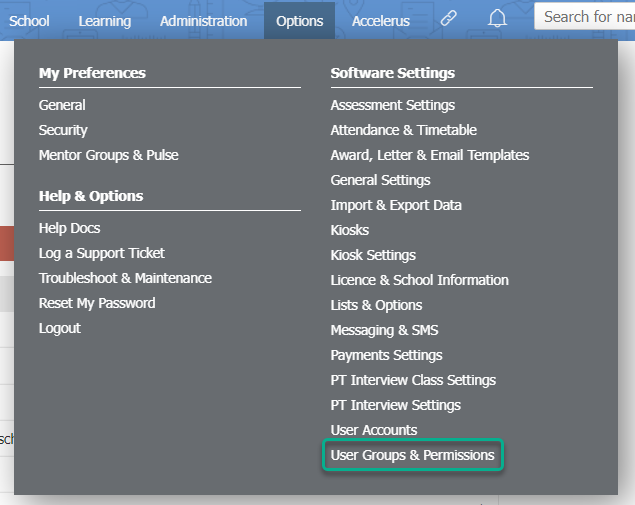
To assign permissions to a Prestia user group, go to Options > Software Settings > User Groups & Permissions .
Click on the Pencil icon next to the staff user group you are setting permissions for, and then click on the Staff option in the left hand menu.
The table below outlines the permissions and the access level granted.
| Permission | Description |
| Read Only (Own and Others) | Can read all news. Cannot create, edit, delete or approve any news. |
| Read Only (Others) + Add, Modify, Read (Own) | Can read all news items. Can create, edit and delete their own news. Cannot approve news. |
| Read Only (Others) + Add, Modify, Read, Approve (Own) | Can read all news items. Can create, edit, delete and approve their own news. |
| Add, Modify + Read (Own + Others) | Can read all news items. Can create, edit and delete all items. Cannot approve news. |
| Add, Modify + Read (Own + Others) + Approve | Can read, create, edit, delete and approve all news. |
| No Access | No access to news. |
Viewing and Searching news items
News items will appear in a list that can be sorted, filtered and searched.
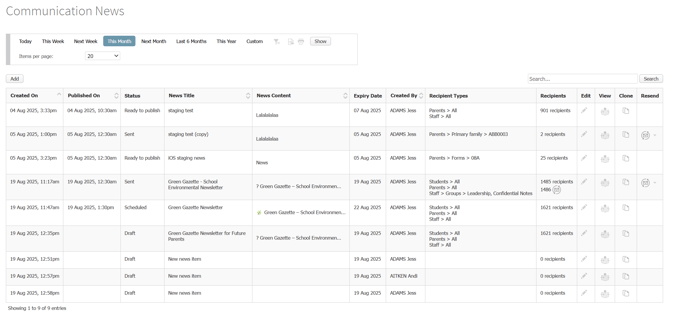
To sort items by date, title or content click the up or down chevron button.

Items can be filtered by a period of time or specific dates, by clicking the ‘Custom’ button and selecting a date range.

Items can also be filtered by clicking the funnel button.

You can search news items by title, or content, by entering the a word or phrase into the search bar and then clicking the search button.

Creating news items
Staff must have the ‘Add’ permission for news items to access this function.
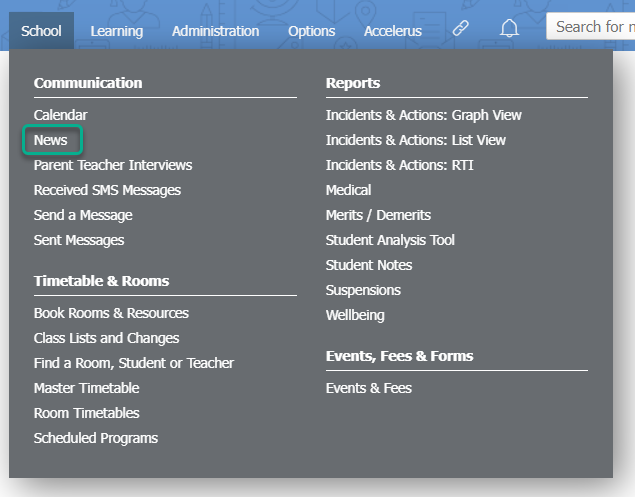
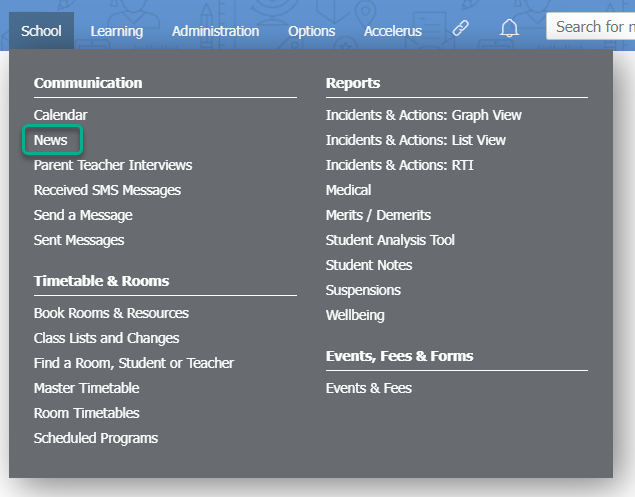
- Go to School > Communication > News .
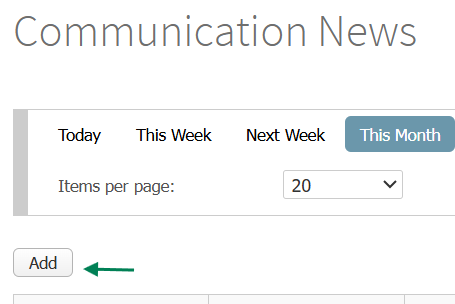
- Click the Add button
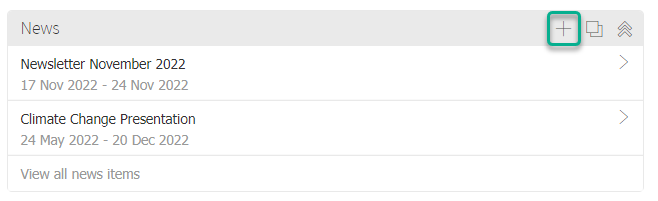
- OR Click the + icon in the news widget on the dashboard.
- Enter a title for your news item in the New news item field.
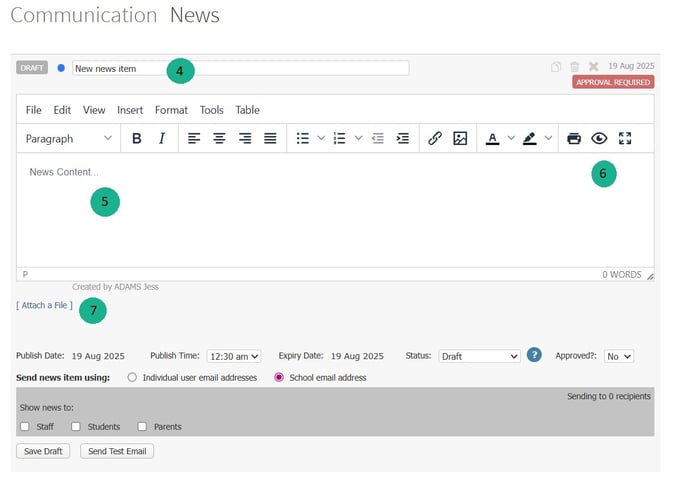
- In the text editor, type in the text for the news item. Note that you can use formatting if required using the options in the header bars in the text editor.
- To print your news item text, click the Printer icon. You can also preview your news item as a popup, by clicking the Eye icon, or in full screen, by clicking the Full screen icon.
- Optionally, attach one or more files by clicking the [ Attach a file ] text. Maximum file size is 1G.
- Select the Publish Date by clicking on the date and using the calendar picker to make a selection. This is the date the news item will appear on the Prestia news feed (once it has been approved).
- Select the Publish Time using the dropdown list. This is the date the news item will appear on the Prestia news feed (once it has been approved).
- Select the Expiry Date by clicking on the date and using the calendar picker to make a selection. This is the date in which the news item will no longer appear on the Prestia news feed.
- Make a selection for Send news item using either the user’s email address or a school email address.
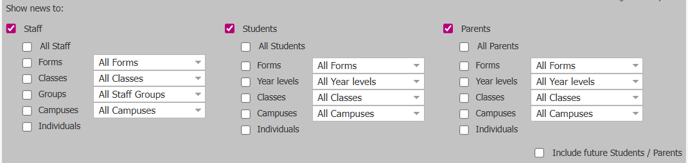
- In Show news to: select who should be able to see this news item. You can make one or more selections by ticking the Staff , Students , and/or Parents checkboxes.
- You can then further refine who will see the news item on their news feed, by choosing one or more Forms , Classes , Groups , Year levels , or Individuals in each user type. You can also choose to include future Students/Parents .
- If the news item is ready for approval, use the Status: dropdown list to change from Draft to Ready to Publish . If you have permission to approve news items, skip to the next section, ‘Approving and publishing news items’.
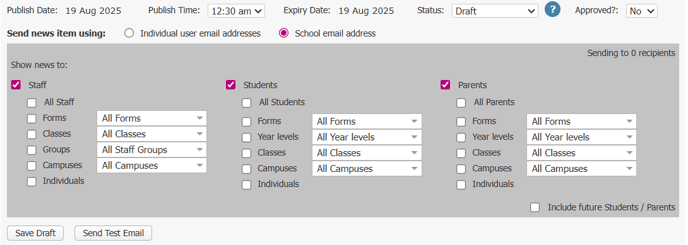
- Click the Save Draft button. Your news item is now ready to be approved, and a Prestia user with approval rights will be notified to approve and publish the item.
Approving news items
News items may only be approved by a user who has the ‘Approve’ permission for news items. When there are news items awaiting approval, an alert will show in the alerts widget on the dashboard of all users with ‘Approve’ permission.
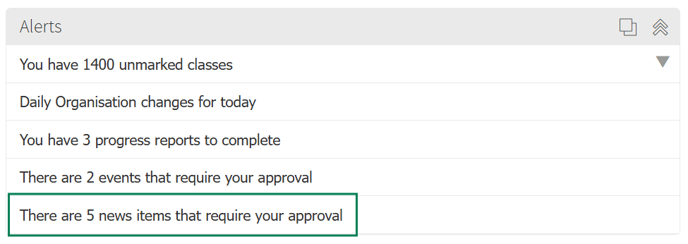
To approve a news item:
- Go to School > Communication > News , or click on the alert shown in your alerts widget.
- Any news items awaiting approval will have a status of Ready to Publish.
- Open the news item you wish to approve by clicking on the Edit button/Pencil icon .
- Review the content, then use the Approved? dropdown list to change the selection to Yes .

- Click the Send Now button. Note: If the news item is set to be published at a future date/time, the button will instead display Schedule . Click to approve this news item to be published at the applicable time.
- The news item will be shown to the selected users once the publish date and time have passed. Any app or email notifications you have enabled in your Messaging & SMS settings will be sent once the news item is published.
Resending news items
It’s possible that, once you have sent your news item, new members join the recipient groups and also need to receive the information.
The item can be sent to all recipients again or just to new members of the recipient group.
- Go to School > Communication > News
- For the selected item, click the envelope icon in the Resend column.
- Click Resend to All or Resend to New
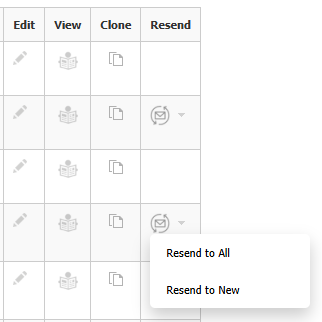
Resend to New will only send to new members of the original recipient group. If you wish to send to an entirely new selection of recipients, you will need to clone the news item, as shown below.
Cloning news items
Rather than rewriting a news item, or copying pasting, for a new group of recipients, you can use the Clone function.
- Go to School > Communication > News
- For the selected item, click the document icon in the Clone column.
- Click OK on the confirmation message.
- Alter the item as necessary or simply send to new recipients.
A few tips
- By default, a table resizes to fit the screen width (unless otherwise specified to be smaller). This is great for basic tables, but isn’t recommended for most complex tables.
- Attach a PDF or Word document to the news item when a complex table is required.
- Consider creating a ‘Master’ news item which has all the school formatting, logos, etc. included. This can be a draft news item that is copied every time a new news item is needed.
- Limit the different fonts and formatting used in a single news item. Multiple changes in fonts and formatting can be distracting.
- Different devices and browsers can display fonts and graphics differently. Stick to standard fonts to ensure the best display on all devices.
- Remember that different devices and browsers show emojis slightly differently (or not at all if converted to plain text). Use emojis to emphasis a point only. Do not use it as the key part of the message.
- Emails for scheduled news items will be sent during the next auto-import that runs after the scheduled release time. For most schools, this is within the hour.
Izin: Siapa yang dapat membuat, menyetujui, dan menerbitkan item berita?
Untuk menetapkan izin ke grup pengguna Prestia, buka Options > Software Settings > User Groups & Permissions .
Klik ikon Pensil di samping grup pengguna staf yang Anda atur izinnya, lalu klik opsi Staff di menu sebelah kiri.
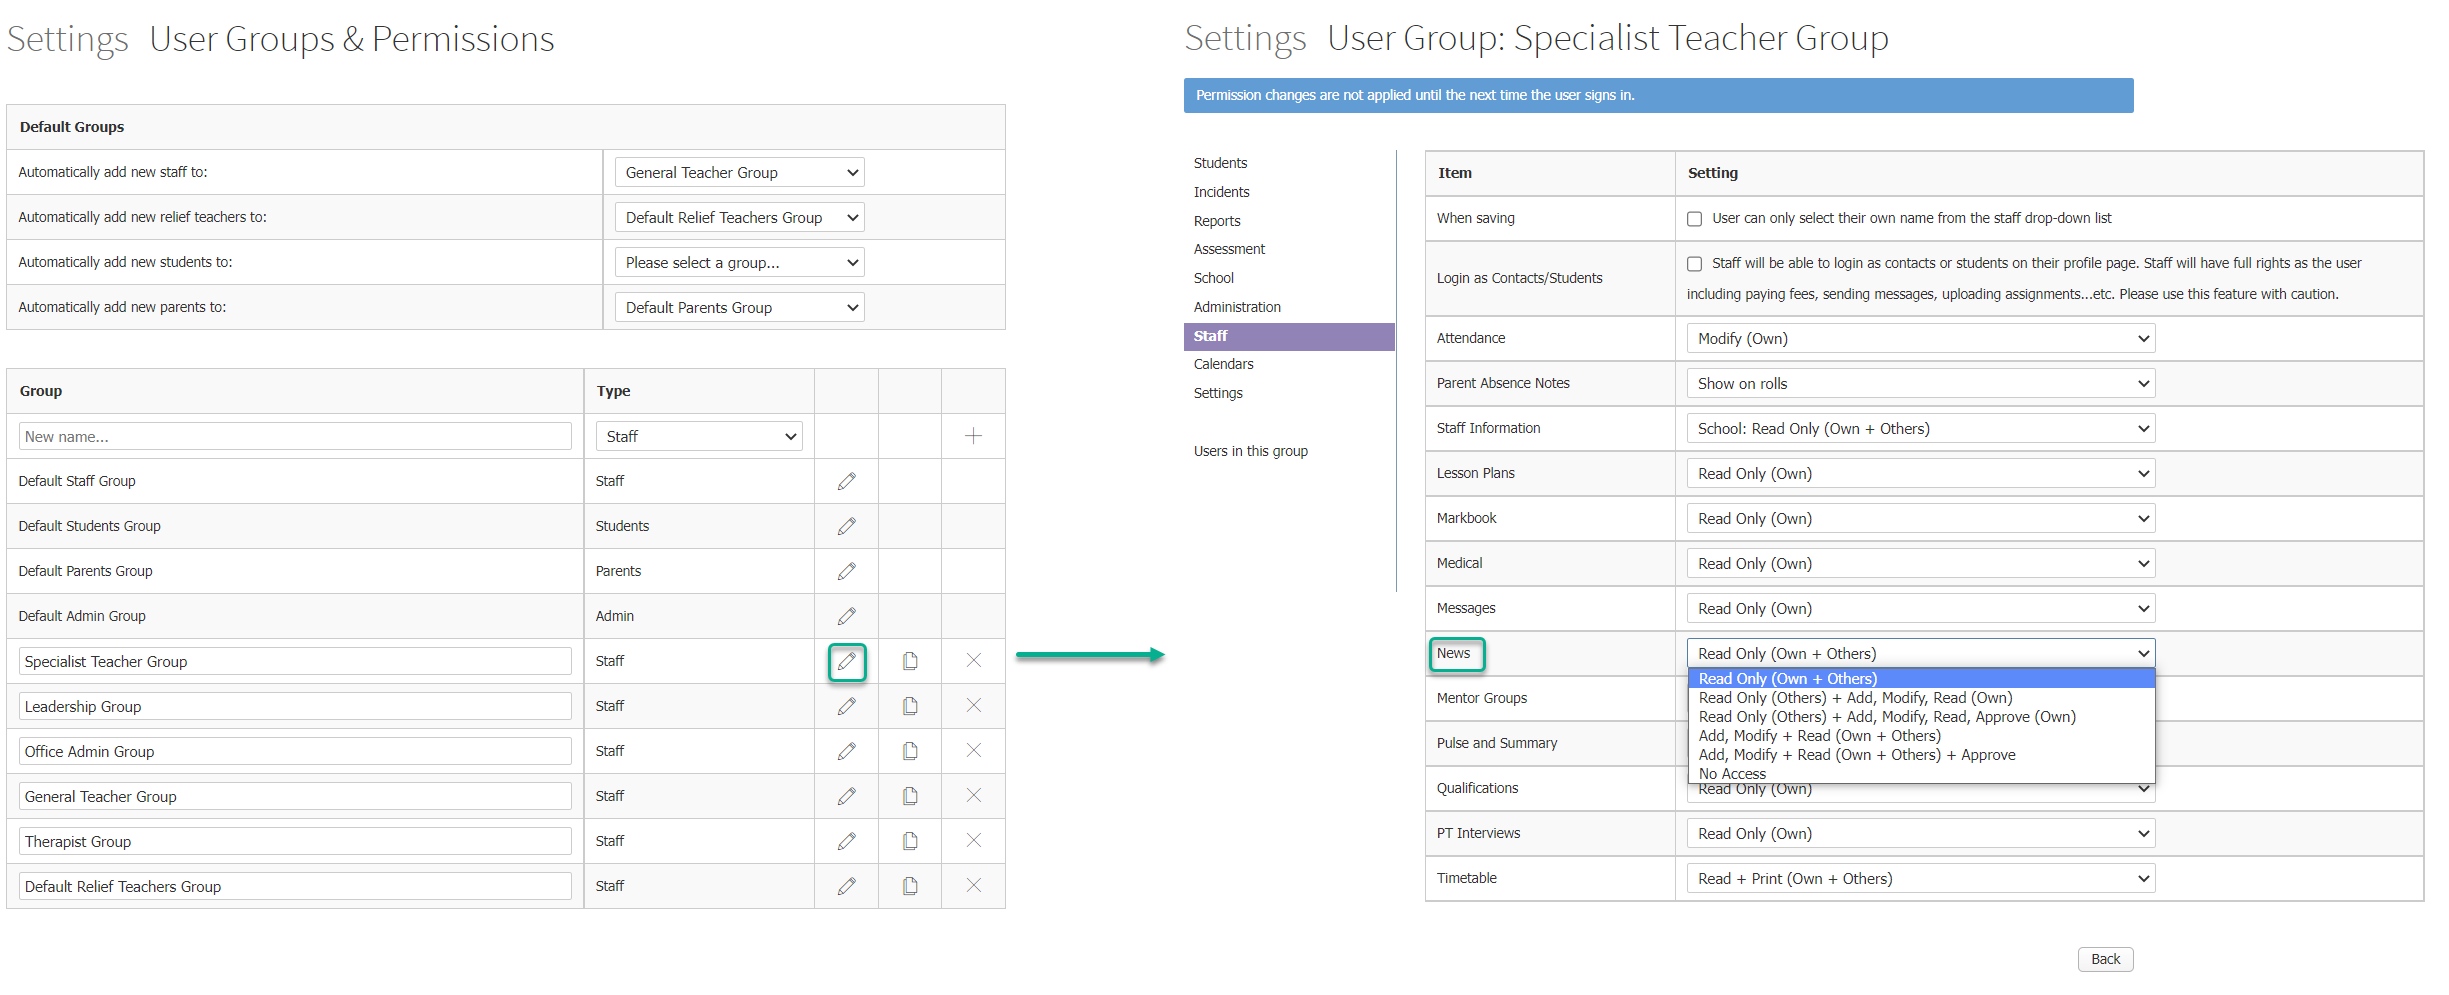
Tabel di bawah ini menguraikan izin dan tingkat akses yang diberikan.
| Izin | Deskripsi |
| Hanya Baca (Milik Sendiri dan Orang Lain) | Dapat membaca semua berita. Tidak dapat membuat, mengedit, menghapus, atau menyetujui berita apa pun. |
| Hanya Baca (Orang Lain) + Tambah, Ubah, Baca (Milik Sendiri) | Dapat membaca semua item berita. Dapat membuat, mengedit, dan menghapus berita mereka sendiri. Tidak dapat menyetujui berita. |
| Hanya Baca (Orang Lain) + Tambah, Ubah, Baca, Setujui (Milik Sendiri) | Dapat membaca semua item berita. Dapat membuat, mengedit, menghapus, dan menyetujui berita mereka sendiri. |
| Tambah, Ubah + Baca (Milik Sendiri + Orang Lain) | Dapat membaca semua item berita. Dapat membuat, mengedit, dan menghapus semua item. Tidak dapat menyetujui berita. |
| Tambah, Ubah + Baca (Milik Sendiri + Orang Lain) + Setujui | Dapat membaca, membuat, mengedit, menghapus, dan menyetujui semua berita. |
| Tanpa Akses | Tidak ada akses ke berita. |
Melihat dan Mencari item berita
Item berita akan muncul dalam daftar yang dapat diurutkan, difilter, dan dicari.
Untuk mengurutkan item berdasarkan tanggal, judul, atau konten, klik tombol chevron atas atau bawah.
Item dapat difilter berdasarkan periode waktu atau tanggal tertentu, dengan mengeklik tombol ‘Custom’ dan memilih rentang tanggal.
Item juga dapat difilter dengan mengeklik tombol corong.
Anda dapat mencari item berita berdasarkan judul, atau konten, dengan memasukkan kata atau frasa ke dalam bilah pencarian lalu mengeklik tombol pencarian.
Membuat item berita
Staf harus memiliki izin ‘Add’ untuk item berita agar dapat mengakses fungsi ini.
- Buka School > Communication > News .
- Klik tombol Add
- ATAU Klik ikon + di widget berita di dashboard.
- Masukkan judul untuk item berita Anda di kolom New news item .
- Di editor teks, ketik teks untuk item berita. Perhatikan bahwa Anda dapat menggunakan pemformatan jika diperlukan dengan menggunakan opsi di bilah header di editor teks.
- Untuk mencetak teks item berita Anda, klik ikon Printer . Anda juga dapat mempratinjau item berita Anda sebagai pop-up, dengan mengeklik ikon Mata , atau dalam layar penuh, dengan mengeklik ikon Layar Penuh .
- Opsional, lampirkan satu atau lebih file dengan mengeklik teks [ Lampirkan file ] . Ukuran file maksimum adalah 1G.
- Pilih Tanggal Publikasi dengan mengeklik tanggal dan menggunakan pemilih kalender untuk membuat pilihan. Ini adalah tanggal item berita akan muncul di feed berita Prestia (setelah disetujui).
- Pilih Waktu Publikasi menggunakan daftar dropdown. Ini adalah waktu item berita akan muncul di feed berita Prestia (setelah disetujui).
- Pilih Tanggal Kedaluwarsa dengan mengeklik tanggal dan menggunakan pemilih kalender untuk membuat pilihan. Ini adalah tanggal di mana item berita tidak akan lagi muncul di feed berita Prestia.
- Buat pilihan untuk Kirim item berita menggunakan alamat email pengguna atau alamat email sekolah.
- Di Tampilkan berita kepada: pilih siapa yang seharusnya dapat melihat item berita ini. Anda dapat membuat satu atau lebih pilihan dengan mencentang kotak centang Staff , Students , dan/atau Parents .
- Anda kemudian dapat lebih lanjut menyaring siapa yang akan melihat item berita di feed berita mereka, dengan memilih satu atau lebih Forms , Classes , Groups , Year levels , atau Individuals di setiap jenis pengguna. Anda juga dapat memilih untuk menyertakan future Students/Parents .
- Jika item berita siap untuk disetujui, gunakan daftar dropdown Status: untuk mengubah dari Draft menjadi Ready to Publish . Jika Anda memiliki izin untuk menyetujui item berita, lewati ke bagian berikutnya, ‘Menyetujui dan menerbitkan item berita’.
- Klik tombol Save Draft . Item berita Anda sekarang siap untuk disetujui, dan pengguna Prestia dengan hak persetujuan akan diberi tahu untuk menyetujui dan menerbitkan item tersebut.
Menyetujui item berita
Item berita hanya dapat disetujui oleh pengguna yang memiliki izin ‘Approve’ untuk item berita. Ketika ada item berita yang menunggu persetujuan, sebuah peringatan akan muncul di widget peringatan pada dashboard semua pengguna dengan izin ‘Approve’.
Untuk menyetujui item berita:
- Buka School > Communication > News , atau klik peringatan yang ditampilkan di widget peringatan Anda.
- Setiap item berita yang menunggu persetujuan akan memiliki status Ready to Publish.
- Buka item berita yang ingin Anda setujui dengan mengeklik tombol Edit/ikon Pensil .
- Tinjau konten, lalu gunakan daftar dropdown Disetujui? untuk mengubah pilihan menjadi Ya .
- Klik tombol Kirim Sekarang . Catatan: Jika item berita diatur untuk dipublikasikan di tanggal/waktu mendatang, tombol akan menampilkan Jadwalkan . Klik untuk menyetujui item berita ini agar dipublikasikan pada waktu yang berlaku.
- Item berita akan ditampilkan kepada pengguna yang dipilih setelah tanggal dan waktu publikasi berlalu. Pemberitahuan aplikasi atau email apa pun yang telah Anda aktifkan di pengaturan Messaging & SMS akan dikirim setelah item berita diterbitkan.
Mengirim ulang item berita
Ada kemungkinan bahwa, setelah Anda mengirim item berita Anda, anggota baru bergabung dengan grup penerima dan juga perlu menerima informasi tersebut.
Item dapat dikirim ke semua penerima lagi atau hanya kepada anggota baru dari grup penerima.
- Buka School > Communication > News
- Untuk item yang dipilih, klik ikon amplop di kolom Kirim Ulang.
- Klik Kirim Ulang ke Semua atau Kirim Ulang ke Baru
Kirim Ulang ke Baru hanya akan mengirim ke anggota baru dari grup penerima asli. Jika Anda ingin mengirim ke pilihan penerima yang benar-benar baru, Anda perlu mengkloning item berita, seperti yang ditunjukkan di bawah ini.
Mengkloning item berita
Daripada menulis ulang item berita, atau menyalin tempel, untuk grup penerima baru, Anda dapat menggunakan fungsi Kloning .
- Buka School > Communication > News
- Untuk item yang dipilih, klik ikon dokumen di kolom Kloning.
- Klik OK pada pesan konfirmasi.
- Ubah item sesuai kebutuhan atau cukup kirim ke penerima baru.
Beberapa kiat
- Secara default, tabel mengubah ukuran agar sesuai dengan lebar layar (kecuali jika ditentukan lain untuk menjadi lebih kecil). Ini bagus untuk tabel dasar, tetapi tidak disarankan untuk sebagian besar tabel kompleks.
- Lampirkan dokumen PDF atau Word ke item berita saat tabel kompleks diperlukan.
- Pertimbangkan untuk membuat ‘Master’ news item yang mencakup semua pemformatan sekolah, logo, dll. Ini bisa menjadi item berita draf yang disalin setiap kali item berita baru dibutuhkan.
- Batasi penggunaan font dan pemformatan yang berbeda dalam satu item berita. Banyak perubahan dalam font dan pemformatan dapat mengganggu.
- Perangkat dan browser yang berbeda dapat menampilkan font dan grafik secara berbeda. Tetap gunakan font standar untuk memastikan tampilan terbaik di semua perangkat.
- Ingatlah bahwa perangkat dan browser yang berbeda menampilkan emoji sedikit berbeda (atau tidak sama sekali jika dikonversi ke teks biasa). Gunakan emoji hanya untuk menekankan suatu poin. Jangan gunakan sebagai bagian utama pesan.
- Email untuk item berita terjadwal akan dikirim selama impor otomatis berikutnya yang berjalan setelah waktu rilis terjadwal. Untuk sebagian besar sekolah, ini terjadi dalam waktu satu jam.