
Scheduled absences and attendance
Absensi Terjadwal dan Kehadiran
Artikel ini menjelaskan cara menjadwalkan kehadiran siswa sebelumnya sehingga Prestia akan secara otomatis menandai kehadiran saat tanggal tersebut tiba.
Dengan Prestia, Anda dapat menjadwalkan penandaan kehadiran otomatis untuk siswa yang akan memiliki perubahan jadwal pelajaran dan kehadiran, baik satu kali maupun berulang. Contohnya, program magang berbasis sekolah (school-based apprenticeship), atau siswa yang akan mengikuti kegiatan kemah.
Melihat dan Mengedit Absensi Terjadwal
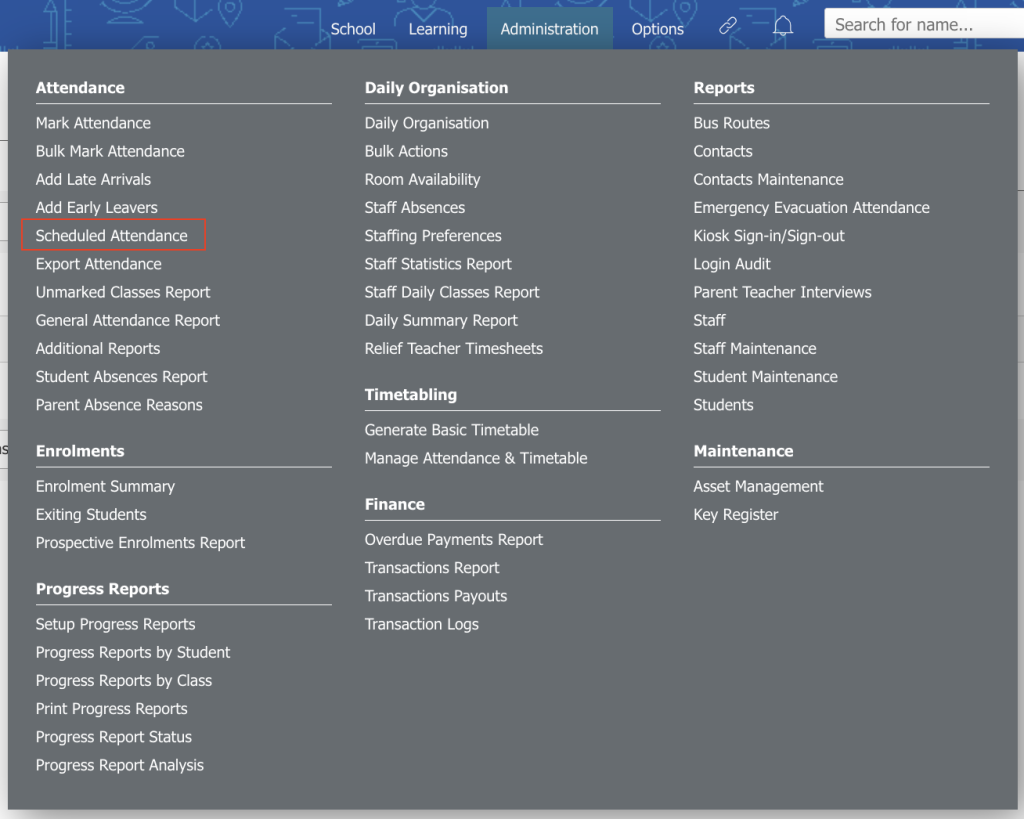
1. Buka Administration > Attendance > Scheduled Attendance.
2. Daftar absensi terjadwal saat ini akan ditampilkan dalam tabel. Anda dapat memilih rentang tanggal yang berbeda menggunakan Date range.
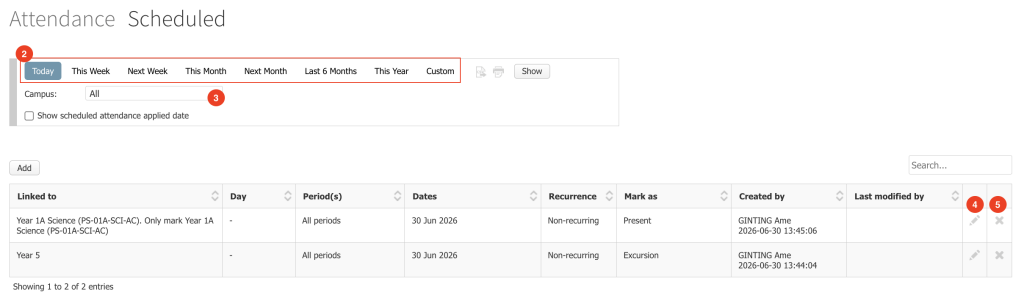
3. Jika tersedia, Anda dapat memilih Campus yang berbeda, lalu klik tombol Show.
4. Klik tombol Pencil yang sesuai untuk melihat atau mengedit data.
5. Klik ikon X untuk menghapus data. Tindakan ini akan mengembalikan status kehadiran pada semua periode yang terdampak oleh jadwal tersebut menjadi belum ditandai (unmarked).
Menambahkan Absensi Terjadwal
1. Buka Administration > Attendance > Scheduled Attendance.
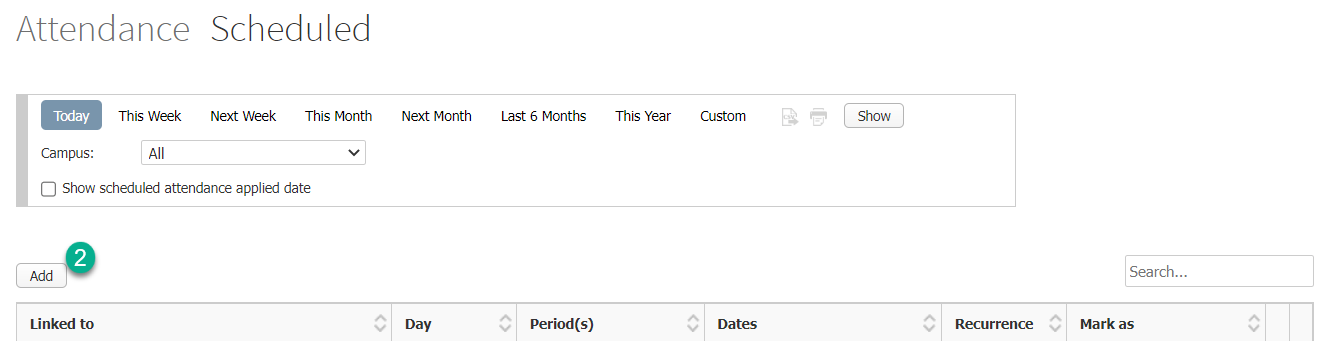
2. Klik tombol Add.
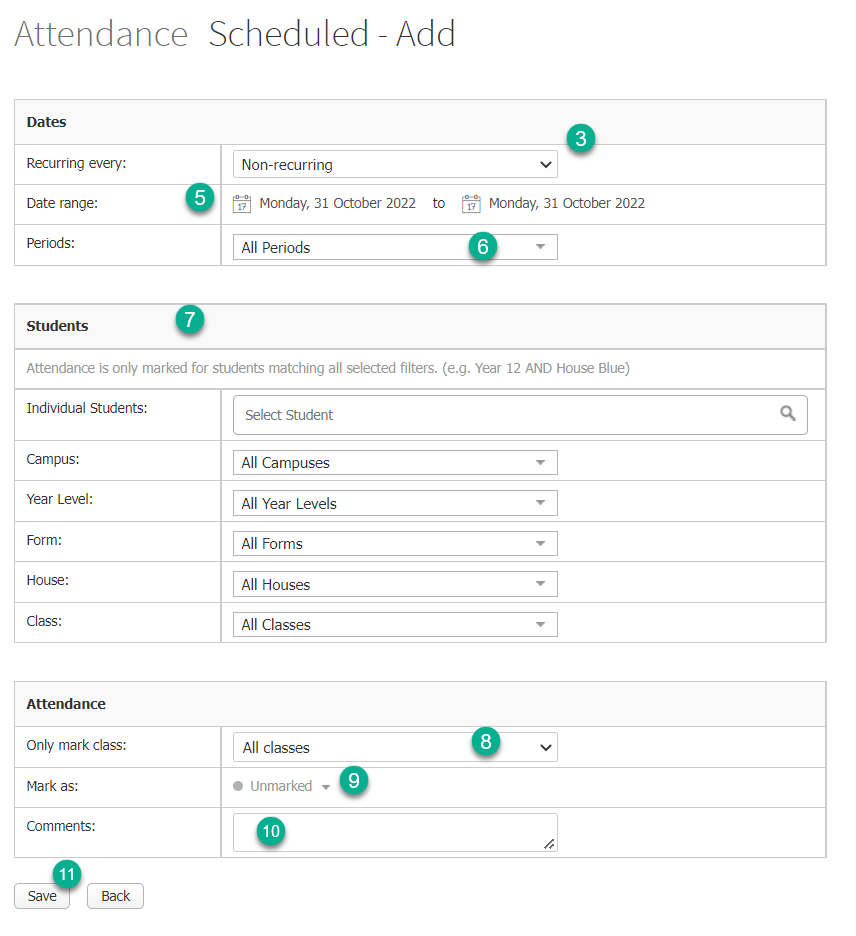
3. Pada daftar Recurring every:, pilih Week atau Fortnight, atau biarkan sebagai Non-recurring jika jadwal hanya berlaku satu kali.
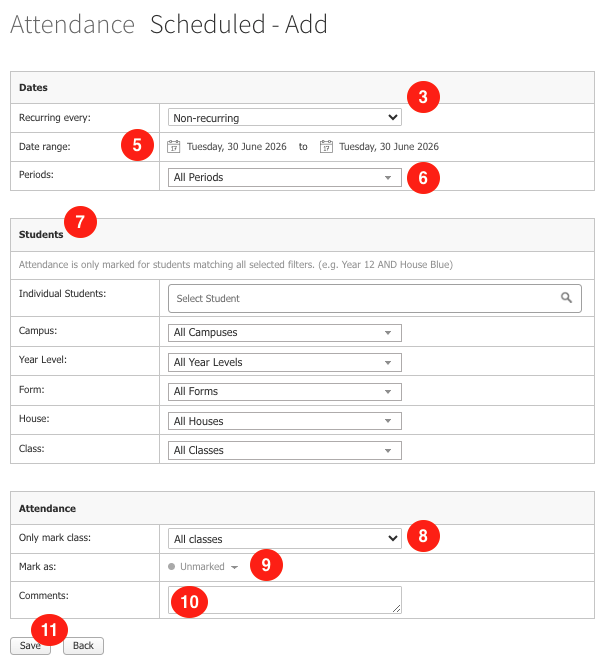
4. Jika Anda membuat absensi terjadwal berulang, kotak centang untuk setiap hari dalam seminggu akan ditampilkan. Centang hari yang sesuai. Sebagai contoh, seorang siswa mungkin memiliki janji temu yang dijadwalkan setiap dua minggu sekali pada hari Kamis.
5. Pada Date range, tentukan periode berlakunya absensi terjadwal. Klik tanggal mulai dan tanggal selesai untuk memilih tanggal melalui kalender.
6. Gunakan daftar Periods untuk memilih satu atau beberapa periode yang akan menggunakan alasan kehadiran tersebut, atau biarkan sebagai All Periods jika berlaku untuk semua periode
7. Pada bagian Students, tentukan siswa yang akan menerima jadwal absensi ini. Anda dapat memilih Individual Students dengan mengetik beberapa huruf pertama dari nama depan, nama panggilan, atau nama keluarga siswa pada kolom Select Student, kemudian memilih siswa dari daftar yang muncul. Ulangi langkah ini untuk menambahkan siswa lainnya.
Sebagai alternatif, Anda dapat menggunakan daftar pilihan lainnya untuk memilih siswa berdasarkan satu atau beberapa Campus, Year Level, Form, House, atau Class. Perlu diingat bahwa kehadiran hanya akan ditandai untuk siswa yang memenuhi semua filter yang dipilih. Sebagai contoh, jika filter yang dipilih adalah Prep dan Allungah atau Bindaree, maka hanya siswa Prep yang berada di salah satu dari kedua House tersebut yang akan dipilih.
8. Jika ingin menandai kehadiran hanya untuk kelas tertentu, ubah pilihan pada Only mark class:. Jika tidak, biarkan sebagai All classes.
9. Pilih jenis kehadiran pada daftar Mark as:
10. Masukkan komentar jika diperlukan pada kolom Comments. Langkah ini bersifat opsional.
11. Klik tombol Save.
With Prestia, you can schedule automated attendance marking for students who will have a one-off or recurring change in their timetable and attendance. This could be, for example, for students studying a VET course, school-based apprenticeship or students going on camp.
Viewing and editing scheduled attendance
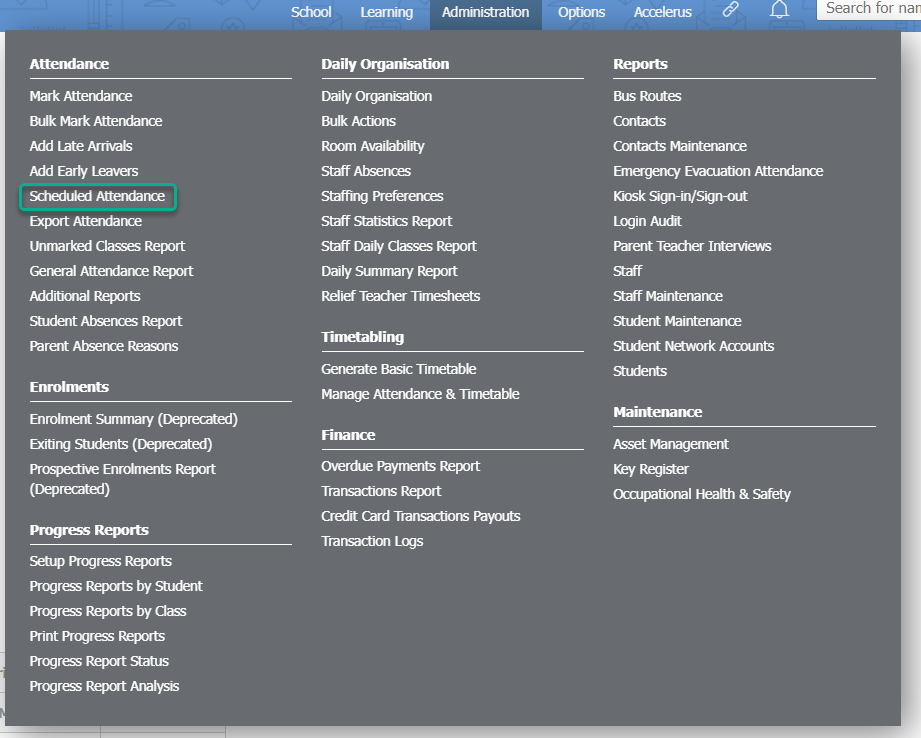
- Go to Administration > Attendance > Scheduled Attendance .
- Your current list of scheduled attendances are shown in the table. You can select a different date range using the Date range selectors .
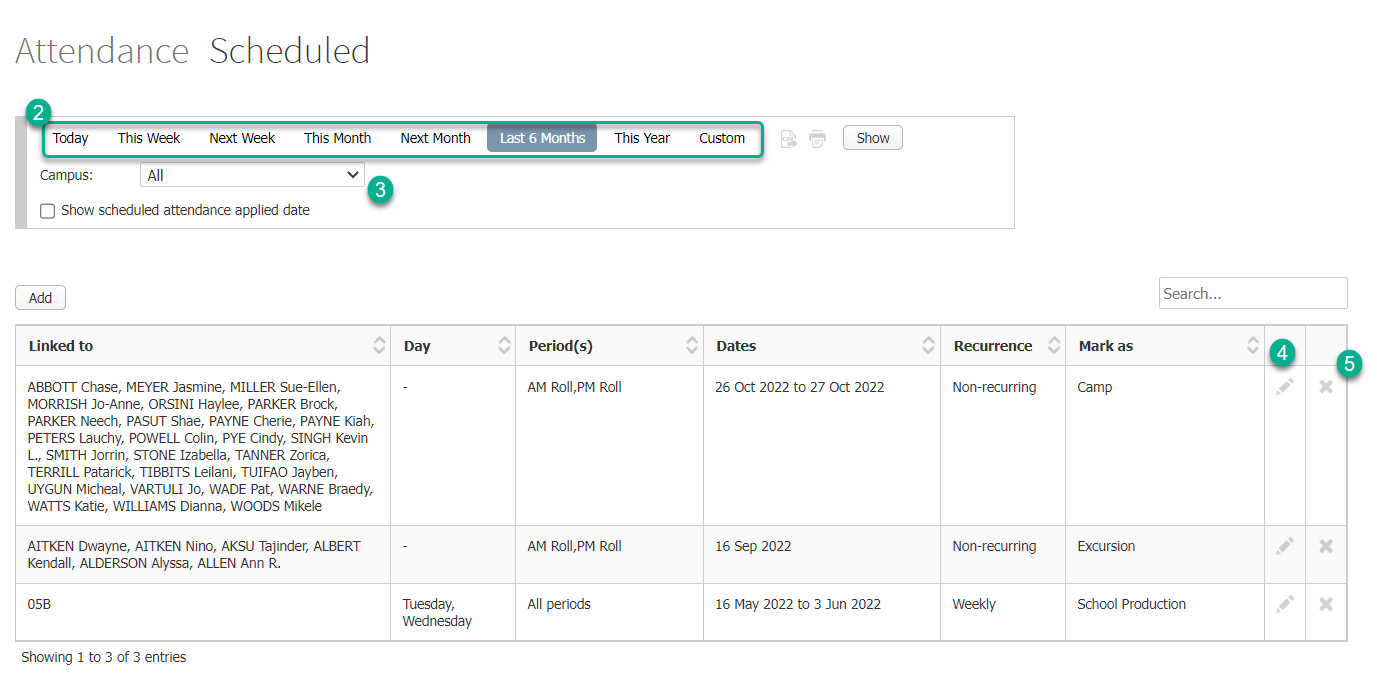
- You can select a different Campus , if applicable, then click the Show button.
- Click on the corresponding Pencil button to view or edit an item.
- You can click on the X icon to delete an item. This will revert all attendance for periods affected by this scheduled attendance item to unmarked.
Adding scheduled attendance
- Go to Administration > Attendance > Scheduled Attendance .
- Click on the Add button.
- Select either Week or Fortnight from the Recurring every: dropdown list, or leave as Non-recurring , as applicable.
- If you chose to create a recurring scheduled attendance, you will see checkboxes next to days of the week. Tick all that apply to this scheduled attendance. For example, a student may have a scheduled appointment once a fortnight on a Thursday.
- The Date range allows you to set the duration to which this scheduled attendance applies. Click on the dates to select new start and end dates from the calendar pickers.
- Use the dropdown list to tick one or more Periods your attendance reason should apply to, or leave as All Periods , as applicable.
- Use the Students section to set who this scheduled attendance applies to. You can select Individual Students by typing in the first few letters or their given, preferred or family name in the Select Student field, then using the dropdown list to select them. Repeat for any other students you wish to add.
You can alternatively use the other dropdown lists to select students of one or more particular Campus , Year Level , Form , House or Class . Remember, attendance is only marked for students matching ALL selected filters (e.g. the selections shown below will select all students in Prep who are in either Allungah or Bindaree houses).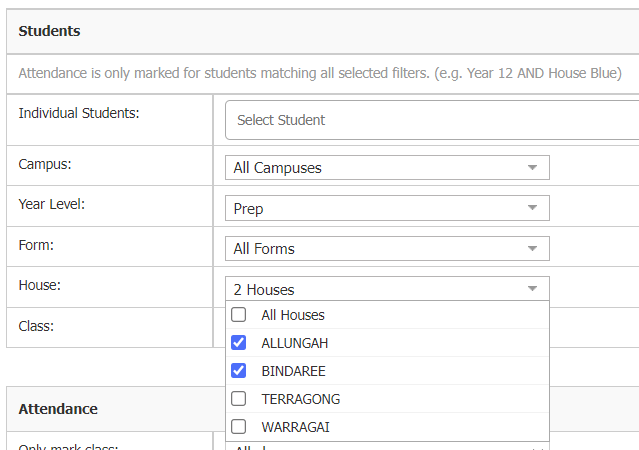
- You can specify to only mark a specific class by changing the Only mark class: dropdown list, or leave it as All classes , as applicable.
- Choose an attendance type from the Mark as: dropdown list.
- Leave any necessary comments in the Comments text area. This is optional.
- Click the Save button.