
Sending an email or internal message
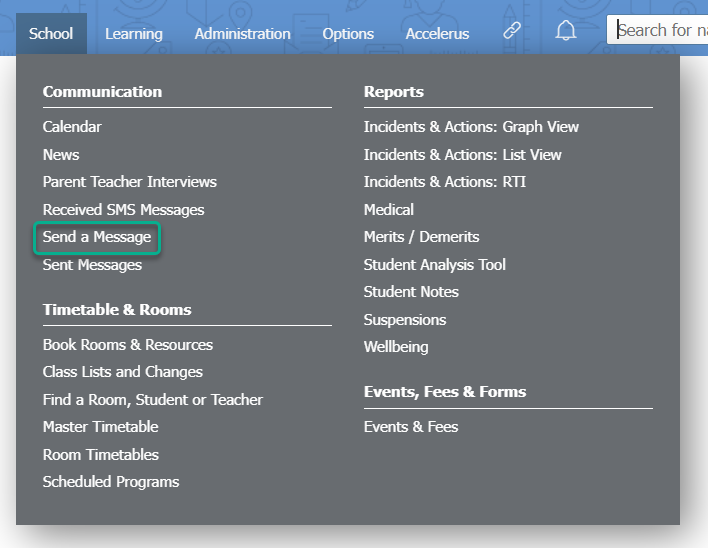
- Buka School > Communication > Send a Message.
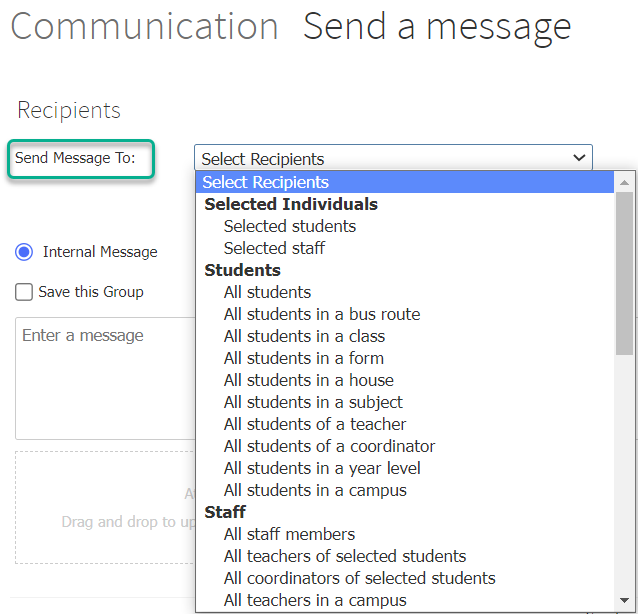
- Pilih penerima Anda dari Send Message To: daftar dropdown. Anda dapat menemukan berbagai opsi di bawah empat judul, Selected Individuals, Students, Staff, dan Groups.
- Pilih jenis pesan yang akan Anda kirim – Internal Message atau Email. Anda mungkin tidak melihat ketiga opsi ini, tergantung pada izin Anda dan pengaturan Prestia sekolah.
a. Anda dapat mencentang kotak untuk Save this Group. Anda akan diminta untuk menamai grup jika demikian. Ini berarti bahwa di halaman Pesan Anda sendiri (diakses menggunakan menu kiri dashboard Anda), Anda akan melihat grup ini ditampilkan. Ini berarti Anda dapat memulai percakapan di masa mendatang dengan grup staf, orang tua, atau siswa yang sama dengan cepat dan mudah.
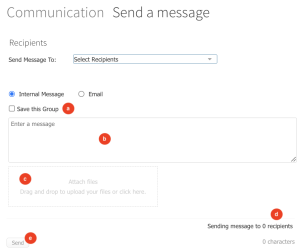
b. Masukkan pesan Anda di area teks.
c. Lampirkan file yang diperlukan – file dapat dalam berbagai format yang berguna, termasuk untuk dokumen, PDF, video, audio, atau dokumen Microsoft Office. Ukuran file maksimum adalah 1G.
c. Anda akan dapat melihat berapa banyak penerima yang Anda kirimkan di hitungan penerima. Mengklik teks ini akan menampilkan popup dengan daftar penerima.
d. Klik tombol Send untuk mengirim pesan Anda, lalu klik OK .
e.Anda akan melihat popup yang menanyakan apakah Anda ingin mengirim pesan lagi ke penerima yang sama atau ke penerima yang berbeda. Buat pilihan Anda sesuai kebutuhan.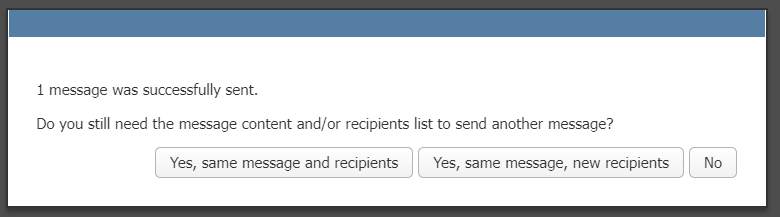
5. Untuk email :
a. Anda perlu mengetik baris subjek di kolom Enter a subject . 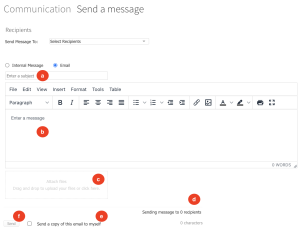
b. Masukkan pesan Anda di editor teks. Anda dapat menggunakan opsi pemformatan yang tersedia untuk email Anda.
c. Lampirkan file yang diperlukan – file dapat dalam berbagai format yang berguna, termasuk untuk dokumen, PDF, video, audio, atau dokumen Microsoft Office. Ukuran file maksimum adalah 1G.
d. Anda akan dapat melihat berapa banyak penerima yang Anda kirimkan di hitungan penerima. Mengklik teks ini akan menampilkan popup dengan daftar penerima dan alamat email mereka.
e. Centang Send a copy of this email to myself, jika diperlukan.
f. Klik tombol Send untuk mengirim pesan Anda, lalu klik OK.
g. Anda akan melihat popup yang menanyakan apakah Anda ingin mengirim pesan lagi ke penerima yang sama atau ke penerima yang berbeda. Buat pilihan Anda sesuai kebutuhan.
Note that staff can only use the messaging features that you they have access to via the permissions settings for their Prestia user group.
- Go to School > Communication > Send a Message.
- Choose your recipients from the Send Message To: dropdown list. You can find different options under four headings, Selected Individuals , Students , Staff , and Groups.
- Choose what type of message you are going to send – Internal Message or Email. You may not see all three of these options, depending on your permissions and the school’s Prestia settings.
- For internal messages :
- You can tick the checkbox to Save this Group . You will be prompted to name the group if so. This means that in your own Messages page (accessed using the left hand menu of your dashboard), you will see this group displayed. This means you can initiate future conversations with the same group of staff, parents or students quickly and easily.
- Enter your message in the text area.
- Attach any required files – files can be in multiple useful formats, including those for documents, PDFs, videos, audio or Microsoft Office documents. The maximum file size is 1G.
- You will be able to see how many recipients you are sending to in the recipient count. Clicking on this text will display a popup with a list of the recipients.
- Click the Send button to send your message, then click OK .
- You will see a popup asking if you want to send the message again to the same or to different recipients. Make your selections as required.
- You can tick the checkbox to Save this Group . You will be prompted to name the group if so. This means that in your own Messages page (accessed using the left hand menu of your dashboard), you will see this group displayed. This means you can initiate future conversations with the same group of staff, parents or students quickly and easily.
- For emails :
a. You need to type a subject line in the Enter a subject field.
b. Enter your message in the text editor. You can use the formatting options available for your email.
c. Attach any required files – files can be in multiple useful formats, including those for documents, PDFs, videos, audio or Microsoft Office documents. The maximum file size is 1G.
d. You will be able to see how many recipients you are sending to in the recipient count. Clicking on this text will display a popup with a list of the recipients and their email addresses.
e. Tick the Send a copy of this email to myself , if required.
f. Click the Send button to send your message, then click OK .
g. You will see a popup asking if you want to send the message again to the same or to different recipients. Make your selections as required.