
Automated Email Alerts to Messaging Groups for Incidents, Notes and Achievements
Pemberitahuan Otomatis melalui Email atau Internal Message ke Grup Pesan untuk Insiden, Catatan, dan Pencapaian
Setiap jenis insiden dan sebagian besar menu lainnya dapat dikonfigurasi untuk secara otomatis mengirim email kepada staf, siswa, atau orang tua menggunakan pesan yang telah ditentukan sebelumnya. Anda dapat menentukan pesan yang berbeda untuk setiap jenis insiden, serta pesan yang berbeda untuk siswa, orang tua, dan staf.
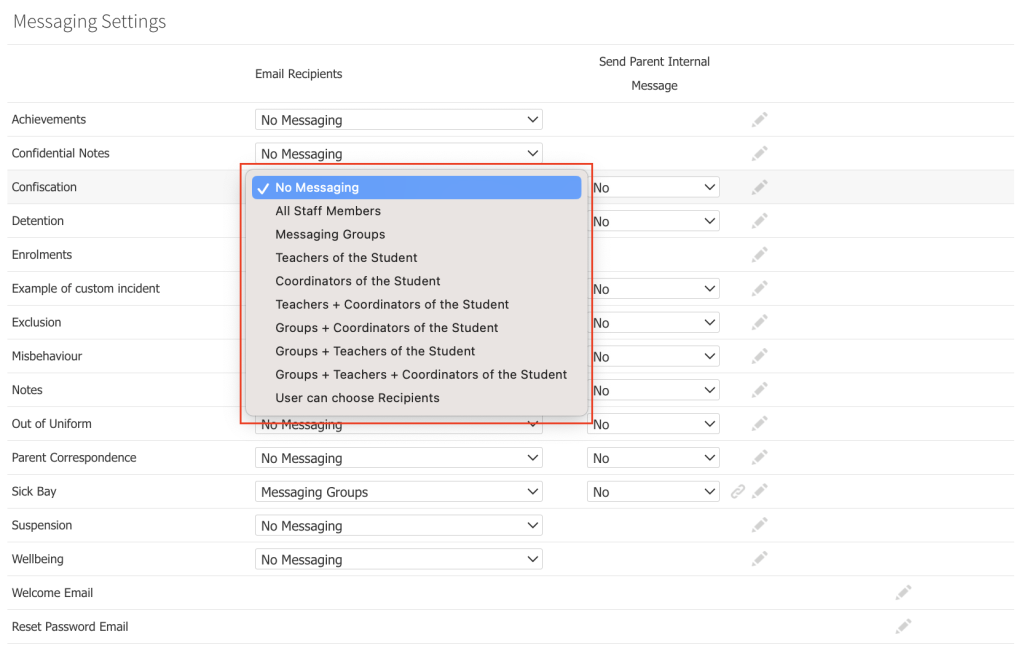
Pengaturan Messaging memungkinkan Anda menentukan bagaimana notifikasi email akan berfungsi. Gunakan daftar dropdown yang sesuai untuk mengaktifkan pengiriman notifikasi melalui email. Setiap daftar dropdown memiliki opsi berikut:
- No Messaging – tidak ada email yang akan dikirim.
- All Staff Members – email akan dikirim kepada seluruh staf.
- Messaging Groups – email hanya akan dikirim kepada anggota grup yang sesuai dengan kelas (form) dan/atau tingkat tahun (year level) siswa.
- Teachers of the Student – email hanya akan dikirim kepada guru siswa tersebut.
- Coordinators of the Student – email hanya akan dikirim kepada koordinator siswa tersebut.
- Teachers + Coordinators of the Student – email hanya akan dikirim kepada guru dan koordinator siswa tersebut.
- Groups + Coordinators of the Student – email hanya akan dikirim kepada anggota grup yang sesuai dengan kelas (form) dan/atau tingkat tahun siswa serta koordinator siswa tersebut.
- Groups + Teachers of the Student – email hanya akan dikirim kepada anggota grup yang sesuai dengan kelas (form) dan/atau tingkat tahun siswa serta guru siswa tersebut.
- Groups + Teachers + Coordinators of the Student – sama seperti di atas, tetapi juga dikirim kepada seluruh guru dan koordinator siswa tersebut.
- User can choose Recipients – pengguna dapat memilih penerima dan grup mana yang akan menerima email.
Mengubah Pengaturan Messaging
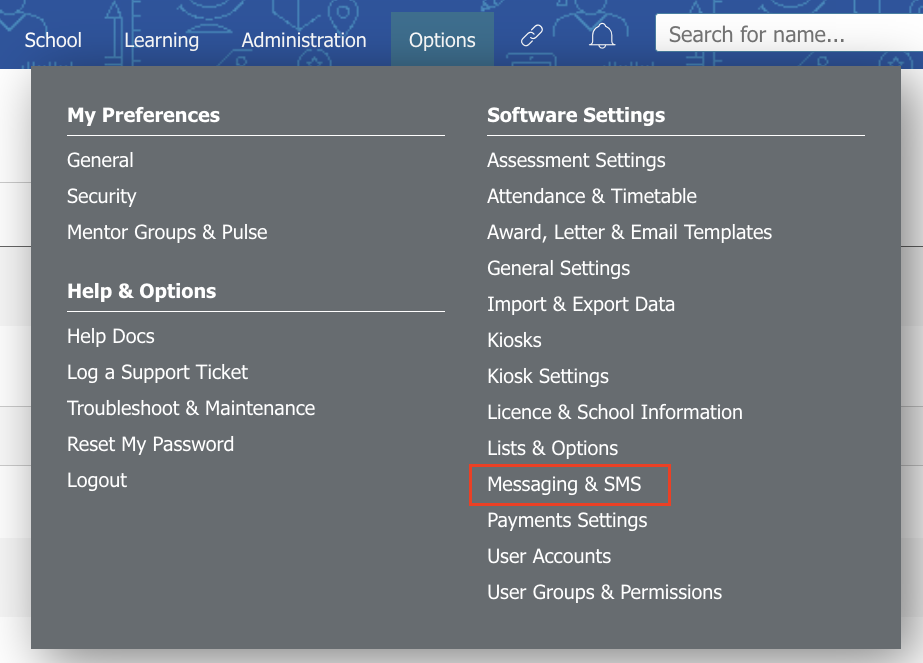
1. Buka Options > Software Settings > Messaging & SMS.
2. Pada bagian Messaging Settings, pilih item yang ingin disesuaikan.
3. Ubah pilihan pada daftar dropdown untuk menentukan penerima yang akan menerima notifikasi otomatis.
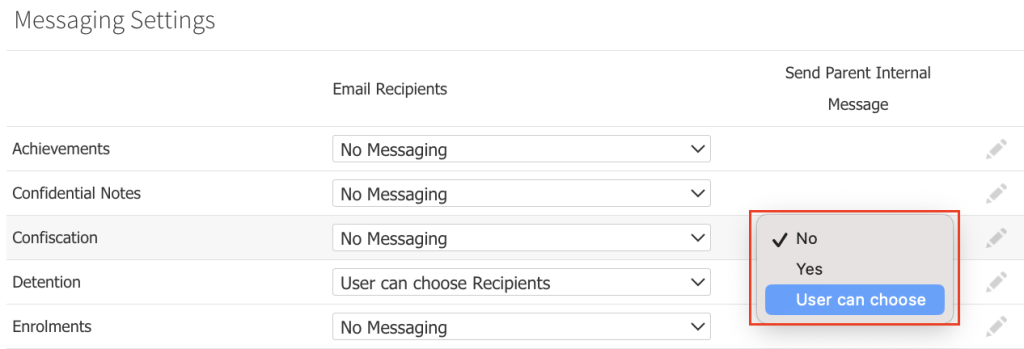
4. Jika Anda ingin mengaktifkan notifikasi Internal Message kepada orang tua untuk item tersebut, ubah opsi Send Parent Internal Message menjadi Yes.
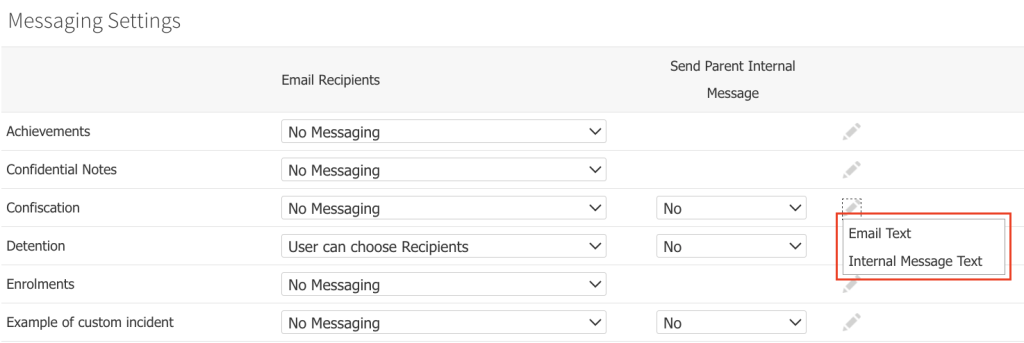
5. Klik ikon pensil yang sesuai untuk mengubah isi pesan pada template email atau Internal Message Text. Tersedia tab terpisah untuk Parent Message, Staff Message, dan Student Message. Jika sebuah template kosong, maka tidak ada notifikasi yang akan dikirim.
Anda dapat menyertakan merge fields dalam template pesan. Dengan mengklik teks [ Show Merge Fields ], akan terbuka tab kedua yang menampilkan daftar merge fields yang tersedia untuk sekolah Anda. Saat Anda membuat jenis insiden atau tindakan (action type) baru, merge fields baru juga akan ditambahkan ke daftar sekolah Anda.
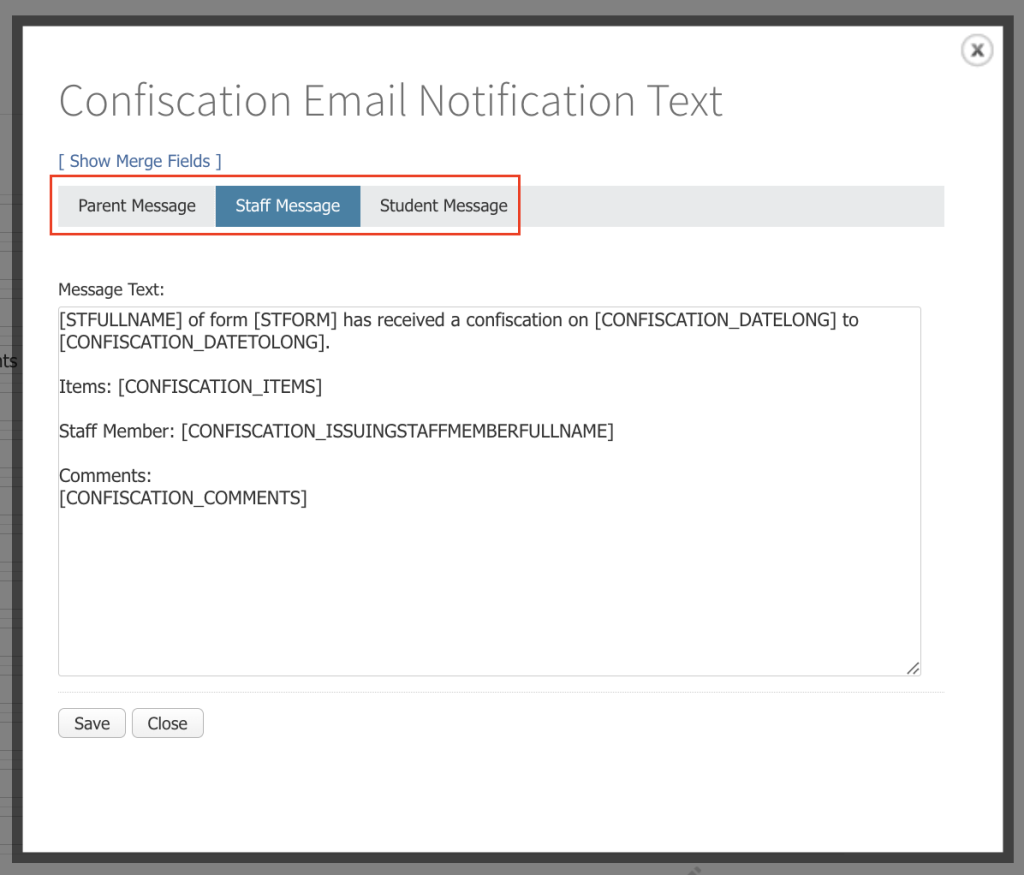
Setelah selesai membuat atau mengedit template pada tab Parent Message, Staff Message, atau Student Message sesuai kebutuhan, klik tombol Save.
6. Jika Anda memilih opsi yang melibatkan messaging groups, Anda juga harus menghubungkan grup yang akan digunakan untuk item tersebut. Jika tidak ada grup yang dipilih, maka pesan tidak akan dikirim. Fitur ini memberikan fleksibilitas untuk membuat grup tanpa harus menggunakannya pada setiap item. Klik ikon Link dan pilih satu atau beberapa messaging groups untuk dihubungkan dengan item tersebut
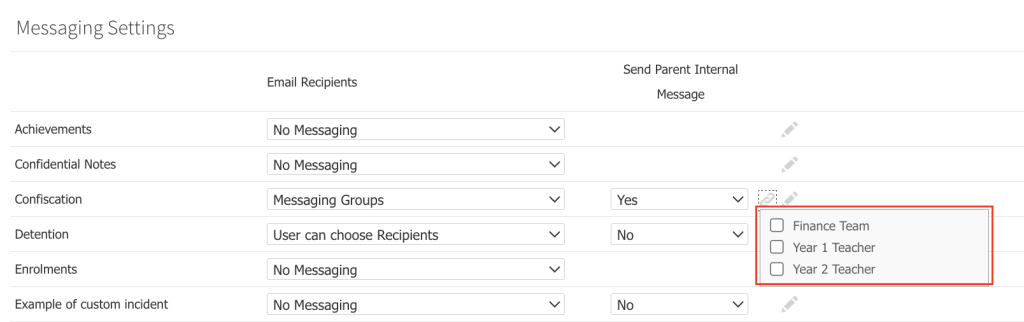
7. Perubahan yang dilakukan akan disimpan secara otomatis.
Membuat Messaging Groups
Messaging Groups digunakan di Prestia untuk mengelompokkan staf, orang tua, atau siswa tertentu. Prestia memungkinkan Anda membuat jumlah grup yang tidak terbatas serta jumlah penerima yang tidak terbatas dalam setiap grup. Selain itu, messaging group dapat dihubungkan dengan kelas (form), tingkat tahun (year level), house, atau huruf pertama dari nama belakang siswa. Hubungan ini digunakan sebagai kriteria saat mengirim notifikasi email sehingga email hanya dikirim kepada pihak yang relevan.
1. Buka Options > Software Settings > Messaging & SMS.
2. Scroll ke bagian Messaging Groups.
3. Untuk menambahkan grup baru, masukkan nama grup pada kolom New group name…, lalu pilih jenis pengguna yang akan menjadi anggota grup tersebut (staff, students, atau parents) dari daftar dropdown. Klik ikon + untuk membuat grup.
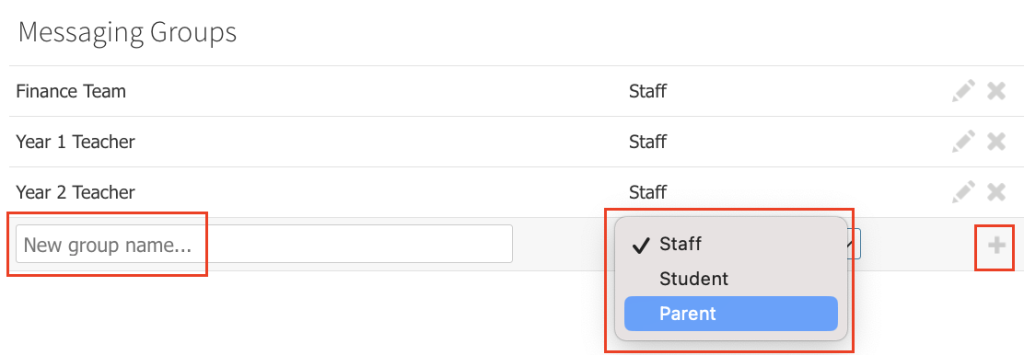
4. Untuk mengubah atau menambahkan anggota ke dalam grup, klik ikon Pencil (Pensil) yang sesuai dengan nama grup.
5. Pilih kriteria yang akan digunakan untuk menghubungkan grup melalui daftar dropdown Link group to students:.
Jika Anda membuat messaging group untuk students atau parents, biasanya Anda akan memilih opsi All. Pada langkah berikutnya, anggota yang dipilih akan berupa siswa yang terkait dengan item tersebut atau orang tua dari siswa yang terkait dengan item tersebut. Prestia kemudian akan mengirim pesan kepada siswa atau orang tua berdasarkan pihak yang terlibat saat insiden, catatan, atau item lainnya dibuat.
Untuk messaging group staff, Anda dapat menghubungkan grup yang berbeda ke kelompok siswa tertentu. Sebagai contoh, messaging group yang berisi koordinator tingkat senior dapat dihubungkan hanya dengan siswa pada tingkat tahun senior.
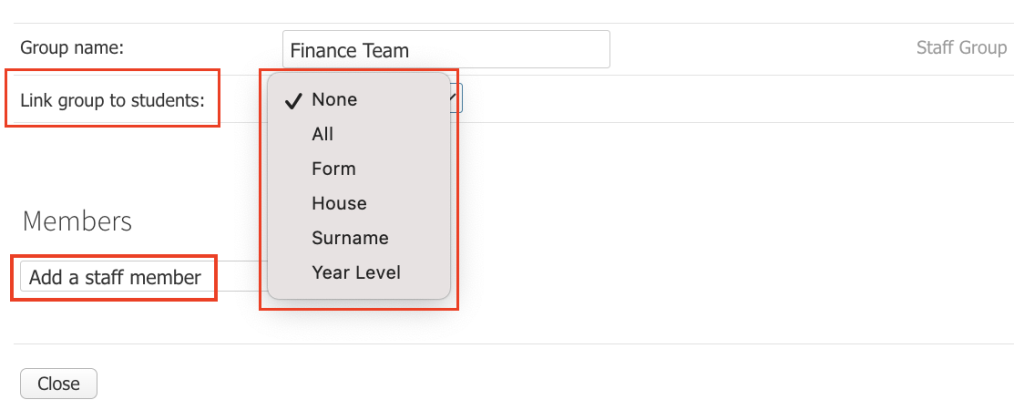
6.Tambahkan staf, siswa, atau orang tua ke dalam grup dengan memilih mereka dari daftar dropdown pada bagian Members. Pengaturan yang Anda buat akan disimpan secara otomatis setiap kali ada perubahan.
The Messaging Settings allow you to specify how the notification emails should function. Use the corresponding dropdown list to enable the emailing of notifications. Each dropdown list has the following options:
- No Messaging – no emails will be sent.
- All Staff Members – an email will be sent to every staff member.
- Messaging Groups – an email will only be sent to members of groups that match the student’s form and/or year level.
- Teachers of the Student – an email will only be sent to the teachers of the student.
- Coordinators of the Student – an email will only be sent to the coordinators of the student.
- Teachers + Coordinators of the Student – an email will only be sent to the teachers and the coordinators of the student.
- Groups + Coordinators of the Student – an email will only be sent to members of groups that match the student’s form and/or year level and the student’s coordinators.
- Groups + Teachers of the Student – an email will only be sent to members of groups that match the student’s form and/or year level and the student’s teachers.
- Groups + Teachers + Coordinators of the Student – same as above but also to all teachers and coordinators of the student.
- User can choose Recipients – the user can choose which recipients and groups should receive the emails.
Changing the messaging settings
- Go to Options > Software Settings > Messaging & SMS.
- Under the Messaging Settings section, choose an item to adjust.
- Change the dropdown list to specify which recipients should receive automated notifications.
- If you would like to enable parent SMS notifications for the item, change the Send Parent Internal Message selection to Yes.
- Click on the corresponding pencil icon to change the message text for either email or SMS templates. There are separate tabs for a Parent Message, Staff Message or Student Message If a template is empty, no notification messages will be sent.
You can include merge fields in your message template. Clicking on the [ Show Merge Fields ] text will open a second tab with the list of available merge fields for your school. When you create new incident or action types, new merge fields are created in your school’s list.
When you have finished your template(s) in each of the Parent, Staff or Student Message tabs as required, click the Save button. - If you have selected an option that includes messaging groups, you will also need to link the groups that should apply to the item. If you do not select any groups, then messages will not be sent. This feature provides you with the flexibility to set up groups but not use them for every item. Click the Link icon and select one or more messaging groups to link them to the item.
- Changes made are automatically saved.
Creating messaging groups
Messaging groups are used in Prestia to group together certain staff, parents or students. Prestia allows for an unlimited number of groups and recipients in each messaging group. In addition, messaging groups can be linked to a form, year level, house or to the first letter of the student’s surname. These links are used as criteria when sending email notifications, so that emails are only sent to the relevant people.
-
Go to Options > Software Settings > Messaging & SMS.
-
Scroll to the Messaging Groups section.
- To add a new group, type the name for the new messaging group in the New group name… field and select the user type that will populate this group (staff, students or parents) from the dropdown list. Click the + icon to create.
- To modify or add members to a group, click the Pencil icon corresponding to the group name.
- Choose which criteria the new group should be linked to using the Link group to students: dropdown list. If you are creating a student or parent messaging group, you will usually be selecting All here. In the next step, the members you select will be either the student the item is linked to, or the parent(s) of students the item is linked to. Prestia will then message parents or students based on who is involved when the incident, note, etc. is created.
For staff messaging groups, you can link separate groups to subsets of students, for example a messaging group that contains senior year level coordinators may be linked to students in senior year levels only. - Add your staff members, students or parents to the group by selecting them from the dropdown list in the Members section. Your settings are automatically saved as you change them.