
Skip to main content
What can we help you with?
How to Set Up Room & Resource Bookings
How to Set Up Rooms & Resources Categories
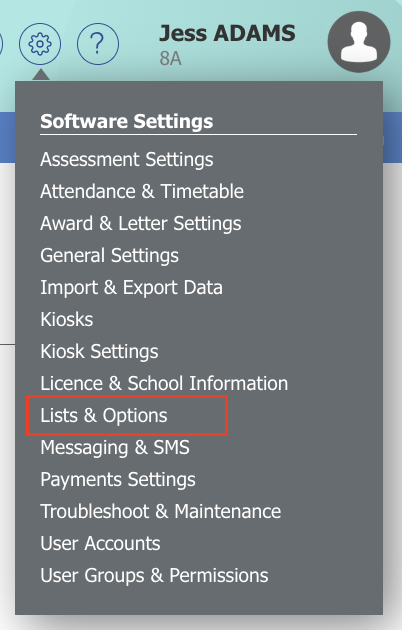
- Click on the Options menu and then click on Lists & Options under the Software Settings subheading.
- Use the dropdown list at the header bar and select Rooms & Resources under the Timetable subheading.
- Fill out the blank field in the Name column in the first row of the table.
- Type a number in the blank field under the Max Days to Book in Advance column. This determines how far ahead of time staff are able to make bookings.
Note: This restriction does not apply to staff who has Admin permission to Resource Bookings in Prestia. - Click on the Add button.
- To delete existing categories, click on the Delete icon.
- Your changes are automatically saved when you edit the values.
How to Use Rooms
- Click on the Options menu and then click on Lists & Options under the Software Settings subheading.
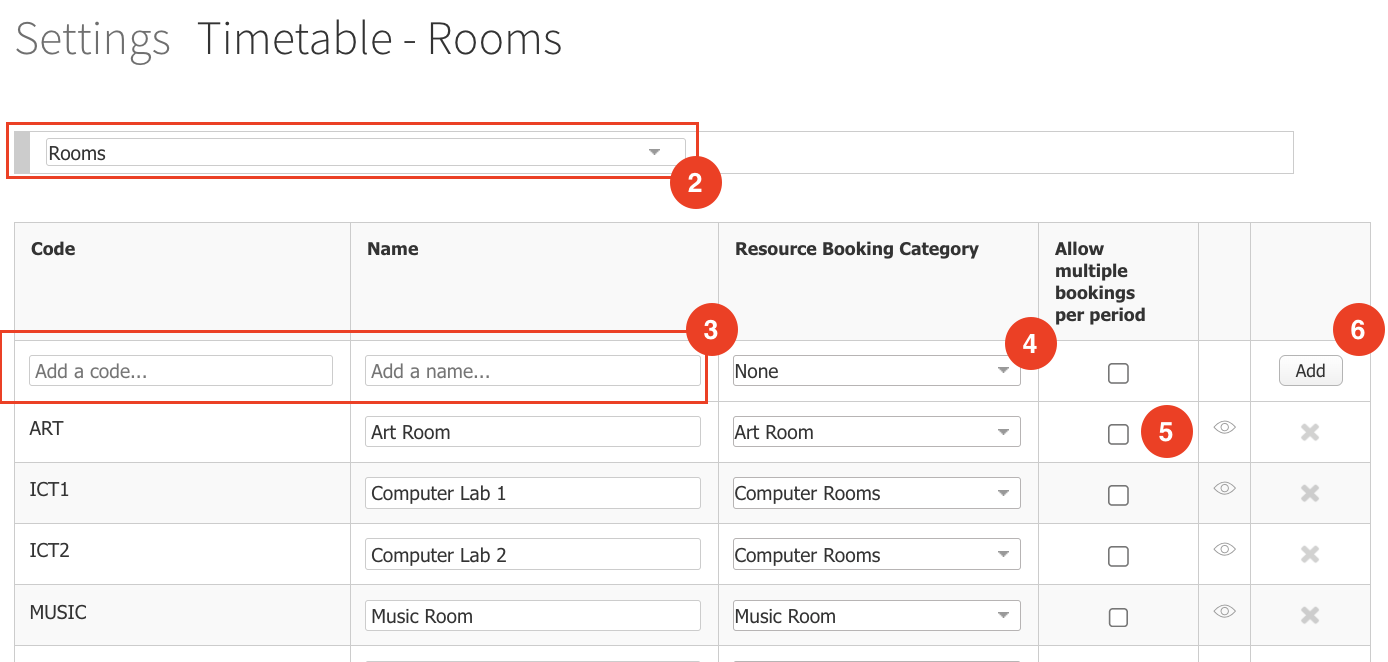
- Use the dropdown list at the header bar and select Rooms under the Timetable subheading.
- Fill in the new room Code and Name in the blank fields in the corresponding columns.
- Use the dropdown list in the Resource Booking Category column to assign the new room a category.
- To Allow multiple bookings per period, tick the check box in this column.
- Click on the Add button to create a new room.
- To delete existing rooms, click on the Delete icon.
- Your changes are automatically saved when you edit the values.
How to Use Resources
- Click on the Options menu and then click on Lists & Options under the Software Settings subheading.
- Use the dropdown list at the header bar and select Resources under the Timetable subheading.
- Fill in the new resource name in the blank field in the Name column.
- Use the dropdown list in the Category column to assign the new resource a category.
- Click on the Add button.
- To delete existing rooms, click on the Delete icon.
- Your changes are automatically saved when you edit the values.
Cara Mengatur Kategori Ruangan & Sumber Daya
- Klik menu Options dan kemudian klik Lists & Options di bawah subjudul Software Settings.
- Gunakan daftar drop-down di bilah header dan pilih Rooms & Resources di bawah subjudul Timetable.
- Isi bidang kosong di kolom Name pada baris pertama tabel.
- Ketik angka di bidang kosong di bawah kolom Max Days to Book in Advance. Ini menentukan berapa lama staf dapat melakukan pemesanan di muka.
Catatan: Pembatasan ini tidak berlaku untuk staf yang memiliki izin Admin untuk Pemesanan Sumber Daya di Prestia. - Klik tombol Add.
- Untuk menghapus kategori yang ada, klik ikon Delete.
- Perubahan Anda akan otomatis tersimpan saat Anda mengedit nilainya.
Cara Menggunakan Ruangan
- Klik menu Options dan kemudian klik Lists & Options di bawah subjudul Software Settings.
- Gunakan daftar drop-down di bilah header dan pilih Rooms di bawah subjudul Timetable.
- Isi Kode dan Nama ruangan baru di bidang kosong pada kolom yang sesuai.
- Gunakan daftar drop-down di kolom Resource Booking Category untuk menetapkan kategori ruangan baru.
- Untuk Mengizinkan beberapa pemesanan per periode, centang kotak di kolom ini.
- Klik tombol Add untuk membuat ruangan baru.
- Untuk menghapus ruangan yang ada, klik ikon Delete .
- Perubahan Anda akan otomatis tersimpan saat Anda mengedit nilainya.
Cara Menggunakan Sumber Daya
- Klik menu Options dan kemudian klik Lists & Options di bawah subjudul Software Settings.
- Gunakan daftar drop-down di bilah header dan pilih Resources di bawah subjudul Timetable.
- Isi nama sumber daya baru di bidang kosong pada kolom Name.
- Gunakan daftar drop-down di kolom Category untuk menetapkan kategori sumber daya baru.
- Klik tombol Add.
- Untuk menghapus ruangan yang ada, klik ikon Delete.
- Perubahan Anda akan otomatis tersimpan saat Anda mengedit nilainya.