
How to use the Student Analysis Tool
Cara menggunakan Student Analysis Tool
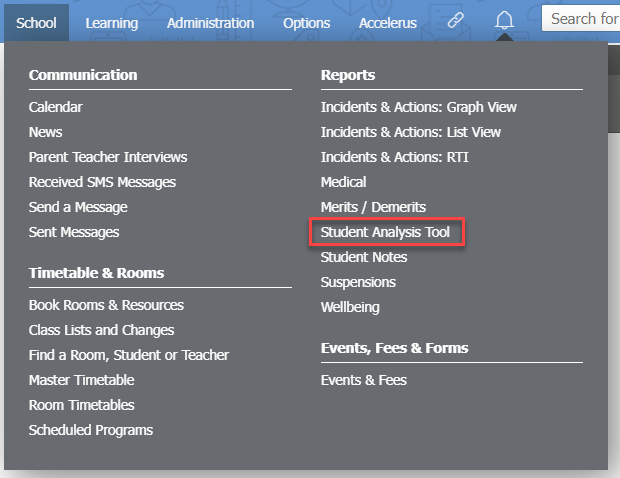
- Buka School > Reports > Student Analysis Tool .
- Alat analisis dapat menampilkan hasil berdasarkan formulir, jenjang kelas, asrama, kampus, dan kelas. Pilih opsi pemfilteran yang Anda perlukan.
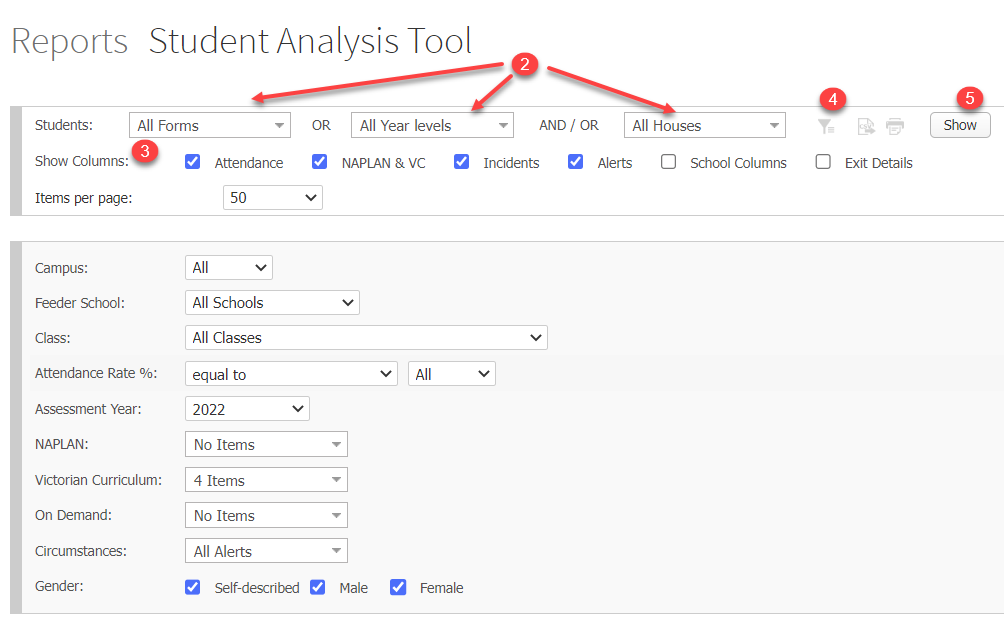
- Centang kotak centang untuk kolom data yang ingin Anda tampilkan.
- Pilih beberapa opsi pemfilteran tambahan dengan mengeklik ikon Filter .
- Klik tombol Show untuk menghasilkan laporan Anda.
- Untuk mencari hasil untuk siswa tertentu, ketik nama mereka di bilah pencarian yang terletak di paling kanan, di atas baris hasil teratas.
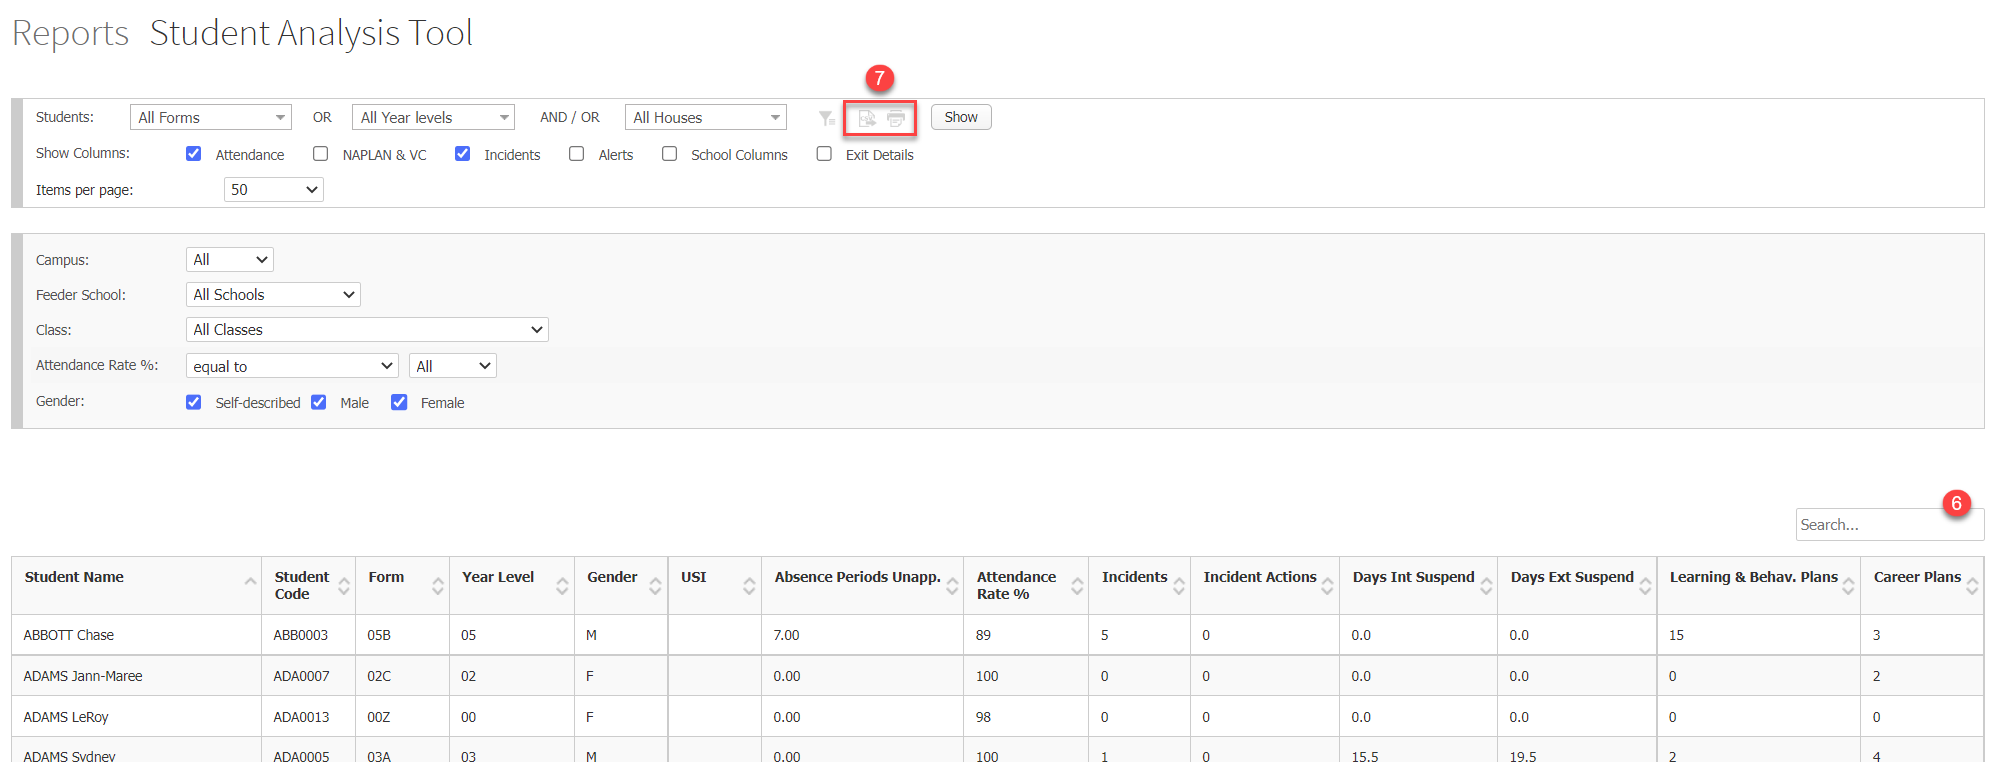
- Untuk mencetak hasil Anda atau mengekspornya ke file CSV, klik tombol yang sesuai Print this page atau Export to CSV yang terletak di bagian atas halaman, di sebelah kiri tombol Show.
- Anda dapat memasukkan data ke dalam kolom kustom apa pun yang telah Anda buat dengan mengeklik sel yang relevan dan memasukkan teks, memilih opsi dari daftar dropdown, atau mencentang kotak centang, tergantung pada jenis kolom kustom. Lihat di bawah untuk instruksi tentang cara membuat kolom kustom.
Kolom Kustom di Student Analysis Tool
Anda dapat membuat kolom kustom di alat analisis siswa untuk merekam data tambahan bagi siswa Anda. Data tambahan ini hanya ditampilkan di Student Analysis Tool.
Untuk membuat kolom kustom Anda, ikuti langkah-langkah di bawah ini.
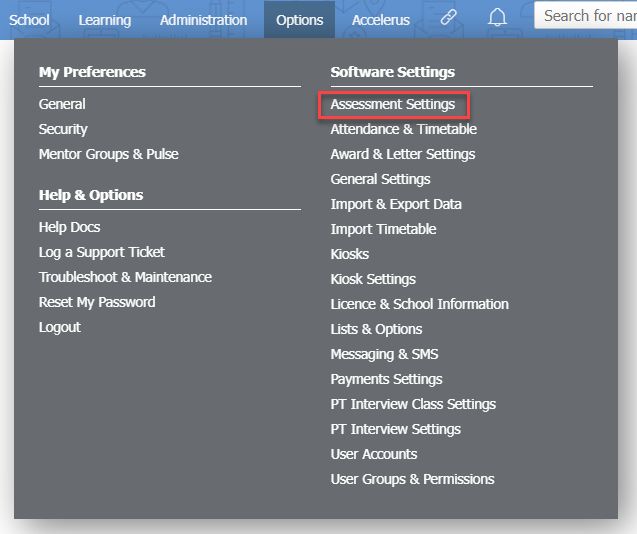
- Buka Options > Software Settings > Assessment Settings .
- Dalam daftar dropdown, pilih Student Analysis Tool .
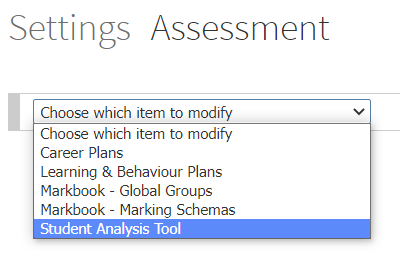
- Di halaman ini Anda dapat membuat kolom kustom Anda dengan menggunakan baris teratas tabel. Anda juga dapat menghapus atau menyembunyikan kolom kustom yang ada menggunakan ikon X atau Eye .
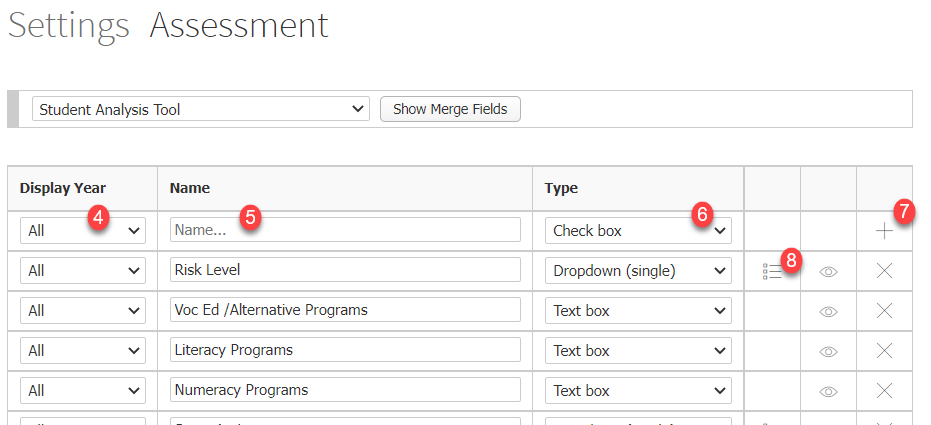
- Dalam daftar dropdown di bawah Display Year , pilih tahun di mana kolom kustom Anda ingin ditampilkan atau biarkan opsi default Semua.
- Ketik nama kolom kustom Anda di bidang Name .
- Gunakan daftar dropdown di kolom Type untuk memilih jenis kolom yang Anda buat. Kolom kustom dapat berupa kotak teks, kotak centang, atau daftar dropdown dengan opsi untuk dipilih.
- Klik ikon + untuk menambahkan kolom kustom baru Anda.
- Jika Anda memilih Dropdown (single) di kolom Type , Anda perlu menentukan opsi dropdown Anda. Klik pada L ist icon di kolom di sebelah kolom Type untuk membuat opsi Anda.
Catatan:
- Untuk menampilkan kolom kustom Anda di hasil, centang kotak centang School Columns di sebelah Show columns: saat memilih apa yang akan ditampilkan.
- Data kehadiran ditampilkan di Student Analysis Tool untuk sekolah yang menggunakan Prestia Attendance dan sekolah yang menyinkronkan Prestia dengan First Class Attendance.
How to use the Student Analysis Tool
- Go to School > Reports > Student Analysis Tool .
- The analysis tool can display results by form, year level, house, campus and class. Select the filtering options that you require.
- Tick the checkboxes for the columns of data you would like to display.
- Select some additional filtering options by clicking on the F ilter icon.
- Click the Show button to produce your report.
- To search the results for an individual student, type their name in the search bar located to the far right, above the top row of results.
- To print your results or export them to a CSV file, click on the corresponding Print this page or Export to CSV buttons located at the top of the page, on the left of the show button.
- You can enter data into any custom columns you have created by clicking in the relevant cell and entering text, choosing an option from a dropdown list, or ticking a checkbox, depending on the custom column type. See below for instructions on how to create custom columns.
Custom columns in the Student Analysis Tool
You can create custom columns in the student analysis tool in order to record additional data for your students. This extra data is only displayed in the Student Analysis Tool.
To create your custom columns, follow the steps below.
- Go to Options > Software Settings > Assessment Settings .
- In the dropdown list select Student Analysis Tool .
- On this page you can create your custom columns by using the top row of the table. You can also delete or hide any of the existing custom columns using the X or Eye icons.
- In the dropdown list under Display Year , select the year that you would like your custom column to be visible for or leave the default All option.
- Type your custom column name in the Name field.
- Use the dropdown list in the Type column to select what type of column you are creating. Custom columns can be a text box, checkbox or dropdown list with options to select from.
- Click on the + icon to add your new custom column.
- If you selected Dropdown (single) in the Type column, you will need to specify your dropdown options. Click on the L ist icon in the column next to the Type column to create your options.
Note: To show your custom columns in the results, tick the School Columns checkbox next to Show columns: when selecting what to display.
Note: Attendance data is displayed in the student analysis tool for schools that use Prestia Attendance and schools that synchronise Prestia with First Class Attendance.