
Skip to main content
What can we help you with?
Membuat Laporan Ketidakhadiran (Absence Letters)/Creating absence letters
Creating absence letters
This process will create a letter for each student with more than [x] number of absences, which may be sent home to parents. This is typically used for unexplained absences.
How to create an Absence letter
- Log into Prestia as an Administrator.
- Go to Administration > Attendance > Student Absences Report.
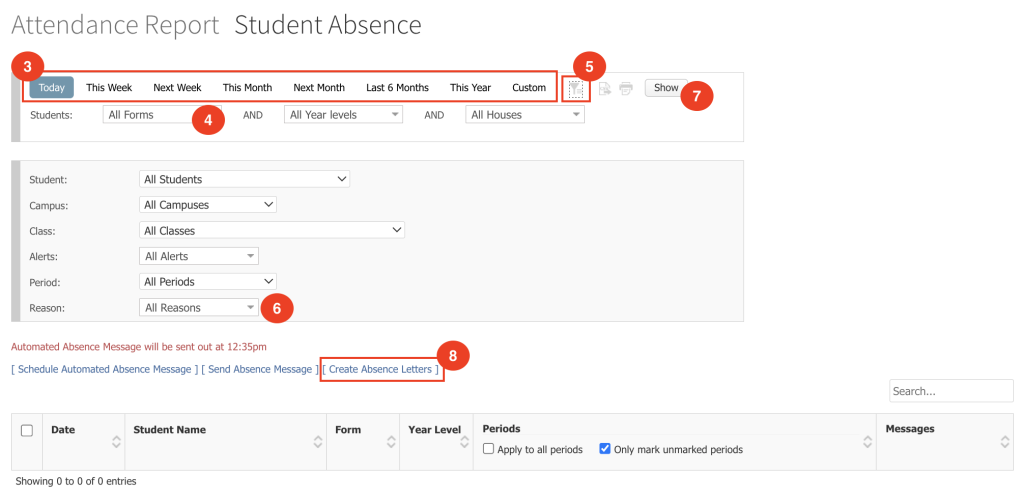
- Select the date range for which you wish to extract attendance data using the Date selectors.
- Use the dropdown list to select particular Forms, Year levels or Houses as required.
- Click on the Filter icon and choose which students you wish to create the letter for (typically all students). Note: The process will still check that the selected students have unexplained absences and will not create letters for those students who do not have the required number of unexplained absences.
- Click the dropdown list next to Reason: and select the attendance reason you wish to alert the parents about (typically Unexplained).
- Click the Show button.
- Click the [ Create Absence Letters ] text.
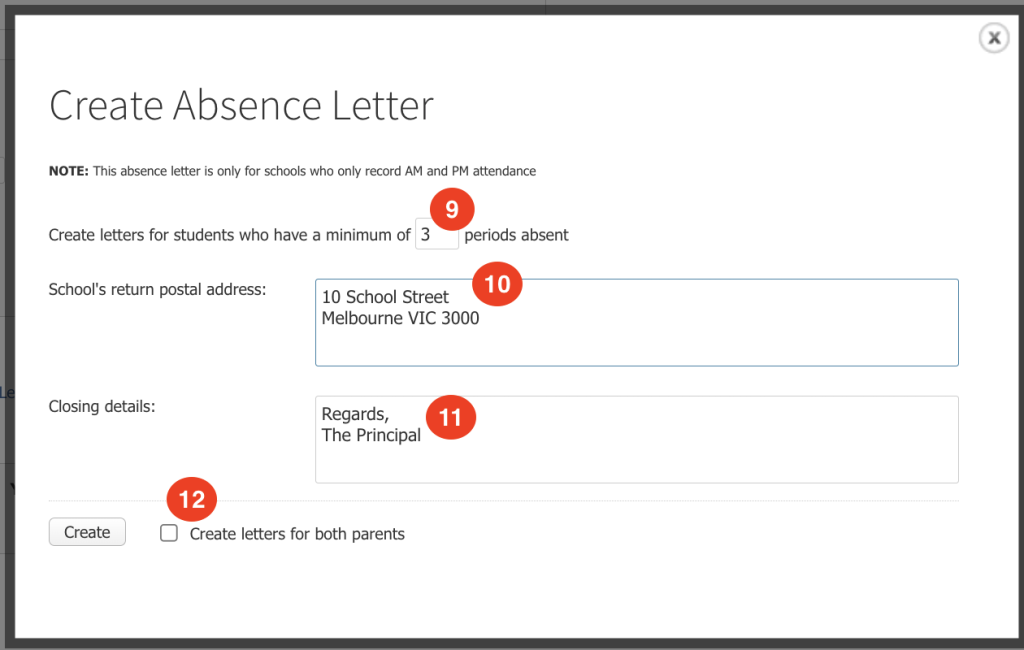
- Type in the minimum numbers of absent periods that a student must have had in order to receive the letter. This goes in the ‘Create letters for students who have a minimum of [x] periods absent‘ field.
- In School’s return postal address:, type in the school address (use a P.O. address if you have one).
- In Closing details: enter any extra information you wish to appear at the end of the letter.
- Next to Create letters for both parents, tick the checkbox if you wish letters to go to both Parent A and Parent B in the student’s Primary family.
- Click the Create button.
- This will open a new tab with the reports to print. It is recommended you check the letters prior to printing.
- Once satisfied that you have chosen the correct students and dates, select the required printer and follow normal printing processes for your browser.
Membuat Laporan Ketidakhadiran (Absence Letters)
Fitur Creating Absence Letters digunakan untuk membuat surat pemberitahuan ketidakhadiran siswa secara massal berdasarkan data absensi yang tercatat dalam sistem. Surat ini umumnya digunakan untuk menginformasikan kepada orang tua atau wali mengenai ketidakhadiran siswa yang belum memiliki alasan yang sah atau belum dijelaskan.
- Masuk ke Prestia menggunakan akun Administrator.
- Buka menu Administration > Attendance > Student Absences Report
- Pilih rentang tanggal yang ingin digunakan untuk mengambil data absensi menggunakan pemilih tanggal (Date selectors)
- Gunakan daftar pilihan (dropdown) untuk memilih Form, Year Level, atau House tertentu jika diperlukan.
- Klik ikon Filter dan pilih siswa yang ingin dibuatkan surat (umumnya semua siswa). Catatan: Sistem tetap akan memerika apakah siswa yang dipilih memiliki ketidakhadiran yang belum dijelaskan dan tidak akan membuat surat untuk siswa yang tidak memenuhi kriteria tersebut.
- Pada daftar pilihan di sebelah Reason, pilih alasan absensi yang ingin diberitahukan kepada orang tua (umumnya Unexplained)
- Klik tombol Show.
- Klik teks [Create Absence Letters].
- Masukkan jumlah minimum periode ketidakhadiran yang harus dimiliki siswa agar menerima surat pada kolom Create letters for students who have a minimum of [x] periods absent.
- Pada bagian School’s returns postal address, masukkan alamat sekolah.
- Pada bagian Closing details, masukkan informasi tambahan yang ingin ditampilkan di akhir surat.
- Jika surat perlu dikirim kepada kedua orang tua (Parent A dan Parent B) dalam keluarga utama siswa, centang opsi Create letters for both parents.
- Klik tombol Create.
- Sistem akan membuka tab baru yang berisi surat-surat yang siap dicetak. Disarankan untuk meninjau isi surat terlebih dahulu sebelum mencetak.
- Setelah memastikan siswa dan rentang tangggal yang dipilih sudah benar, pilih printer yang diinginkan dan lanjutkan proses pencetakan sesuai prosedur standar pada browser yang digunakan.