
Bulk Actions for Daily Organisation
Action Massal di Daily Organisation
Deskripsi Fitur
Gunakan Daily Organisation di Prestia untuk melakukan berbagai pengaturan harian seperti:
- Melepas alokasi guru (unallocate teachers)
- Melepas alokasi ruang (rooms)
- Menandai kehadiran siswa
- Membatalkan kelas
Pengelolaan melalui halaman Daily Organisation sangat cocok untuk perubahan tunggal yang dilakukan satu per satu.
Namun, ketika Anda perlu melakukan perubahan dalam jumlah besar (bulk actions), misalnya untuk:
- Semua kelas pada satu tingkat tahun (year level)
- Semua kelas yang diajar oleh seorang guru
- Semua kelas yang menggunakan ruangan tertentu
maka penggunaan halaman Bulk Actions akan jauh lebih cepat dan efisien.
Memilih Kelas yang Tepat
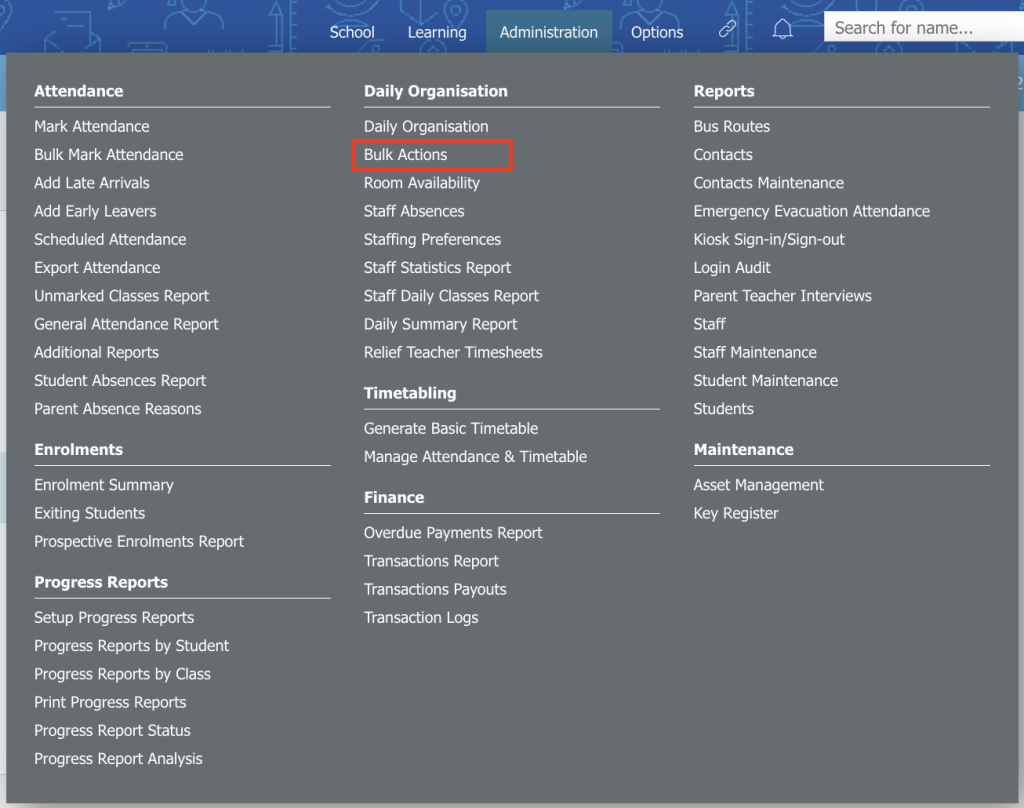
1.Buka menu Administration > Daily Organisation > Bulk Actions.
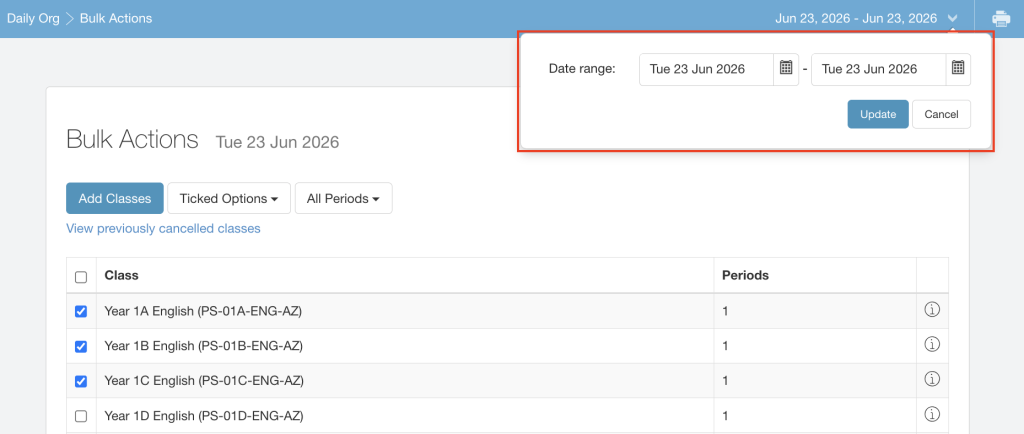
2.Pilih rentang tanggal di bagian kanan atas.
- Jika Anda hanya perlu menerapkan bulk action untuk satu hari, maka set tanggal Start dan End sama.
- Jika tidak, pilih rentang tanggal sesuai periode perubahan yang diinginkan.
3.Klik tombol Add Classes. Akan muncul kotak filter yang dapat Anda gunakan untuk memilih kelas. Anda dapat:
- Memilih kelas secara individual
- Memilih seluruh year level
- Menggunakan kolom pencarian untuk mempersempit hasil
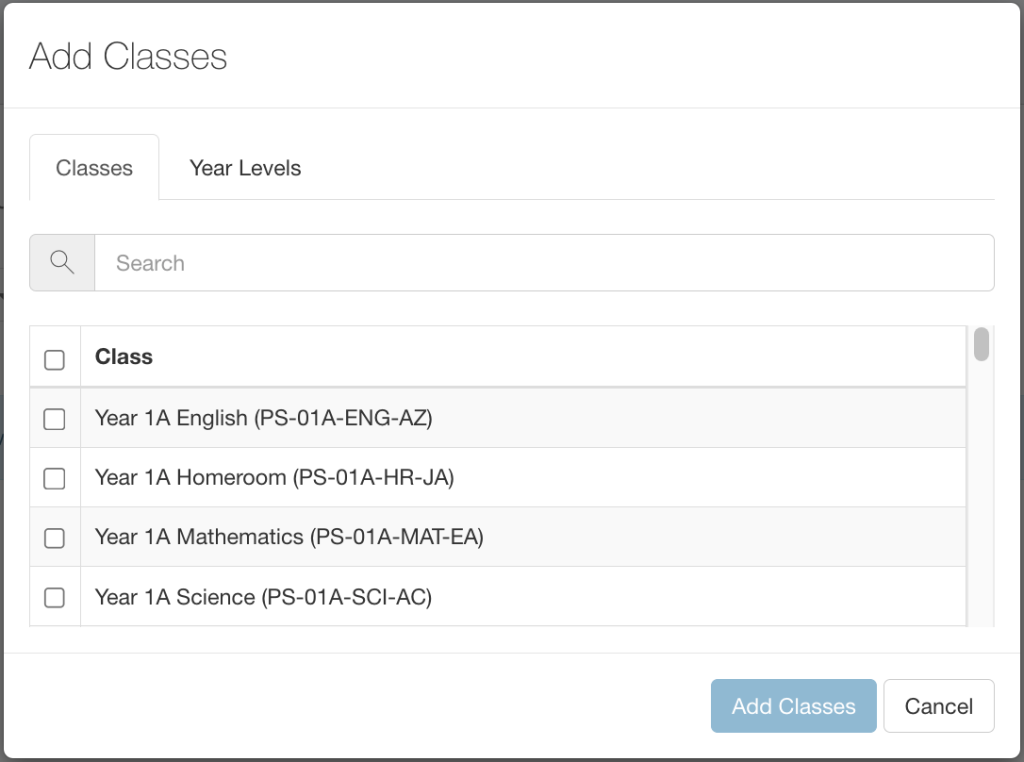
Contoh: Anda dapat mencari semua kelas yang diajar oleh Jess Adams dengan mengetik inisialnya, misalnya “JA”, pada kolom pencarian.
Cobalah juga mengetik nama mata pelajaran atau nama kelas untuk melihat opsi pencarian lainnya yang bisa digunakan.
Disarankan untuk mencari kelompok paling spesifik (lowest common denominator) agar hasil lebih tepat. Kadang ini berarti menggunakan pencarian beberapa kali, sehingga Anda bisa terus menggunakan fitur Select All daripada harus menyeleksi atau membatalkan satu per satu pada daftar yang terlalu besar.
Menghapus Kelas dari Pilihan (Removing Classes from Selection)
Jika setelah menambahkan kelas Anda menemukan bahwa ada kelas yang tidak seharusnya ikut dipilih—misalnya Anda memilih semua kelas Year 1 untuk satu hari, tetapi tidak bermaksud membatalkan kelas english karena siswa tetap diharapkan hadir—Anda dapat menghapus kelas tersebut dari seleksi sebelum menerapkan bulk actions.
- Setelah melakukan pemilihan, periksa daftar kelas untuk memastikan tidak ada kesalahan atau ketidaksesuaian
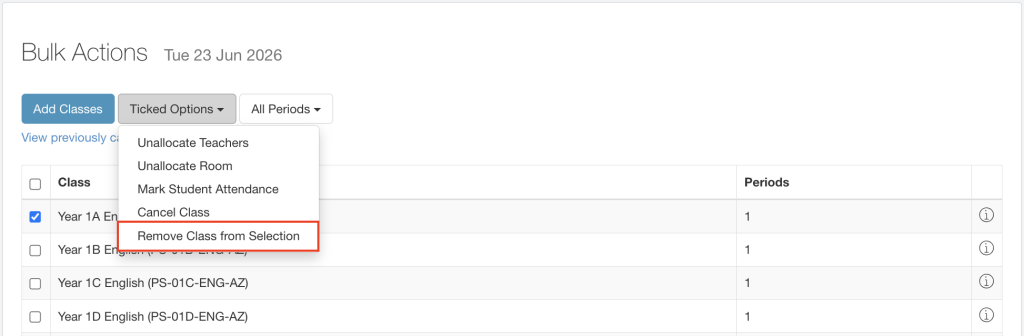
- Jika ditemukan kelas yang tidak ingin disertakan, centang kotak di samping kelas tersebut
- Klik tombol Ticked Options, lalu pilih Remove Classes from Selection
- Setelah itu selesai, Anda dapat melanjutkan proses Bulk Actions seperti biasa
Melepas Alokasi Guru dari Kelas (Unallocating Teachers from Their Classes)
3.Pilih kelas yang relevan mengikuti langkah pada bagian sebelumnya.
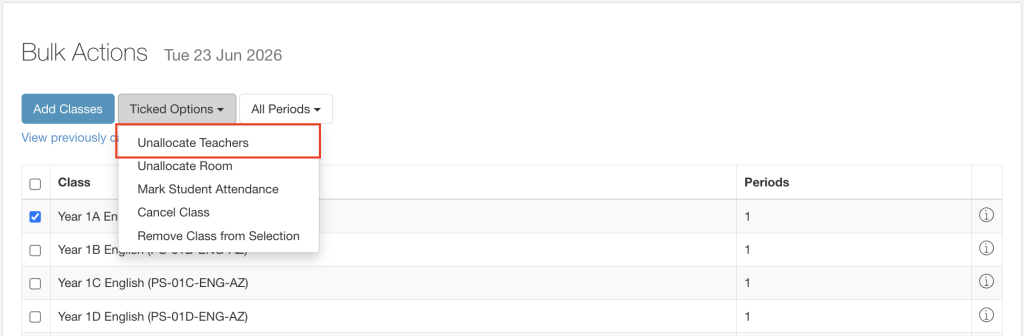
4.Klik tombol Ticked Options, lalu pilih Unallocate Teachers.
Penandaan kehadiran siswa secara massal juga dapat dilakukan melalui Administration > Bulk Mark Attendance, atau menggunakan Scheduled Attendance.
Namun, jika Anda juga telah melakukan unallocate ruangan dan guru untuk satu atau beberapa kelas, penggunaan halaman Bulk Actions akan lebih efisien karena kelas sudah dipilih sebelumnya sehingga menghemat waktu.
1.Buka menu Administration > Daily Organisation > Bulk Actions.
2.Pilih rentang tanggal yang diperlukan di bagian kanan atas.
3.Pilih kelas yang relevan sesuai langkah sebelumnya.
4.Klik tombol Ticked Options, lalu pilih Mark Student Attendance.
6.Masukkan komentar jika diperlukan. Komentar ini akan ditampilkan pada:
- Roll guru
- Profil siswa (untuk dilihat oleh staf)
7.Klik Save.
8.Akan muncul pesan peringatan.
- Klik OK untuk melanjutkan
- Klik Cancel jika perlu mengubah detail kehadiran terlebih dahulu
Membatalkan kelas dapat memengaruhi data kehadiran siswa. Data kehadiran dari kelas yang dibatalkan akan diabaikan, tidak akan dimasukkan ke dalam laporan, dan tidak akan diekspor. Akibatnya, perhitungan tingkat kehadiran siswa dapat berubah.
Contoh
Jika seorang siswa diharapkan menghadiri 80 sesi suatu mata pelajaran untuk mencapai tingkat kehadiran 100%, lalu satu sesi dibatalkan, maka perhitungan kehadiran akan didasarkan pada 79 sesi.
Perubahan ini tidak selalu berdampak negatif, tetapi penting untuk memahami konsekuensinya sebelum memutuskan untuk membatalkan kelas dengan cara ini.
Alternatif yang Direkomendasikan
Dalam banyak kasus, lebih baik menggunakan halaman ini untuk menandai kehadiran siswa sesuai alasan sebenarnya daripada membatalkan kelas.
Sebagai contoh, Anda dapat menandai kehadiran siswa secara massal sebagai:
- Other Education Activity
- Work Experience
Setelah itu, Anda tetap dapat menggunakan fitur Unallocate Teacher dan Unallocate Room untuk membebaskan sumber daya yang tidak digunakan sehingga dapat dialokasikan ke kegiatan lain.
1.Buka menu Administration > Daily Organisation > Bulk Actions.
2.Pilih rentang tanggal yang diperlukan di bagian kanan atas.
3.Pilih kelas yang relevan sesuai langkah-langkah sebelumnya.
4.Klik tombol Ticked Options, lalu pilih Cancel Class.
5.Akan muncul pesan peringatan. Baca informasi yang ditampilkan dan pastikan Anda memahami dampaknya.
- Klik OK untuk melanjutkan proses pembatalan.
- Klik Cancel jika Anda ingin kembali dan menyesuaikan pilihan.
Hasil Setelah Kelas Dibatalkan
- Guru yang kelasnya dibatalkan akan dianggap memiliki jadwal In Lieu.
-
Kelas yang dibatalkan akan ditampilkan dengan jelas pada halaman:
Administration > Daily Organisation > Daily Organisation
Melalui halaman tersebut, Anda dapat:
- Mengaktifkan kembali (Reinstate) kelas secara individual jika diperlukan.
- Melihat daftar kelas yang telah dibatalkan pada hari tersebut.
Jika Anda perlu mengaktifkan kembali (reinstate) kelas yang sebelumnya telah dibatalkan, Prestia memungkinkan Anda untuk melihat daftar kelas yang dibatalkan dan menghapus status pembatalannya.
1.Buka menu Administration > Daily Organisation > Bulk Actions.
2.Pilih rentang tanggal yang diperlukan di bagian kanan atas.
3.Klik View Previously Cancelled Classes.
4.Daftar kelas yang sebelumnya dibatalkan akan ditampilkan. Setiap kelas akan memiliki ikon X di sampingnya.
- Klik ikon X pada kelas yang ingin diaktifkan kembali.
- Klik OK pada pesan konfirmasi yang muncul.
Hasil Setelah Reinstate
Setelah pembatalan dihapus:
- Kelas akan kembali muncul pada jadwal guru dan siswa.
- Sistem akan memperlakukan kelas tersebut seolah-olah tidak pernah dibatalkan.
- Jadwal kelas akan kembali tersedia untuk pengelolaan dan pencatatan kehadiran seperti biasa.
Managing all daily org changes via our Daily Organisation page is great for single changes that are done one at a time. But when we need to make changes in bulk, e.g. all classes of a year level, all classes of a teacher or room, etc., then using the Bulk Actions page will make it a breeze. Have a look below to learn how to master Bulk Actions.
Go to Administration > Daily Organisation > Bulk Actions. If you do not see this menu, please speak to your Prestia administrator at the school to allow access to this page.
Selecting the right classes
- Go to Administration > Daily Organisation > Bulk Actions
- Choose the date range you are after on the top right – if you are needing to apply a bulk action for one day, make the dates the same, otherwise select the start and end dates of when the actions are to be applied.
- Click the Add Classes button. This will bring up a filtering box that you can use – you can select individual classes, whole year levels, or use the search box to refine your selection. For example, I was able to find all classes taught by Jess Adams by typing her initials, ‘EM2’, in the search bar.
Try typing a subject name or class name to see what else you can use. It is also possible to add classes in multiple lots – for example, if I need to unallocate both teachers Jess Adams and Nina Arthur from their classes on a particular day, I would use the search to find classes taught by Jess Adams, then select all by checking the top check box and then click Add Classes. To add classes taught by Nina Arthur, I would repeat the process but this time using Nina’s initials.
It is recommended to try to find the lowest common denominator, that will give you the most specific results. Sometimes that means using the search box a few times, making it quicker as you can keep ‘selecting all’, rather than using a broader search once and having to go through the list painstakingly ticking or untick the boxes next to each class that you want to include or exclude.
Removing classes from selection
If you find that after adding the classes, you have added some classes that don’t belong – for example, if I select all year 10 classes for one day, but I didn’t mean to cancel their form assembly classes as they will still be expected to attend form assembly that day, I can remove the classes from my selection before applying any bulk actions.
- After making the selection, check the list of classes for any mistakes or anomalies
- If any are found, tick the boxes next to the classes you want to remove from the selection
- Click the Ticked Options button and select Remove Classes from Selection
- Once this has been done, you are free to continue with your Bulk Actions.
Unallocating teachers from their classes
When students go on camp or in situations like exams being run at the school, you may wish to unallocate the teachers from their classes. To reallocate the teachers to the classes, you must do this one class at a time via Daily Organisation – it is not possible to ‘undo’ this action in bulk, so please ensure you have considered the outcome before proceeding.
To Unallocate teachers in bulk, do the following:
- Go to Administration > Daily Organisation > Bulk Actions
- Choose the required date range on the top right
- Select the relevant classes, as per the steps above.
- Click the Ticked Options button and select Unallocate Teachers.
- A Warning message will appear – check the details and if you want to proceed, click OK, or click Cancel if any details are wrong so that you can adjust the selection.
The teachers who have been unallocated from a class will now be considered to have classes In Lieu. The classes that exist but are now without teachers will appear clearly in the Administration > Daily Organisation > Daily Organisation page, so that you can allocate other staff to the classes if you wish, or just purely so that you can see a list of classes with no teacher allocated.
Unallocating rooms
When students go on camp or in situations like exams being run at the school, you may wish to unallocate the classes’ rooms. To reallocate the rooms to the classes, you must do this one class at a time via Daily Organisation – it is not possible to ‘undo’ this action in bulk, so please ensure you have considered the outcome before proceeding.
To Unallocate rooms in bulk, do the following:
- Go to Administration > Daily Organisation > Bulk Actions
- Choose the required date range on the top right
- Select the relevant classes, as per the steps above
- Click the Ticked Options button and select Unallocate Room.
- A Warning message will appear – check the details and if you want to proceed, click OK, or click Cancel if any details are wrong so that you can adjust the selection.
The rooms which have been unallocated from a class will now be considered available for other classes to move into, or for room/resource bookings. The classes that exist but are now without rooms will appear clearly in the Administration > Daily Organisation > Daily Organisation page, so that you can allocate other rooms to the classes if you wish, or just purely so that you can see a list of classes with no room allocated.
Marking student attendance in bulk
Marking bulk attendance may also be done via Administration > Bulk Mark Attendance, or via a Scheduled Attendance. However if you have also had to unallocate rooms and teachers for one or more classes, using the Bulk Actions page makes your life easier, as you’ve already selected the right classes, saving you time.
It isn’t recommended to use this page if you’re only marking attendance, and not also utilising the unallocating features. To purely mark bulk attendance, use the Administration > Bulk Mark Attendance or Scheduled Attendance features.
To mark student attendance in bulk, do the following:
- Go to Administration > Daily Organisation > Bulk Actions
- Choose the required date range on the top right
- Select the relevant classes, as per the steps above
- Click the Ticked Options button and select Mark Attendance.
- Select the attendance type using the Mark Students As dropdown menu.
- Enter any relevant comments – these will appear on the teachers’ rolls and next to the students’ attendance in their profile for staff to view.
- Click Save
- A warning message will appear – if you want to proceed, click OK, or click Cancel if you need to adjust the attendance details.
Cancelling classes
Cancelling classes can affect your attendance data. The attendance data of cancelled classes is ignored, and not included in reports, nor will it be exported, which will likely result in students having their attendance rate calculated differently – for example, if a student is expected to attend 80 periods of a subject in order to achieve a 100% attendance rate – if 1 period of that class is cancelled, the calculation will now be based on 79 periods for 100% attendance. This is not necessarily always a negative thing – but you need to be aware of the implications to decide whether cancelling the class this way is the best option.
In a lot of cases, it is better to use this page to mark students in these classes to correctly reflect the reason for the class cancellation. For example, you may want to bulk mark the students’ attendance as “Other education activity” or “Work Experience”, and then you can use this page to release the resources, such as unallocate the teacher and room from the classes, so that you can utilise them for other things.
If cancelling the classes in bulk is the action you wish to take, here are the steps.
- Go to Administration > Daily Organisation > Bulk Actions
- Choose the required date range on the top right
- Select the relevant classes, as per the steps above
- Click the Ticked Options button and select Cancel Class.
- A warning message will appear – read the details and ensure you are happy to proceed. If so, click OK, or click Cancel if you need to go back.
The teachers who have classes cancelled will now be considered to have classes In Lieu. The classes have been cancelled will appear clearly in the Administration > Daily Organisation > Daily Organisation page, so that you can individually Reinstate the class if you wish, or purely so that you can see a list of classes that have been cancelled for today.
Viewing previously cancelled classes and how to reinstate them
If you need to reinstate any classes that had been cancelled, you may view the previously cancelled classes and delete the cancellation.
Here are the steps:
- Go to Administration > Daily Organisation > Bulk Actions
- Choose the required date range on the top right
- Click View previously cancelled classes.
- A list of the classes you previously cancelled will appear, each one with an ‘x’ icon next to it. To delete the cancellation (therefore reinstating the class), click the x icon and then click OK.
This will bring the class back onto the teachers and student’s timetables, as though it had never been cancelled.