
Skip to main content
What can we help you with?
Importing and Exporting Generic Data
Importing data
- Login to XUNO as an Administrator.
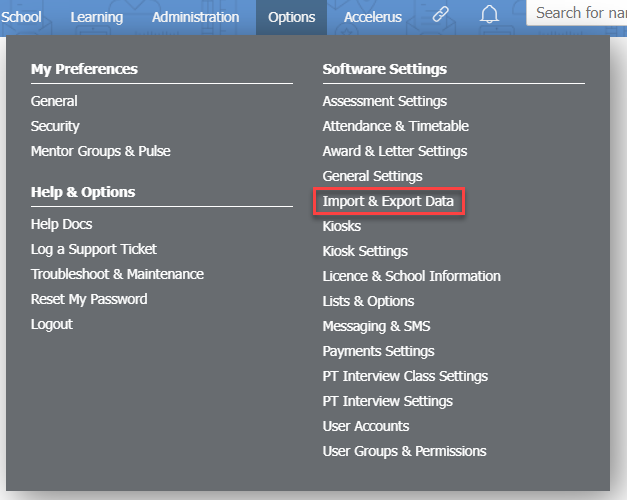
- Go to Options > Software Settings > Import & Export Data.
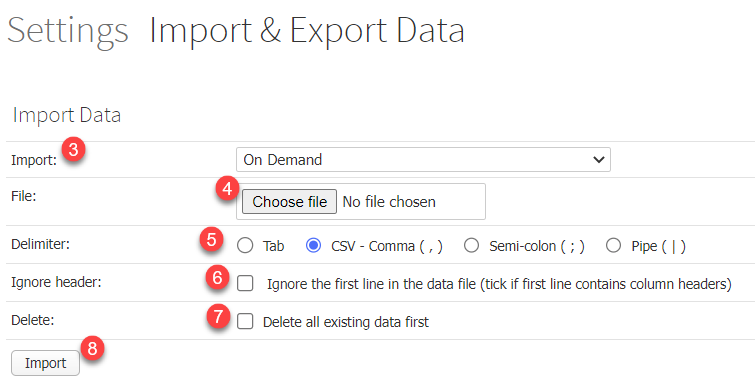
- Select what data you will be importing from the Import dropdown list.
- Click on the Choose File button and select a file to import.
NOTE: Based on the type of data you are importing, the following settings may or may not appear. - In Delimiter:, choose which characters separate the columns (e.g. tab, comma, semi-colon, etc.) If you are unsure, please ask your technician or open the file you are importing with Notepad to view the raw data.
- If the first row of the file contains a header of column names, then tick the Ignore header: checkbox.
- If you wish to delete the existing data before importing, tick the Delete all existing data first: checkbox.
WARNING: use this option carefully! - Click the Import button to proceed with the import.
Exporting data
- Login to XUNO as an Administrator.
- Go to Options > Software Settings > Import & Export Data.
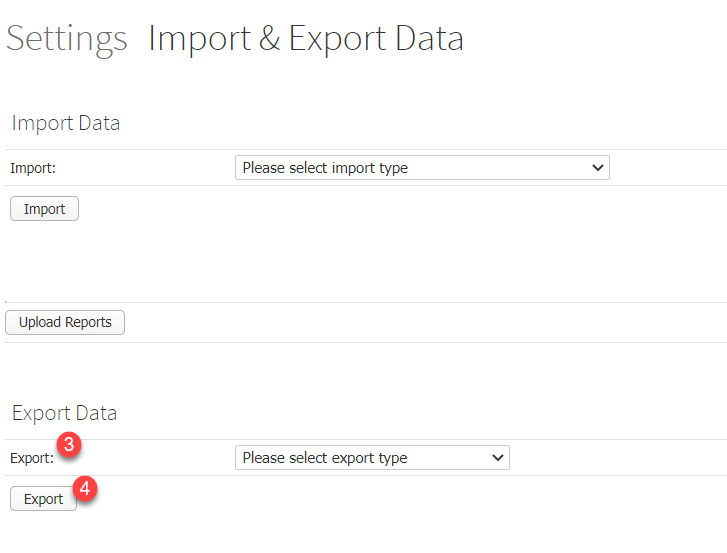
- Select the type of data that you would like to export using the Export: dropdown list.
- Click the Export button to proceed with the import.
Mengimpor data
- Masuk ke Prestia sebagai Administrator.
- Buka Options > Software Settings > Import & Export Data .
- Pilih data yang akan Anda impor dari daftar dropdown Import .
- Klik tombol Choose File dan pilih file untuk diimpor.
CATATAN: Berdasarkan jenis data yang Anda impor, pengaturan berikut mungkin muncul atau tidak. - Di Delimiter: , pilih karakter yang memisahkan kolom (misalnya tab, koma, titik koma, dll.). Jika Anda tidak yakin, silakan tanyakan kepada teknisi Anda atau buka file yang Anda impor dengan Notepad untuk melihat data mentah.
- Jika baris pertama file berisi header nama kolom, maka centang kotak centang Ignore header: .
- Jika Anda ingin menghapus data yang ada sebelum mengimpor, centang kotak centang Delete all existing data first: .
PERINGATAN: gunakan opsi ini dengan hati-hati! - Klik tombol Import untuk melanjutkan proses impor.
Mengekspor data
- Masuk ke Prestia sebagai Administrator.
- Buka Options > Software Settings > Import & Export Data .
- Pilih jenis data yang ingin Anda ekspor menggunakan daftar dropdown Export: .
- Klik tombol Export untuk melanjutkan proses impor.