
How to create, add, view and delete student achievements and awards
Cara membuat template penghargaan
Membuat templat penghargaan kustom memberikan kemampuan kepada sekolah Anda untuk membuat penghargaan yang indah yang dapat diberikan kepada siswa, dengan cepat dan nyaman.
Untuk membuat templat, cukup buat dokumen .docx baru di Microsoft Word 2007+ dan mulailah mendesain penghargaan Anda. Tulis teks, sisipkan gambar, dan berkreasi sebanyak yang Anda inginkan; penghargaan siswa dimaksudkan untuk menyenangkan!
Setelah Anda selesai mendesain templat Anda, sertakan merge fields Prestia Anda. Merge fields digunakan sebagai pengganti teks statis, seperti nama siswa, untuk mengubah templat non-spesifik Anda menjadi penghargaan yang dapat digunakan berkali-kali.
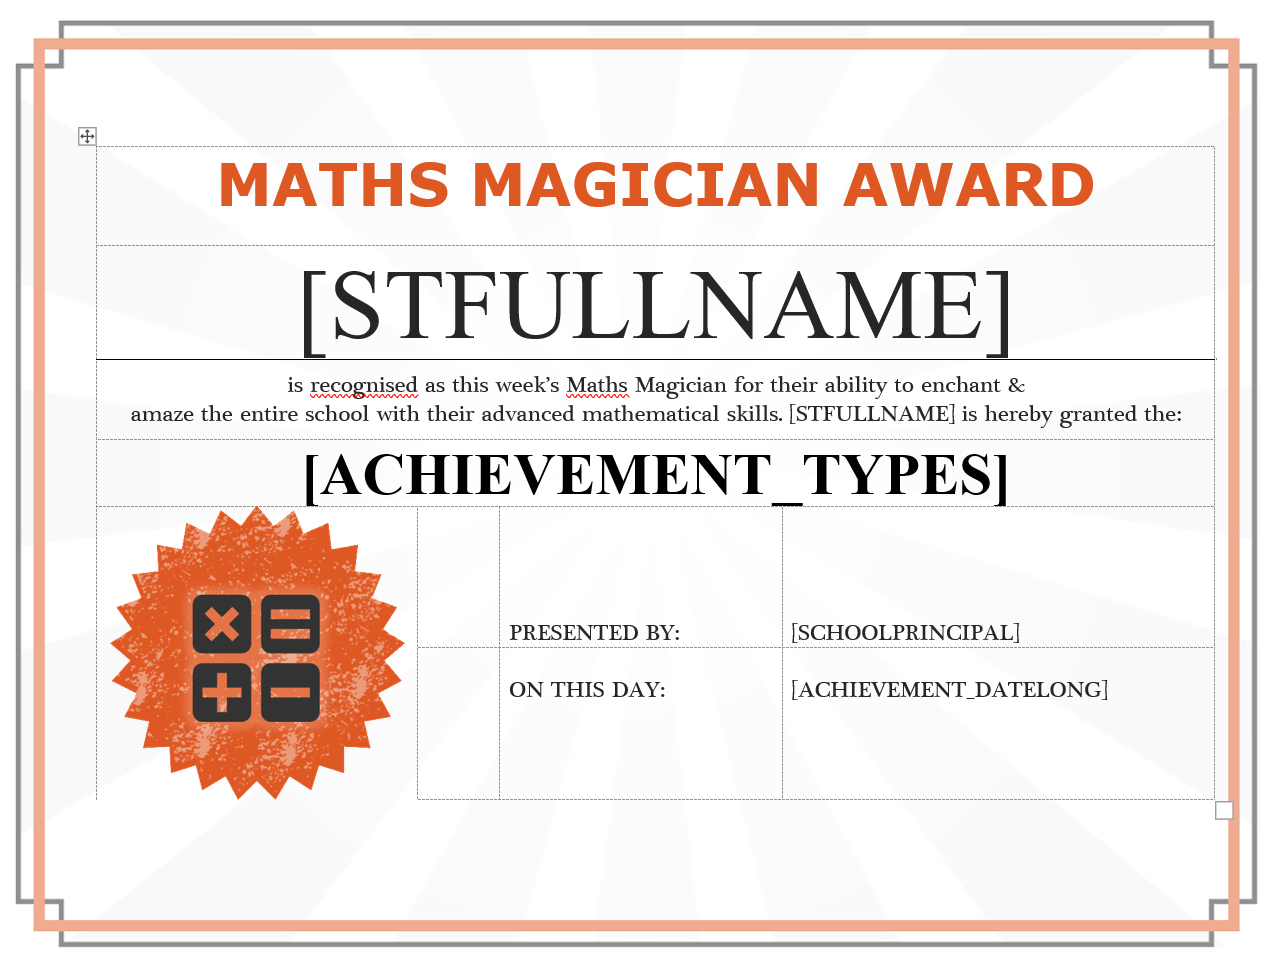
Contoh berikut menunjukkan cara menggunakan merge field:
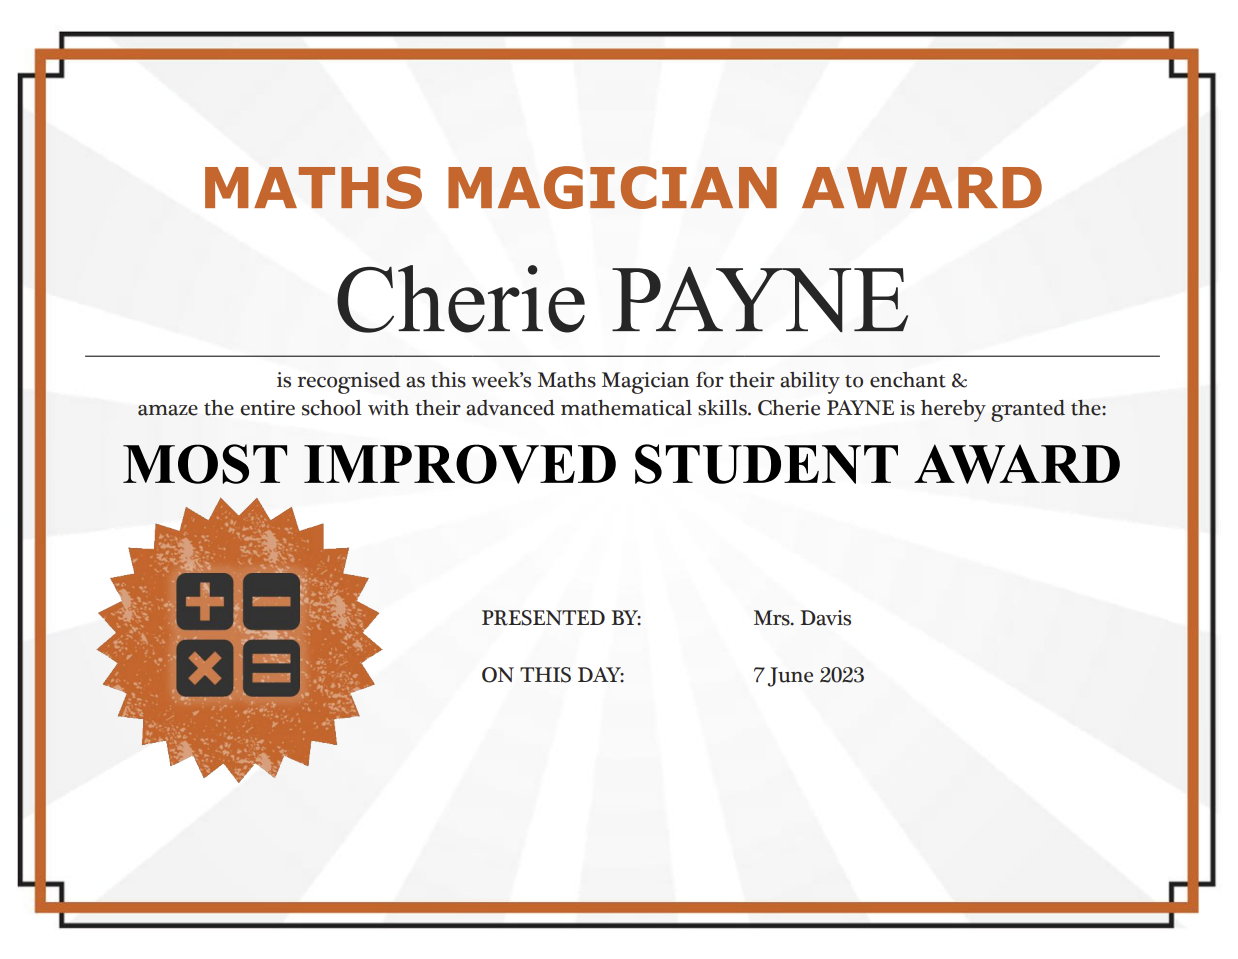
Jika kita menerapkan penghargaan ini kepada siswa bernama Cherie Payne untuk prestasi ‘Penghargaan Siswa Paling Berprestasi’, penghargaan yang dicetak akan terlihat seperti ini:
Merge fields apa yang bisa saya gunakan?
Untuk melihat daftar lengkap merge fields, buka Options > Software Settings > Award, Letter & Email Templates . Setelah berada di halaman ini, klik tombol Show Merge Fields untuk melihat daftar lengkap.
Cara mengunggah templat Anda
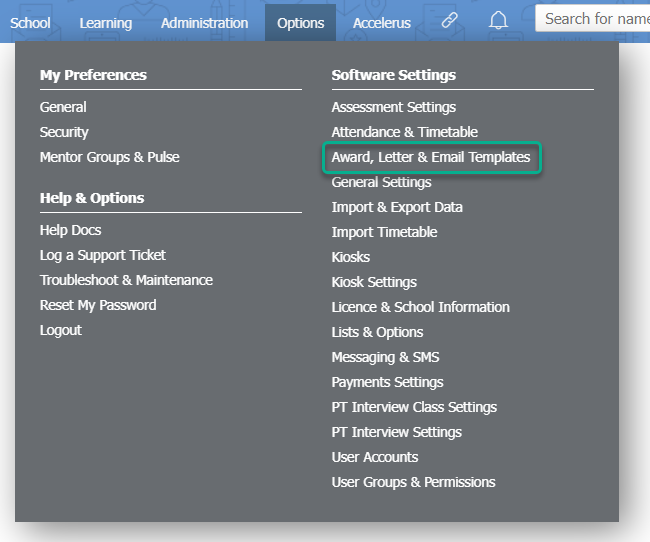
- Buka Options > Software Settings > Award, Letter & Email Templates.
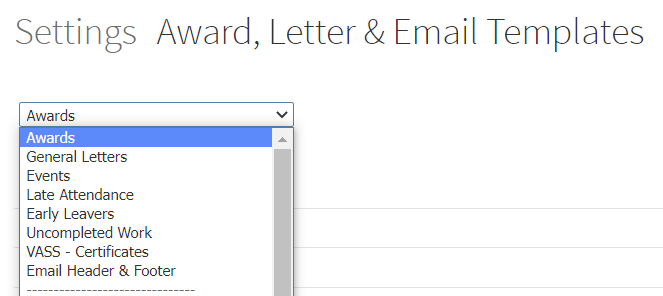
- Dari daftar dropdown, pilih opsi Awards , jika ini belum menjadi opsi default.
- Klik tombol Add.
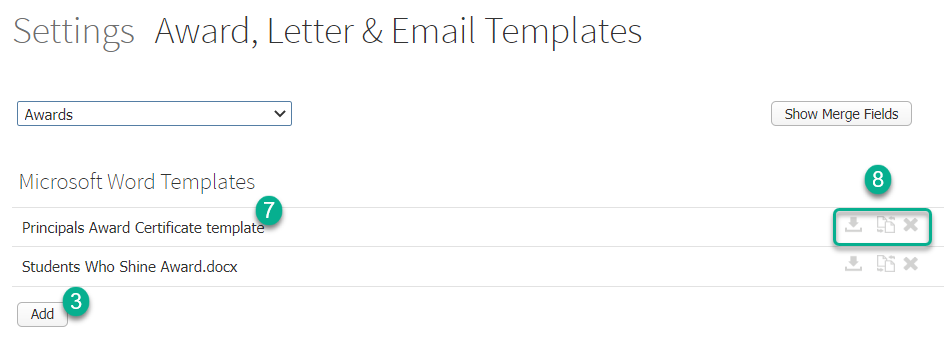
- Klik tombol Choose File.
- Navigasikan dan pilih templat penghargaan yang ingin Anda unggah.
- Klik tombol Add di jendela pop-up.
- Anda dapat mengganti nama templat penghargaan yang baru ditambahkan dengan mengklik teks nama, lalu mengetik nama baru. Klik di mana saja di layar untuk menyimpan.
- Anda juga dapat mengunduh, mengganti, atau menghapus templat menggunakan ikon yang sesuai di sebelah kanan nama templat.
Cara menambahkan atau memodifikasi jenis prestasi
- Buka Options > Software Settings > Lists & Options .
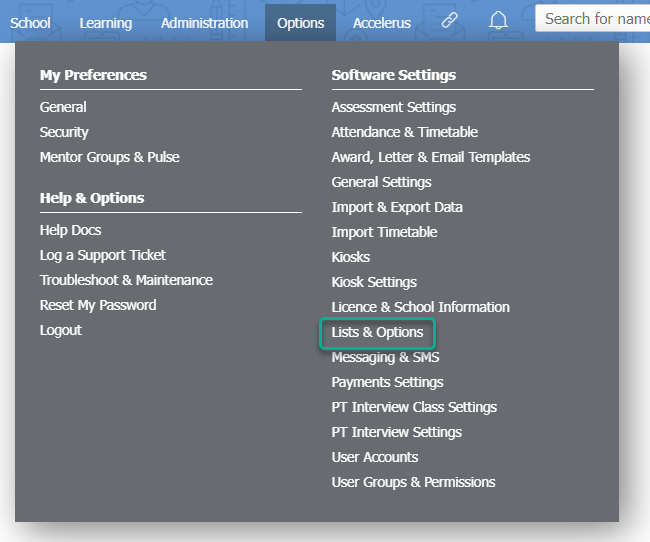
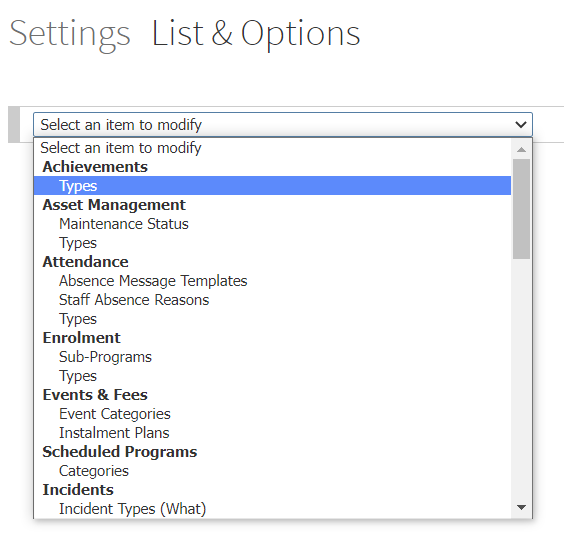
- Dalam daftar dropdown, temukan subjudul Achievements dan pilih Types.
- Tambahkan jenis prestasi baru dengan mengetik nama di kolom Item pada bidang Add a new item , lalu klik tombol Add.
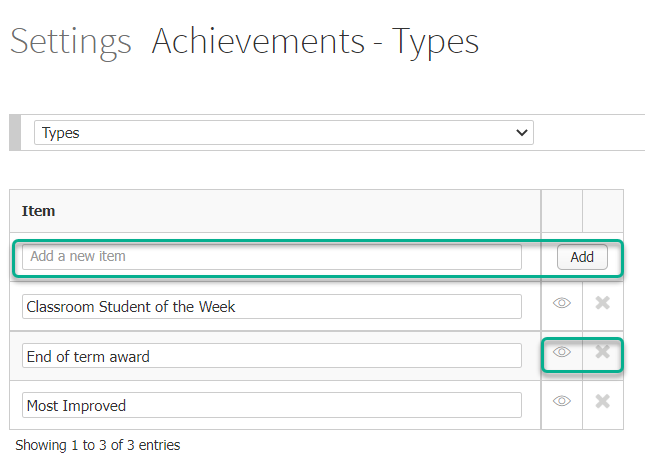
- Anda dapat mengedit nama jenis prestasi dengan mengubah teks di kolom Item . Perhatikan bahwa ini juga akan mengubah kata-kata di semua prestasi sebelumnya yang diberikan kepada siswa.
- Anda dapat menyembunyikan jenis prestasi dengan mengklik ikon Eye yang sesuai. Prestasi yang sudah ditambahkan untuk siswa akan tetap terlihat di catatan mereka, namun ini tidak lagi menjadi jenis yang dapat dipilih untuk prestasi/penghargaan baru.
- Anda dapat menghapus jenis prestasi dengan mengklik ikon X yang sesuai. Anda tidak akan dapat menghapus jenis prestasi jika sudah pernah digunakan sebelumnya.
Cara menambahkan prestasi dan/atau penghargaan untuk siswa
Setelah Anda membuat templat, Anda siap untuk memberikan prestasi/penghargaan kepada siswa Anda!
- Cari siswa menggunakan bilah pencarian dan klik namanya untuk pergi ke dashboard siswa mereka.
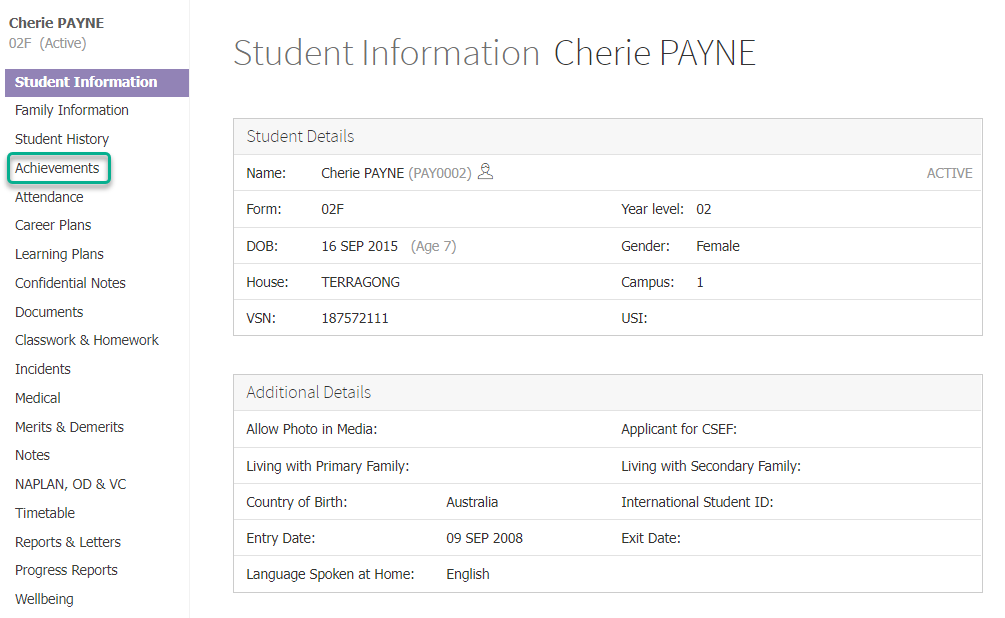
- Klik Achievements di menu sebelah kiri.
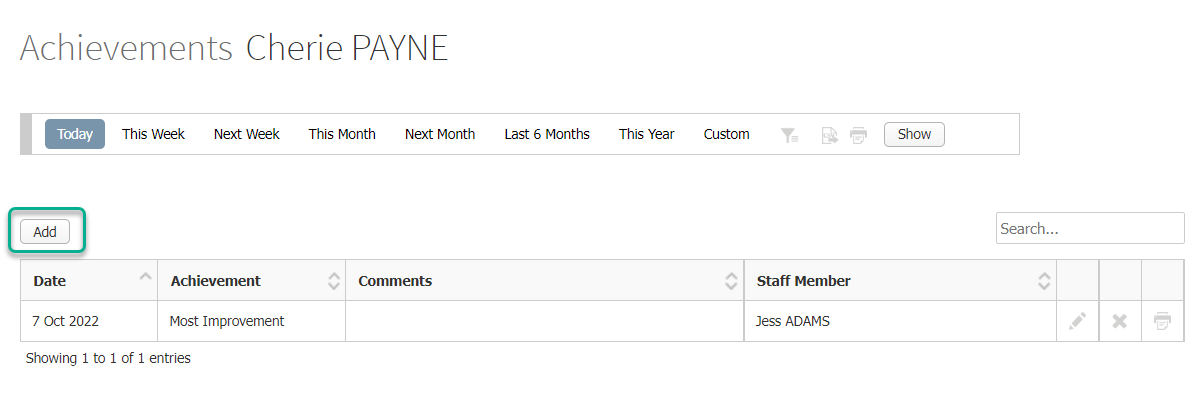
- Klik tombol Add.
- Jika Anda menambahkan prestasi/penghargaan yang sama untuk lebih dari satu siswa, Anda dapat mengklik teks [ Show / Hide additional student selection ] , lalu pilih satu atau lebih siswa secara berurutan dari daftar dropdown. Semua informasi akan diduplikasi untuk setiap siswa yang ditambahkan, dan ini akan membuat prestasi dan/atau penghargaan untuk setiap siswa.
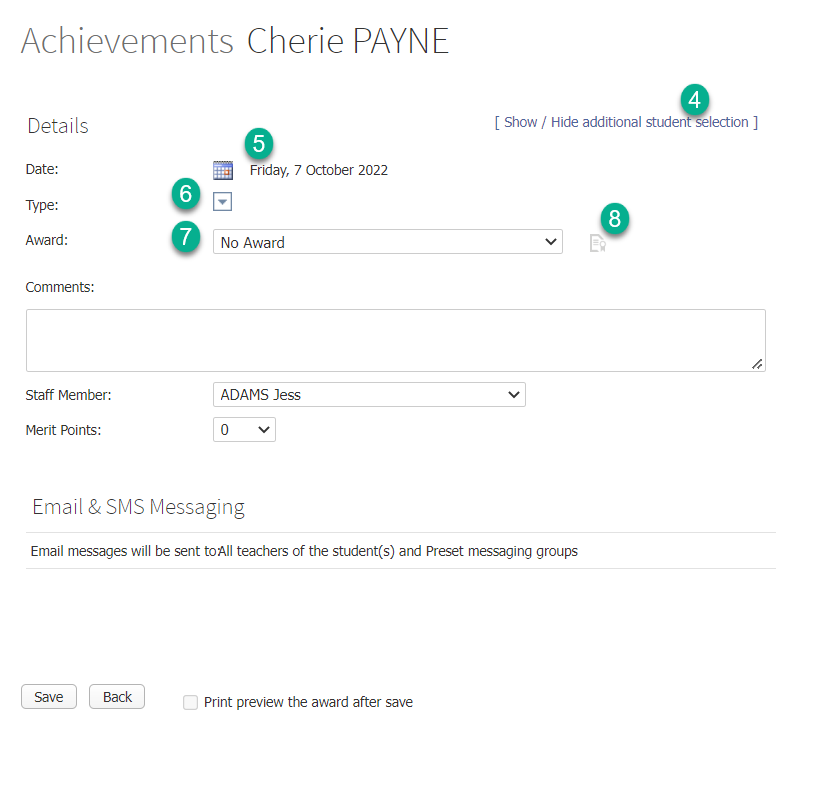
- Klik date untuk memilih tanggal prestasi menggunakan pemilih kalender yang muncul.
- Klik panah dropdown Type: untuk memilih jenis prestasi. Anda juga dapat menambahkan jenis prestasi baru dengan mengklik tautan Edit List, jika Anda telah diberikan izin untuk melakukannya.
- Gunakan daftar dropdown Award: untuk memilih templat penghargaan yang akan Anda gunakan. Anda juga dapat membiarkannya sebagai No Award jika Anda menambahkan prestasi saja.
- Klik ikon Award options di sebelah kanan daftar dropdown untuk memodifikasi subjek penghargaan, teks penghargaan, tempat, serta tanggal dan waktu upacara.
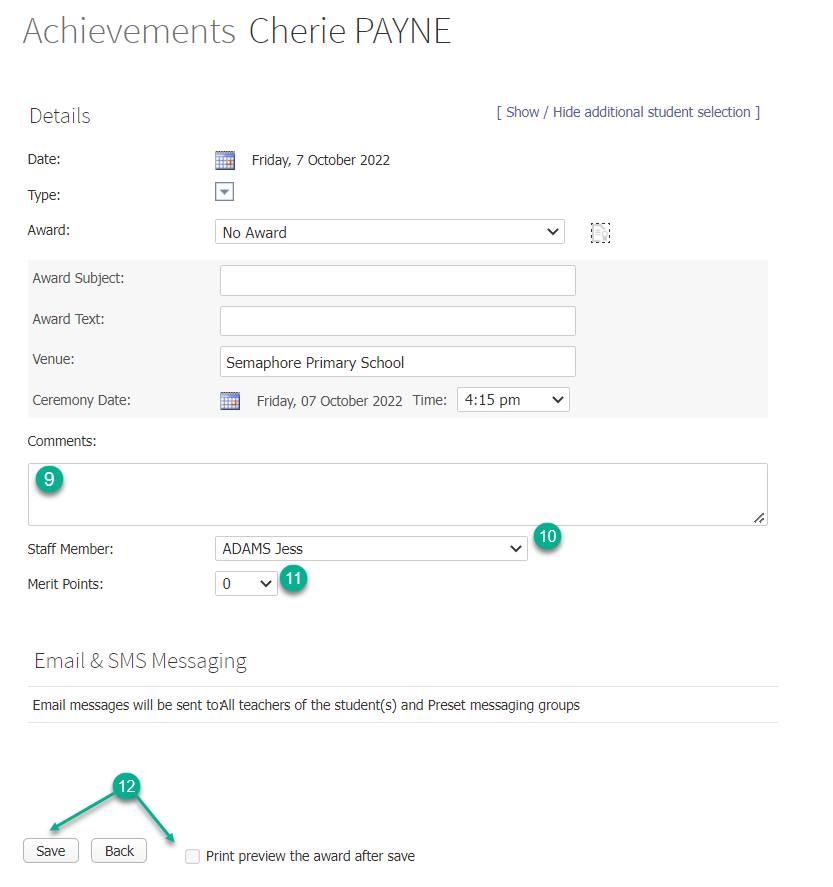
- Ketikkan komentar internal apa pun tentang prestasi di kotak comments.
- Dari daftar dropdown staff member, pilih nama anggota staf yang memberikan penghargaan.
- Dalam daftar dropdown merit points, pilih berapa banyak poin merit yang akan diberikan kepada siswa.
- Klik tombol Save, setelah Anda selesai. Untuk menyimpan dan mencetak penghargaan, centang kotak Print preview the award after save dan klik tombol Save.
- Jika diaktifkan di Messaging Settings Anda, notifikasi email dan/atau SMS akan dikirimkan kepada staf, orang tua, atau keduanya sesuai dengan pengaturan Anda. Lihat artikel terkait ‘ How to set up automated email or SMS notification alerts for incidents, notes and achievements to messaging groups ‘ untuk informasi mengenai pengaturan ini.
Melihat atau memodifikasi prestasi atau penghargaan
- Cari siswa menggunakan bilah pencarian dan klik namanya untuk pergi ke dashboard siswa mereka.
- Klik Achievements di menu sebelah kiri.
- Tentukan rentang tanggal prestasi yang ingin Anda lihat dengan mengklik pemilih Date range di bagian atas halaman.
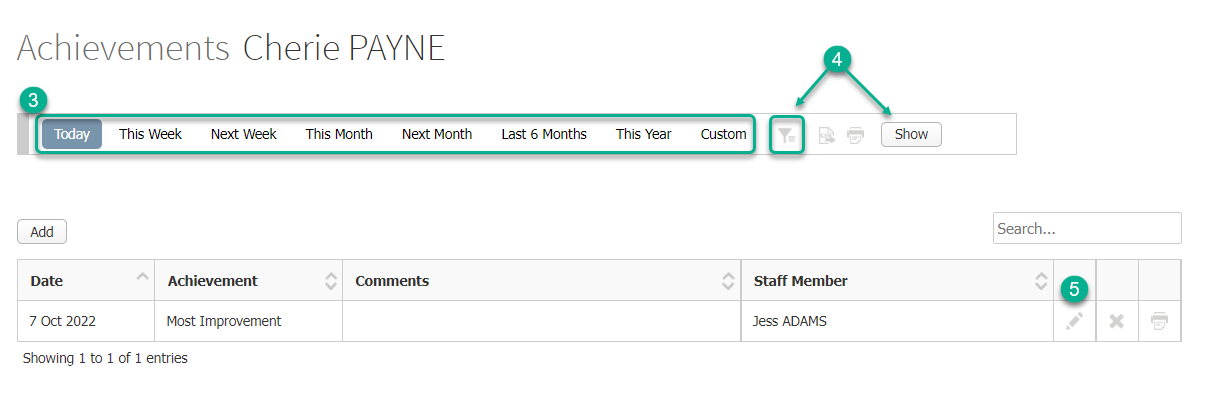
- Anda dapat mengklik ikon Filter untuk melihat lebih banyak opsi penyaringan, lalu klik tombol Show untuk menampilkan hasil yang difilter.
- Klik ikon Pencil di sebelah prestasi yang ingin Anda lihat atau edit.
- Anda dapat mengedit semua detail penghargaan, termasuk jenis, opsi penghargaan, komentar, anggota staf, dan poin merit.
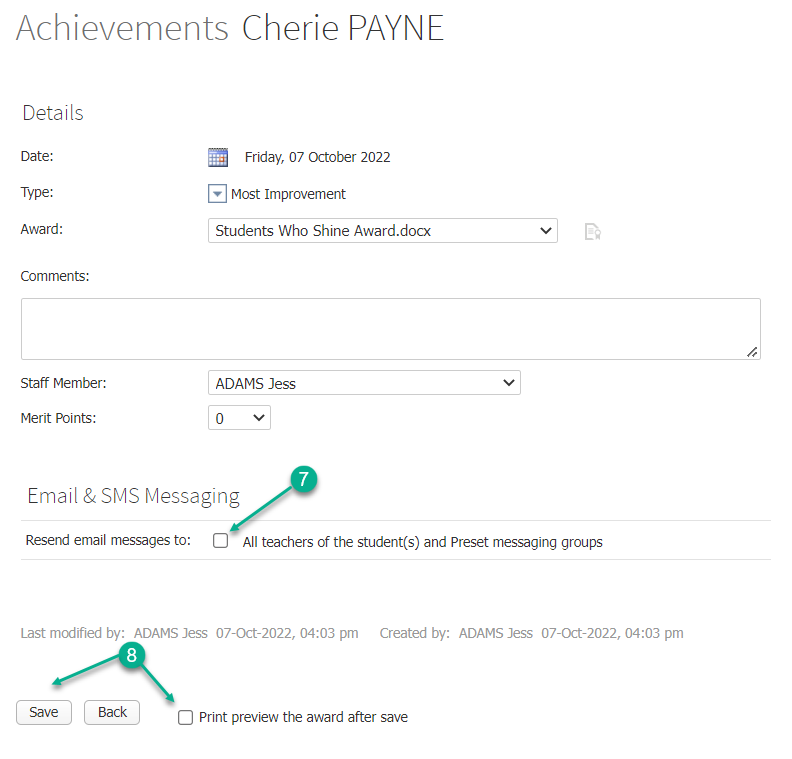
- Centang kotak di sebelah ‘resend alert emails’ untuk memberi tahu pengguna Anda tentang prestasi atau penghargaan yang diperbarui (jika ini diatur di Messaging Settings Anda).
- Setelah Anda selesai mengedit atau melihat, klik tombol Save . Untuk menyimpan dan mencetak penghargaan, centang kotak Print preview the award after save dan klik tombol Save .
Menghapus prestasi atau penghargaan
- Cari siswa menggunakan bilah pencarian dan klik namanya untuk pergi ke dashboard siswa mereka.
- Klik Achievements di menu sebelah kiri.
- Tentukan rentang tanggal prestasi yang ingin Anda lihat dengan mengklik pemilih Date range di bagian atas halaman.
- Anda dapat mengklik ikon Filter untuk melihat lebih banyak opsi penyaringan, lalu klik tombol Show untuk menampilkan hasil yang difilter.
- Klik ikon X untuk penghargaan yang ingin Anda hapus. Sebuah peringatan akan muncul meminta Anda untuk mengonfirmasi. Klik OK untuk melanjutkan.
Unduh contoh template
Kami telah menyediakan sejumlah templat penghargaan di bawah ini, sehingga Anda dapat langsung mulai membuat penghargaan. Tidak ada batasan untuk apa yang dapat Anda lakukan dengan templat penghargaan, jadi bersenang-senanglah!
Mencetak Penghargaan atau Prestasi Secara Massal
Anda sekarang dapat mencetak prestasi atau penghargaan secara massal dengan menavigasi ke Learning > Reports > Achievements . Cukup pilih siswa, klik ‘Ticked Options’ , lalu pilih ‘Print Selected Awards’ . Sebuah file ZIP akan dihasilkan berisi sertifikat individual untuk setiap siswa yang dipilih, membuatnya cepat dan mudah untuk mengunduh semuanya sekaligus.
How to create an award template
Creating custom award templates gives your school the ability to make beautiful awards which can be assigned to students, quickly and conveniently.
To make the template, simply create a new .docx document within Microsoft Word 2007+ and begin designing your award. Write text, insert images, and be as creative as you want; student awards are meant to be fun!
Once you have finished designing your template, include your Prestia merge fields. Merge fields are used in place of static text, such as the student’s name, so as to change your non-specific template into a multi-use award.
The following example shows you how to use a merge field:
If we were to apply this award to a student named Cherie Payne for the achievement ‘Most Improved Student Award’, the printed award would look like this:
What merge fields can I use?
To see the full list of merge fields, go to Options > Software Settings > Award, Letter & Email Templates. Once on this page, click the Show Merge Fields button to view the full list.
How to upload your template
- Go to Options > Software Settings > Award, Letter & Email Templates.
- From the dropdown list, select the Awards option, if this does not already come up as the default option.
- Click the Add button.
- Click the Choose File button.
- Navigate to and select the award template you would like to upload.
- Click the Add button in the popup.
- You can rename the newly added award template by clicking on the name text, then typing the new name. Click anywhere else on the screen to save.
- You can also download, replace or delete a template using the applicable icon to the right of the template’s name.
How to add or modify achievement types
- Go to Options > Software Settings > Lists & Options.
- In the dropdown list, find the Achievements subheading and select Types.
- Add a new achievement type by typing a name in the Add a new item field in the Item column, then clicking the Add button.
- You can edit the name of an achievement type by changing the text in the Item column. Note that this will also change the wording in all previous achievements assigned to students.
- You can hide an achievement type by clicking its corresponding Eye icon. Achievements already added for students will still be visible in their records, however this will no longer be a type that can be selected for new achievements/awards.
- You can delete an achievement type by clicking its corresponding X icon. You will not be able to delete an achievement type if it has been used in the past.
How to add an achievement and/or award for a student
Once you have made the template, you are ready to assign achievements/awards to your students!
- Find a student using the search bar and click on their name to go to their student dashboard.
- Click on Achievements in the left hand menu.
- Click on the Add button.
- If you are adding the same achievement/award to more than one student, you can click the [ Show / Hide additional student selection ] text, then select one or more students in turn from the dropdown list. All information will be duplicated for each student added, and this will create an achievement and/or award for each student.
- Click on the date to select the date of the achievement using the calendar picker that appears.
- Click the Type: dropdown arrow to select the type of achievement. You can also add a new achievement type by clicking on the Edit List link, if you have been assigned permission to do this.
- Use the Award: dropdown list to select the award template that you will use. You can also leave this as No Award if you are adding an achievement on its own.
- Click on the Award options icon to the right of the dropdown list to modify the award subject, award text, venue and ceremony date and time.
- Type any internal comments about the achievement in the comments box.
- From the staff member drop down list, select the name of the staff member who is giving the award.
- In the merit points drop down list select how many merit points to give to the student.
- Click the Save button, when you have finished. To save and print the award, tick the Print preview the award after save checkbox and click the Save button.
- If enabled in your Messaging Settings, emails and/or SMS notifications will be sent to staff, parents or both as determined by your settings. See the related article ‘How to set up automated email or SMS notification alerts for incidents, notes and achievements to messaging groups‘ for information on setting this up.
View or modify an achievement or award
- Find a student using the search bar and click on their name to go to their student dashboard.
- Click on Achievements in the left hand menu.
- Specify the date range of the achievements you want to see by clicking on the Date range selectors at the top of the page.
- You can click the Filter icon to see more filtering options, then click the Show button to display your filtered results.
- Click on the Pencil icon next to the achievement you wish to view or edit.
- You can edit all of the award details, including its type, award options, comments, staff member and merit points.
- Tick on the checkbox next to resend alert emails to alert your users to the updated achievement or award (if these are set up in your Messaging Settings).
- When you are finished editing or viewing, click the Save button. To save and print the award, tick the Print preview the award after save checkbox and click the Save button.
Delete an achievement or award
- Find a student using the search bar and click on their name to go to their student dashboard.
- Click on Achievements in the left hand menu.
- Specify the date range of the achievements you want to see by clicking on the Date range selectors at the top of the page.
- You can click the Filter icon to see more filtering options, then click the Show button to display your filtered results.
- Click on the X icon for the award you want to delete. An alert will appear asking you to confirm. Click OK to proceed.
Download template examples
We have provided a number of award templates below, so that you can jump in and immediately start making awards. There is no limit to what you can do with award templates, so have fun!
Bulk Printing the Awards or Achievements
You can now bulk print achievements or awards by navigating to Learning > Reports > Achievements. Simply select the students, click ‘Ticked Options’, then choose ‘Print Selected Awards’. A ZIP file will be generated containing individual certificates for each selected student, making it quick and easy to download them all at once.