
Skip to main content
What can we help you with?
Incidents & Actions: Add, edit and delete student incidents and actions
Menambah insiden atau tindakan baru
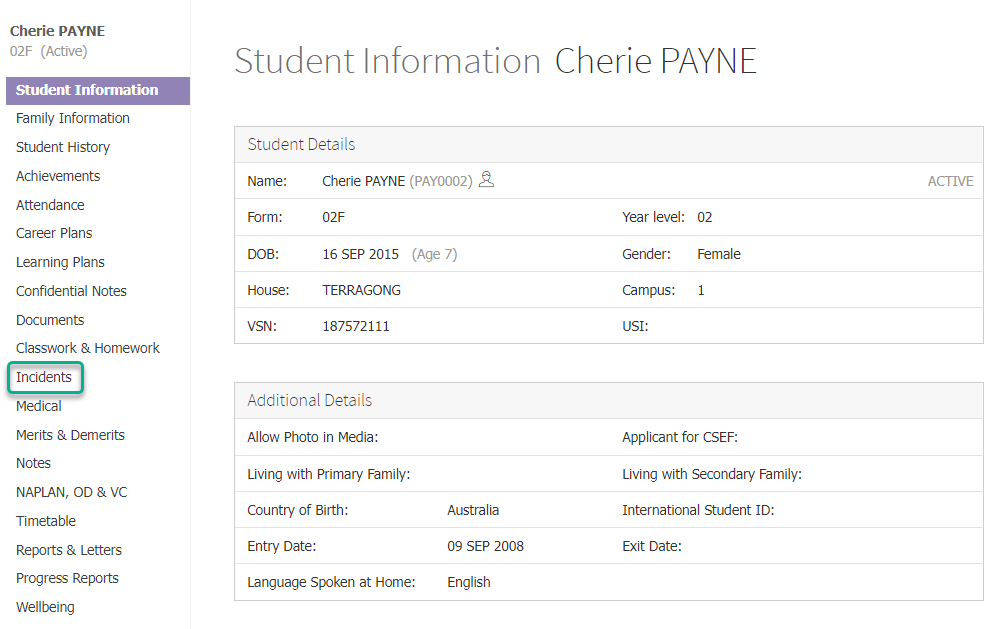
- Temukan siswa menggunakan bilah pencarian dan klik namanya untuk menuju ke dashboard siswa mereka.
- Klik item Incidents di menu sebelah kiri.
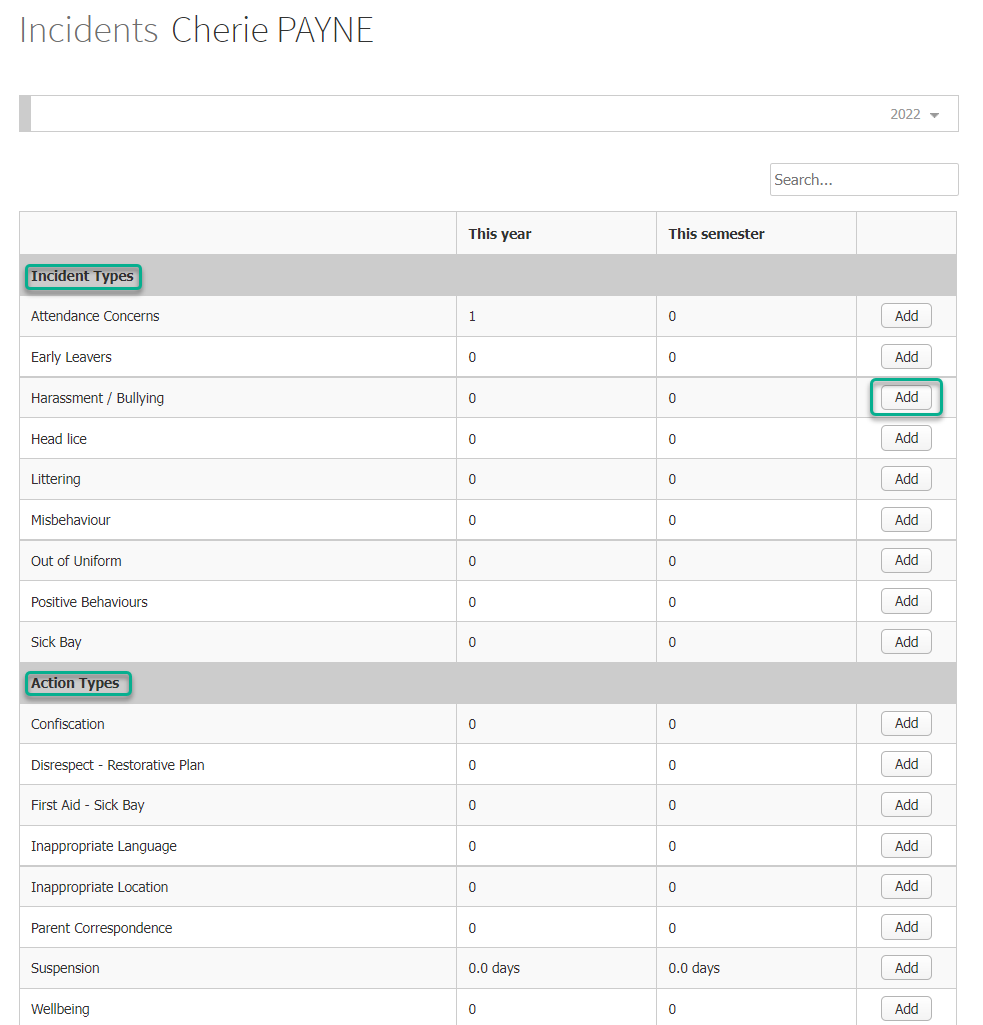
- Pilih jenis insiden atau tindakan dan klik tombol Add yang sesuai. Anda hanya dapat menambahkan insiden/tindakan jika Anda memiliki izin yang diperlukan.
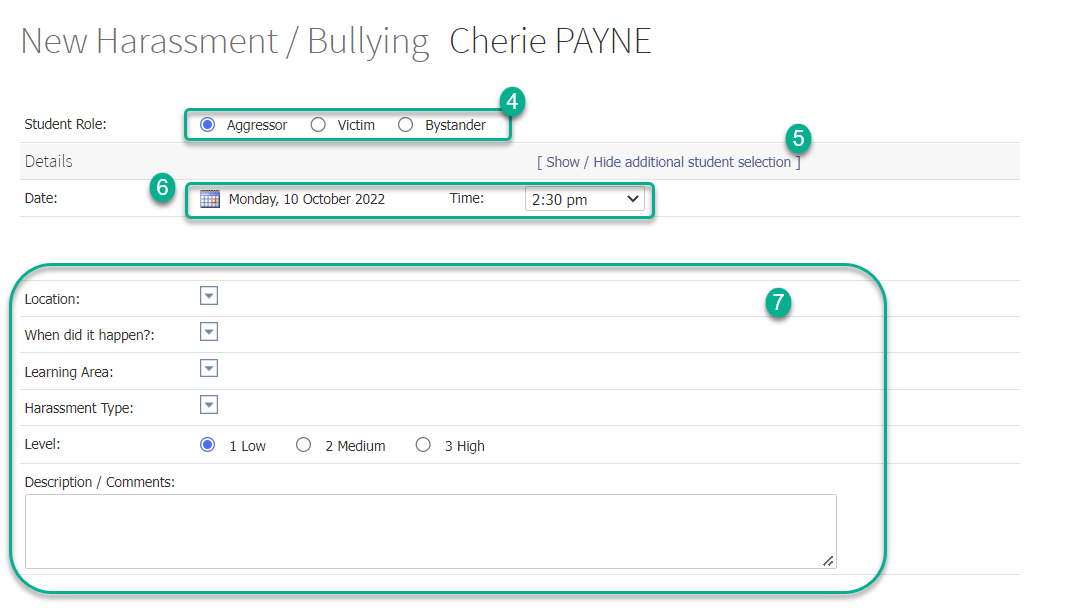
- Jika Anda menambahkan insiden, dan Student Role diaktifkan untuk jenis insiden tersebut, pilih peran yang sesuai untuk siswa ini.
- Jika Anda membuat insiden atau tindakan yang berlaku untuk beberapa siswa, Anda dapat mengklik teks [ Show / Hide additional student selection ] dan memilih satu atau lebih siswa untuk ditambahkan ke catatan ini. Jika peran siswa diaktifkan, Anda dapat menetapkan peran untuk setiap siswa yang Anda pilih. Setiap siswa tambahan yang Anda tambahkan juga akan memiliki insiden yang sama yang tersimpan di profil mereka.
- Di bagian Details , pilih tanggal dan waktu untuk insiden atau tindakan menggunakan pemilih Kalender dan daftar dropdown Time , secara berurutan.
- Isi sisa formulir yang relevan. Kolom-kolom akan telah diatur oleh orang yang membuat jenis insiden atau tindakan di Prestia untuk sekolah Anda.
- Dalam insiden di mana tindakan Prestia yang terkait dapat ditambahkan, Anda akan melihat bagian Behaviour Management . Gunakan daftar dropdown Choose an action to add untuk memilih tindakan. Jika bagian ini tidak ditampilkan, atau Anda membuat tindakan sendiri, lewati ke Langkah 10.
- Jendela pop-up akan muncul dengan formulir tindakan Prestia. Kolom-kolom akan telah diatur oleh orang yang membuat jenis tindakan di Prestia untuk sekolah Anda. Isi formulir tindakan dan klik tombol Save setelah selesai.
- Pilih tombol radio No atau Yes yang sesuai untuk menunjukkan apakah orang tua telah dihubungi.
- Di bagian Status & Staff Details , buat pilihan yang sesuai. Anda mungkin melihat atau tidak melihat semua kolom yang ditampilkan di bawah ini, tergantung pada pengaturan jenis insiden/tindakan.
- Lampirkan file apa pun ke insiden/tindakan jika diperlukan, dengan mengklik di area Upload dan mencari file Anda, atau dengan menyeret dan menjatuhkan file ke area tersebut.
- Klik tombol Save, atau tombol Save & Print jika Anda ingin mencetak surat insiden/tindakan, dan ada templat yang terkait dengan jenis insiden/tindakan ini.
- Jika ada notifikasi email otomatis yang diatur untuk catatan siswa atau catatan rahasia, ini akan dikirim ke penerima sebagaimana ditentukan oleh pengaturan pesan Anda.
Melihat atau mengedit insiden atau tindakan
- Temukan siswa menggunakan bilah pencarian dan klik namanya untuk menuju ke dashboard siswa mereka.
- Klik item Incidents di menu sebelah kiri.
- Gunakan dropdown Year jika Anda perlu mengubah rentang tanggal yang ditampilkan.
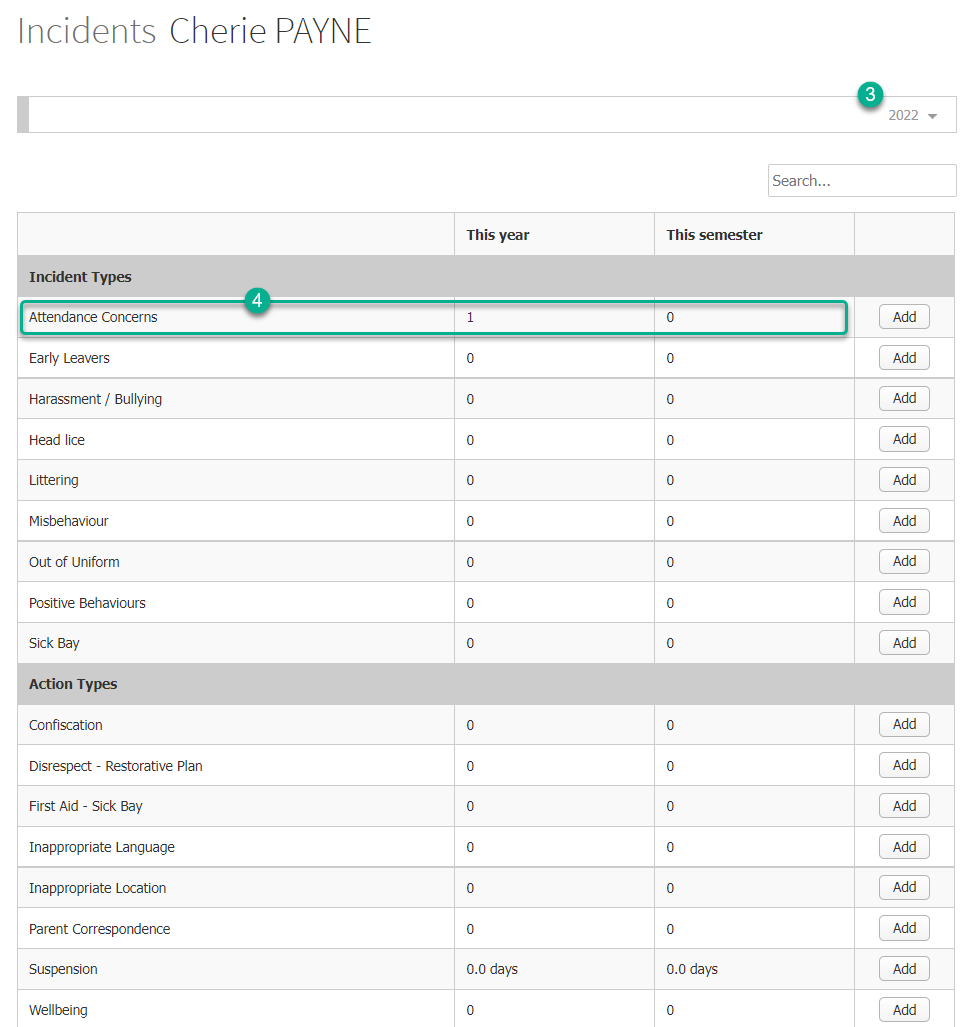
- Klik baris insiden atau tindakan yang ingin Anda lihat atau ubah. Jika Anda perlu melihat semua insiden secara bersamaan, terlepas dari jenisnya, gunakan laporan insiden untuk memfilter semua insiden berdasarkan siswa tertentu. Lihat artikel terkait ‘ Incident/action reporting ‘ untuk informasi lebih lanjut.
- Klik ikon Pencil di sebelah insiden/tindakan untuk melihat atau mengeditnya. Anda dapat menggunakan bilah Search di kanan atas tabel untuk menemukan insiden/tindakan tertentu, atau mengurutkan kolom mana pun di tabel dengan panah up atau down di header kolom.
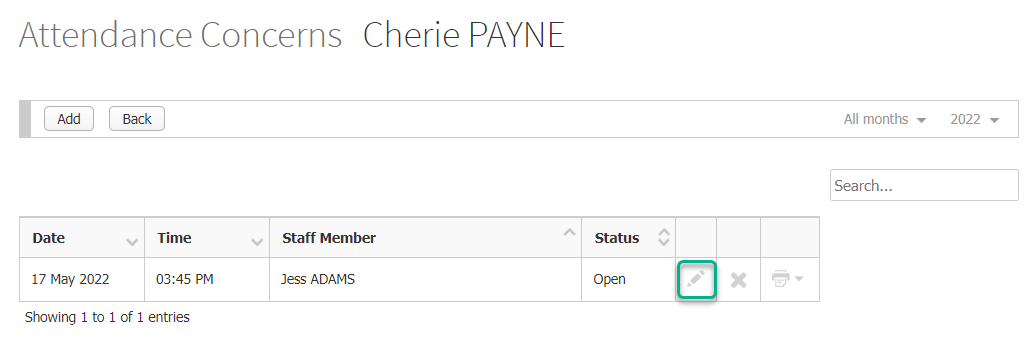
- Edit insiden/tindakan Anda sesuai kebutuhan.
- Jika Anda mengedit insiden/tindakan dan ada notifikasi email otomatis yang diatur untuk jenis insiden atau tindakan tersebut, ini akan dikirim ke penerima sebagaimana ditentukan oleh pengaturan pesan Anda jika Anda mencentang kotak centang untuk Resend email messages to: penerima yang berlaku.
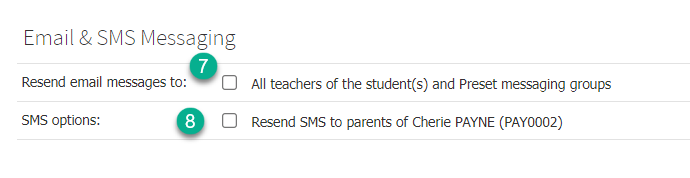
- Demikian pula, jika SMS diaktifkan untuk orang tua untuk jenis insiden atau tindakan ini, Anda dapat mencentang Resend SMS to parents of [student] untuk mengirim ulang SMS.
- Klik tombol Save atau Save & Print , atau tombol Back jika Anda hanya melihat. Catatan: jika insiden atau tindakan asli dibuat dengan siswa tambahan yang ditambahkan, pengeditan hanya akan memengaruhi insiden/tindakan untuk siswa yang Anda cari, bukan siswa tambahan tersebut.
Menghapus insiden atau tindakan
- Temukan siswa menggunakan bilah pencarian dan klik namanya untuk menuju ke dashboard siswa mereka.
- Klik item Incidents di menu sebelah kiri.
- Gunakan dropdown Year jika Anda perlu mengubah rentang tanggal yang ditampilkan.
- Klik baris insiden atau tindakan yang ingin Anda lihat atau ubah. Jika Anda perlu melihat semua insiden secara bersamaan, terlepas dari jenisnya, gunakan laporan insiden untuk memfilter semua insiden berdasarkan siswa tertentu. Lihat artikel terkait ‘ Incident/action reporting ‘ untuk informasi lebih lanjut.
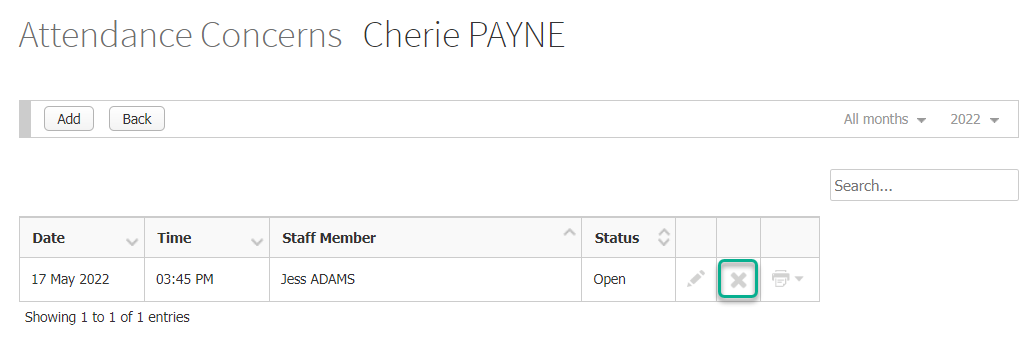
- Klik ikon X di sebelah insiden/tindakan untuk menghapusnya. Anda dapat menggunakan bilah Search di kanan atas tabel untuk menemukan insiden/tindakan tertentu, atau mengurutkan kolom mana pun di tabel dengan panah up atau down di header kolom.
Adding a new incident or action
- Find a student using the search bar and click on their name to go to their student dashboard.
- Click on the Incidents item in the left hand menu.
- Choose an incident or action type and click on the corresponding Add button. You can only add incidents/actions if you have the required permissions.
- If you are adding an incident, and Student Role is enabled for that incident type, select the appropriate role for this student.
- If you are creating an incident or action that applies to multiple students, you can click the [ Show / Hide additional student selection ] text and select one or more students to add to this note. If student role is enabled, you can assign a role for each student you select. Any additional students you add will also have the same incident saved to their profile.
- In the Details section, select a date and time for the incident or action using the Calendar picker and Time dropdown list, respectively.
- Fill in the rest of the form as applicable. The fields will have been set up by the person who created the incident or action type in Prestia for your school.
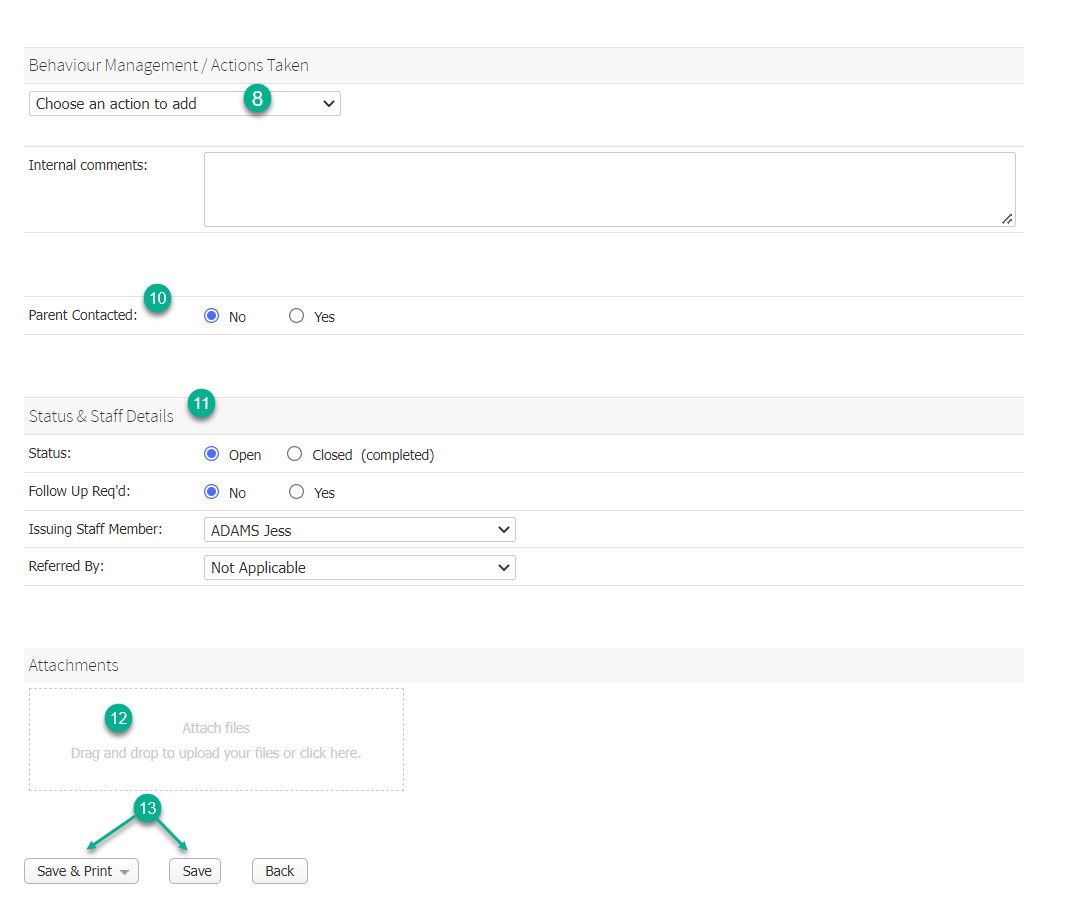
- In incidents where linked Prestia actions can be added, you will see the Behaviour Management section. Use the Choose an action to add dropdown list to select an action. If this section is not displayed, or you are creating an action on its own, skip to Step 10.
- A popup window will appear with the Prestia action form. The fields will have been set up by the person who created the action type in Prestia for your school. Fill in the action form and click the Save button when completed.
- Choose the applicable No or Yes radio button to indicate whether the parent was contacted.
- In the Status & Staff Details section, make selections as appropriate. You may or may not see all fields shown below, depending on the incident/action type settings.
- Attach any files to the incident/action if required, by clicking in the Upload area and browsing to your file, or by dragging and dropping files into the area.
- Click on the Save button, or the Save & Print button if you would like to print an incident/action letter, and there is a template associated with this incident/action type.
- If there are automated email notifications set up for student notes or confidential notes, these will be sent to recipients as determined by your messaging settings.
Viewing or editing an incident or action
- Find a student using the search bar and click on their name to go to their student dashboard.
- Click on the Incidents item in the left hand menu.
- Use the Year dropdown if you need to change the date range displayed.
- Click on the row of the incident or action that you would like to view or modify. If you need to view all incidents together, regardless of type, then use an incident report to filter all incidents by a particular student. See the related article ‘Incident/action reporting‘ for more information.
- Click the Pencil icon next to an incident/action to view or edit it. You can use the Search bar at the top right of the table to find specific incidents/actions, or sort any of the columns in the table with up or down arrows in the column header.
- Edit your incident/action as needed.
- If you are editing an incident/action and there are automated email notifications set up for that incident or action type, these will be sent to recipients as determined by your messaging settings if you tick the checkbox to Resend email messages to: the applicable recipients.
- Similarly, if SMS is enabled for parents for this incident or action type, you can tick the Resend SMS to parents of [student] to resend the SMS(s).
- Click the Save or Save & Print button, or the Back button if you are viewing only. Note: if the original incident or action was created with additional student(s) added, editing will only affect the incident/action for the student you searched for, not the additional students(s).
Deleting an incident or action
- Find a student using the search bar and click on their name to go to their student dashboard.
- Click on the Incidents item in the left hand menu.
- Use the Year dropdown if you need to change the date range displayed.
- Click on the row of the incident or action that you would like to view or modify. If you need to view all incidents together, regardless of type, then use an incident report to filter all incidents by a particular student. See the related article ‘Incident/action reporting‘ for more information.
- Click the X icon next to an incident/action to delete it. You can use the Search bar at the top right of the table to find specific incidents/actions, or sort any of the columns in the table with up or down arrows in the column header.