
How to create recurring events in Prestia
Fitur ini memungkinkan pengguna untuk menyederhanakan proses perencanaan event dengan mudah menyiapkan event yang berlangsung secara teratur. Baik itu les musik mingguan, lokakarya bulanan, atau aktivitas dua mingguan, fitur ini memungkinkan penyelenggara untuk menentukan frekuensi dan durasi event hanya dengan beberapa klik.
Cara kerja Event Berulang
Event berulang memungkinkan Anda menjadwalkan event yang terjadi berulang kali selama periode waktu tertentu. Berikut adalah cara kerjanya:
- Frekuensi : Anda dapat mengatur seberapa sering event terjadi—harian, mingguan, dua mingguan, atau bulanan.
- Pola : Anda dapat menentukan pola tertentu, seperti setiap Senin, tanggal satu setiap bulan, atau setiap Kamis kedua.
- Durasi : Anda dapat menentukan tanggal mulai dan berakhir untuk pengulangan.
- Persyaratan : Anda dapat mengatur opsi pilihan Anda untuk persetujuan event, pengisian formulir event, dan/atau pembayaran event. Anda dapat menentukan apakah Anda memerlukannya dalam setiap seri atau hanya sekali untuk event pertama. Jika Anda telah memilih opsi untuk menyetujui event pertama, maka orang tua hanya perlu menyetujui event berulang sekali. Setelah disetujui, semua contoh event akan secara otomatis dijadwalkan sesuai dengan frekuensi yang ditentukan. Jika ada perubahan yang diperlukan di masa mendatang—seperti menyesuaikan waktu atau lokasi.
- Integrasi : Event berulang juga akan ditampilkan di kalender Prestia, sehingga memudahkan pengelolaan dan pengecekan jadwal.
Catatan:
Prestia saat ini memungkinkan pembuatan event berulang, tetapi biaya belum termasuk dalam fitur ini.
Menyiapkan Event Berulang
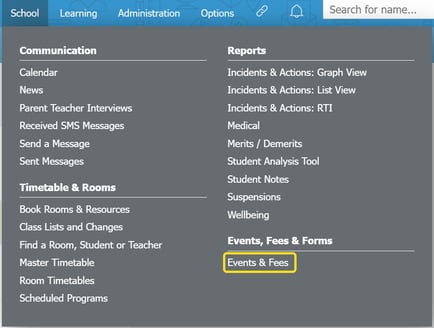
- Pergi ke School > Events, Fees & Forms > Events & Fees.
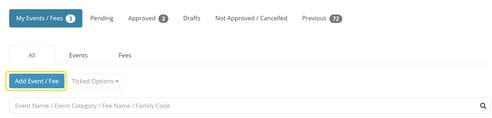
- Klik tombol Add Event/Fee untuk membuat event baru.
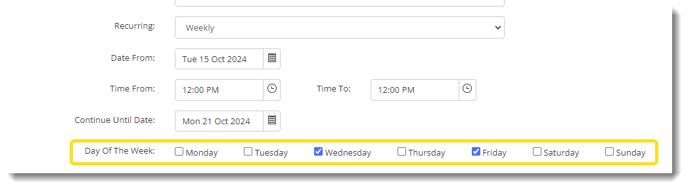
3. Di tab Event details, pilih frekuensi event, yaitu kejadian harian, mingguan, dua mingguan, atau bulanan. Untuk event mingguan dan dua mingguan, pengguna dapat memilih hari-hari tertentu dalam seminggu, memungkinkan pemilihan beberapa hari untuk mengakomodasi berbagai jadwal. Namun, jika itu adalah event satu kali yang tidak berulang, Anda harus memilih opsi “non-recurring” sebagai gantinya. Ini memastikan bahwa event hanya dijadwalkan untuk tanggal dan waktu yang ditentukan tanpa kejadian di masa mendatang.
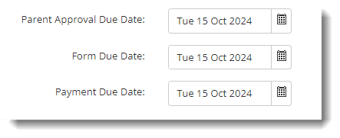
Anda juga dapat mengatur persyaratan Persetujuan (Izin), Pengiriman Formulir, dan Pembayaran dengan opsi di bawah ini:

Catatan:
Jika sekolah memilih “Required for each Recurring Event,” mereka dapat mengubah tanggal jatuh tempo untuk setiap kejadian secara individual, setelah event disetujui. Namun, jika sekolah memilih “Once only for the first event,” setiap perubahan hanya dapat dilakukan pada event pertama setelah disetujui.
Tips:
Jika opsi berikut diatur:
- Pembayaran (Sekali untuk event pertama): Orang tua wajib melakukan pembayaran hanya sekali untuk semua event, yaitu mereka dapat melakukan pembayaran hanya pada event pertama untuk mencakup semua event berulang.
- Pembayaran (Diperlukan untuk setiap event berulang): Orang tua harus melakukan pembayaran untuk setiap event berulang.
- Izin (Sekali untuk event pertama): Orang tua hanya perlu menyetujui sekali untuk semua event berulang dalam seri tersebut.
- Izin (Diperlukan untuk setiap event berulang): Orang tua harus memberikan persetujuan untuk setiap kejadian individual dalam seri tersebut.
- Formulir Event (Sekali untuk event pertama): Orang tua wajib mengisi dan mengirimkan formulir hanya sekali, untuk kejadian pertama dalam seri tersebut.
- Formulir Event (Diperlukan untuk setiap event berulang): Orang tua harus mengisi dan mengirimkan formulir untuk setiap event dalam seri tersebut.
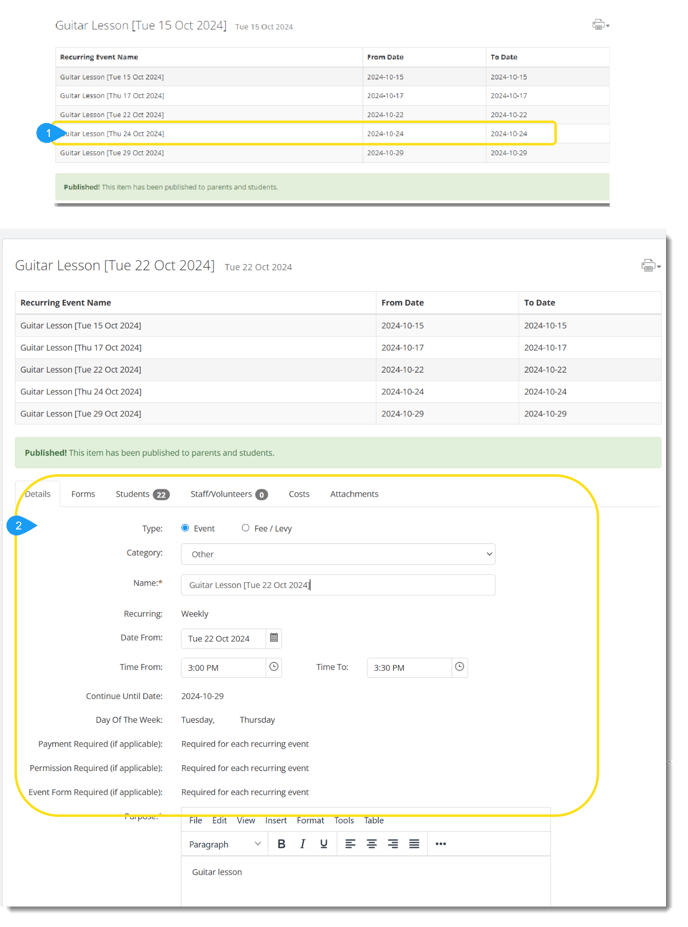
4. Setelah disetujui, semua event berulang akan dibuat, disetujui, dan ditampilkan di bagian atas halaman event. Setiap event menyediakan detail dan dapat dilihat serta beberapa bidangnya dapat diubah.
Catatan:
Setelah event berulang disetujui, event tersebut tidak dapat dikembalikan ke Draft atau Siap untuk Persetujuan. Selain itu, modifikasi pada event berulang terbatas. Anda dapat menambah atau menghapus siswa dan staf untuk setiap event atau seri berulang, mengubah waktu mulai dan berakhir, serta memperbarui Nama dan Tujuan event. Jika Anda memilih opsi ‘Required for each Recurring Event,’ Anda juga dapat memperbarui Tanggal Jatuh Tempo. Ini memungkinkan fleksibilitas sambil mempertahankan struktur seri event Anda.
Membatalkan Event Berulang
Fitur event berulang Prestia memungkinkan Anda membatalkan kejadian individual atau sisa seri event. Fleksibilitas ini memastikan Anda dapat mengelola jadwal Anda secara efektif, apakah Anda perlu membatalkan satu kejadian karena keadaan yang tidak terduga atau membatalkan seluruh seri karena alasan apa pun. Cukup pilih event atau seri tertentu yang ingin Anda batalkan, dan event tersebut akan dihapus dari kalender.
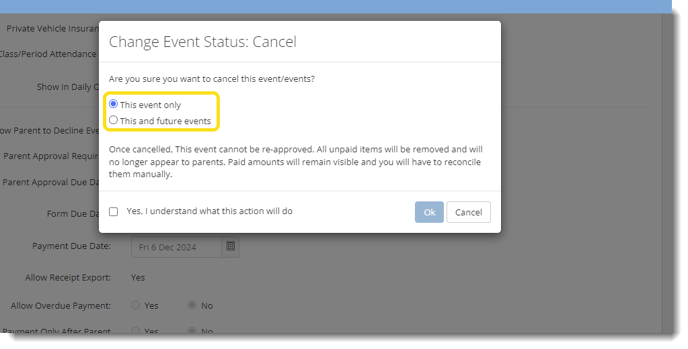
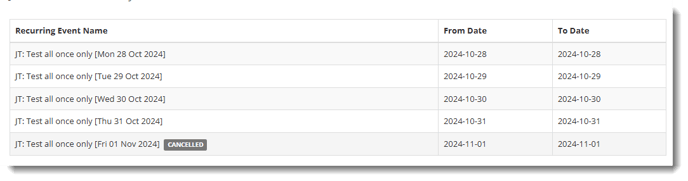
Event yang dibatalkan dalam seri berulang akan tetap ditampilkan dan ditandai sebagai ‘Cancelled.’ Silakan lihat di bawah:
Previously, Prestia did not have the capability to create recurring events. However, schools can now easily set up recurring events in the Events & Fees module.This feature allows users to streamline the event planning process by easily setting up events that occur on a regular basis. Whether it’s weekly music lessons, monthly workshops, or fortnightly activities, this feature enables organisers to define the frequency and duration of the events with just a few clicks.
How Recurring Events works
Recurring events allows you to schedule an event that happens repeatedly over a specified time period. Here’s how they typically work:
-
Frequency: You can set how often the event occurs—daily, weekly, fortnightly, or monthly.
-
Pattern: You can define specific patterns, such as every Monday, the first of the month, or every other Thursday.
-
Duration: You can specify the start and end dates for the recurrence.
- Requirements: You can setup your preferred options for event approval, event form completion, and/or event payment. You can specify whether you require them in each series or only once for the first event.If you have chosen the option to approve the first event, then parents will only need to approve the recurring events once. Once approved, all instances of the event will be automatically scheduled according to the specified frequency. If any changes are needed in the future—like adjusting the time or location.
- Integration: Recurring events will also be shown in the Prestia calendars making it easier to manage and check the schedules.
Setting up Recurring Events
- Go to School > Events, Fees & Forms > Events & Fees.
- Click on the Add Event/Fee button to create a new event.
- In the Event details tab, select the frequency of the event, that is daily, weekly, fortnightly, or monthly occurrences. For weekly and fortnightly events, users can choose specific days of the week, allowing for the selection of multiple days to accommodate various schedules. However, if it is a one-time event that does not repeat, you should select the option for “non-recurring” instead. This ensures that the event is scheduled only for the specified date and time without any future occurrences.
You can also setup the Approval (Permission), Form Submission and Payment requirement with the below options:
If the school selects “Required for each Recurring Event,” they can change the due dates for each occurrence individually, after the event has been approved. However, if the school chooses “Once only for the first event,” any changes can only be made to the first event after it has been approved.
Tips:
If the following options are set:
-
Payment (Once for the first event): Parents are required to make a payment only once for all of the events i.e. they can make payment only in the first event to cover all the recurring events.
-
Payment (Required for each recurring event): Parents must make a payment for each recurring event.
-
Permission (Once for the first event): Parents need to approve only once for all recurring events in the series.
-
Permission (Required for each recurring event): Parents must provide approval for each individual occurrence in the series.
-
Event Form (Once for the first event): Parents are required to complete and submit the form only once, for the first occurrence in the series.
-
Event Form (Required for each recurring event): Parents must complete and submit the form for each event in the series.
4. Once approved, all recurring events will be created, approved, and displayed at the top of the event page accordingly. Each event provides details and able to view and modify some fields.
Note:
Once the recurring event has been approved, it cannot be reverted back to Draft or Ready for Approval. Additionally, modifications to recurring events are limited. You can add or remove students and staff for each recurring event or series, change the start and end times, and update the Name and Purpose of the event. If you select the option ‘Required for each Recurring Event,’ you can also update the Due Dates accordingly. This allows for some flexibility while maintaining the structure of your event series.
Cancelling Recurring Events
Prestia’s recurring events feature allows you to cancel individual instances or the remaining series of events. This flexibility ensures you can manage your schedule effectively, whether you need to cancel a single occurrence due to unforeseen circumstances or cancel the entire series for any reason. Simply select the specific event or series you wish to cancel, and it will be removed from the calendar.
A cancelled event in a recurring series will still be displayed and marked as ‘Cancelled.’ Please see below: