
How to use student wellbeing information
We recommend you ensure that only limited staff should have access to this menu due to the generally sensitive and confidential nature of the data.
Each student can have a primary support contact assigned to them as well as other information such as frequency of visits and programs entered. You can also add your own custom alerts, which will appear next to the student on each page, alongside any other major alerts that have been imported from your Student Information System (SIS) administration package (such as access restrictions, student at risk and medical alerts).
Viewing and editing student wellbeing information
- Choose a student from the search bar and click on their name to go to their student dashboard.
- Click on the Wellbeing item in the left hand menu.
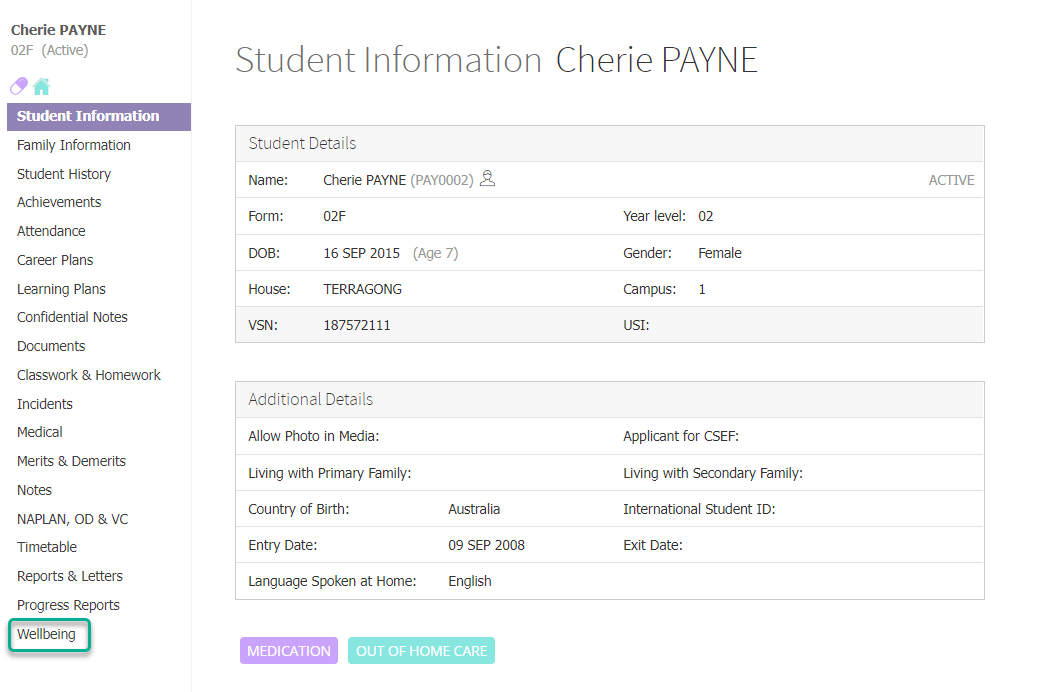
- In the Information section, you can select a Primary Support Contact, Frequency of Visits and Behavioural Level from the dropdown list options.
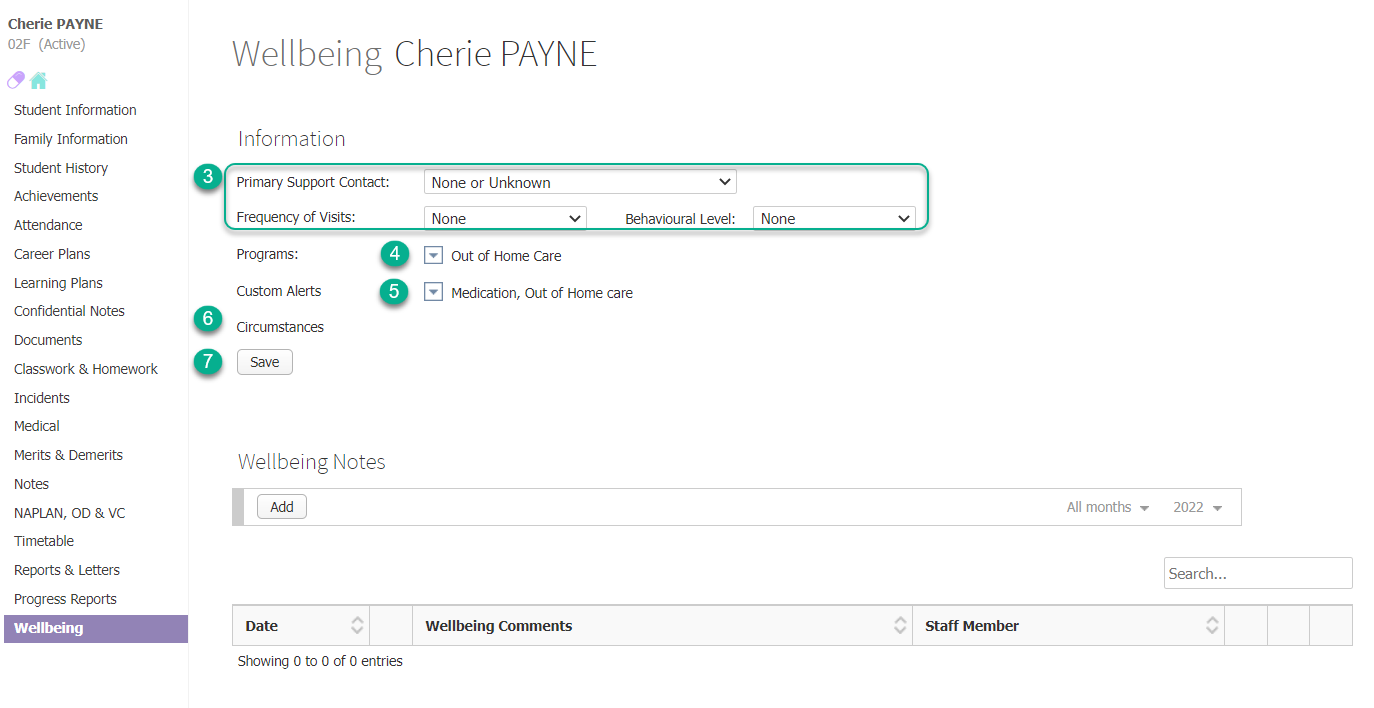
- Next to Programs, you can select all the programs (such as language support and integration) that the student is enrolled in, by clicking the dropdown arrow and ticking the appropriate boxes. You can add to and modify this list yourself, if you have permission, by clicking the [ Edit List ] text at the bottom of the lis
- Next to Custom Alerts, you can tick all the alerts that you want shown next to the student’s name (e.g. Medication, Out of home care), by clicking the dropdown arrow and ticking the appropriate boxes. You can add to and modify this list yourself, if you have permission, by clicking the [ Edit List ] text at the bottom of the list.
- Alerts coming from your SIS will be shown next to Circumstances Alerts.
- Click the Save button, when done.
Adding a new wellbeing note
You can add specific welfare notes with attachments, visitations, confidential data, discussions and any other information needed to a student’s profile.
- Choose a student from the search bar and click on their name to go to their student dashboard.
- Click on the Wellbeing item in the left hand menu.
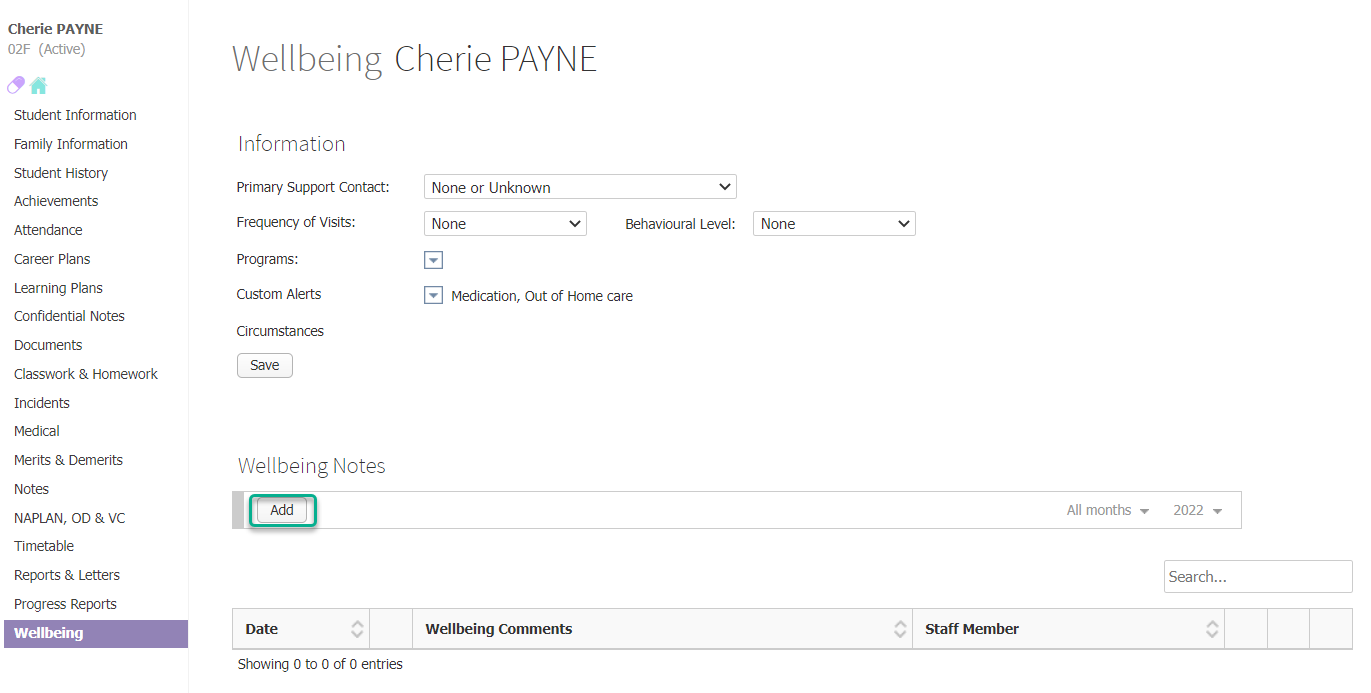
- In the Wellbeing Notes section, click the Add button.
- Under the Details section, click the Calendar icon next to Date: and select a date for the wellbeing note.
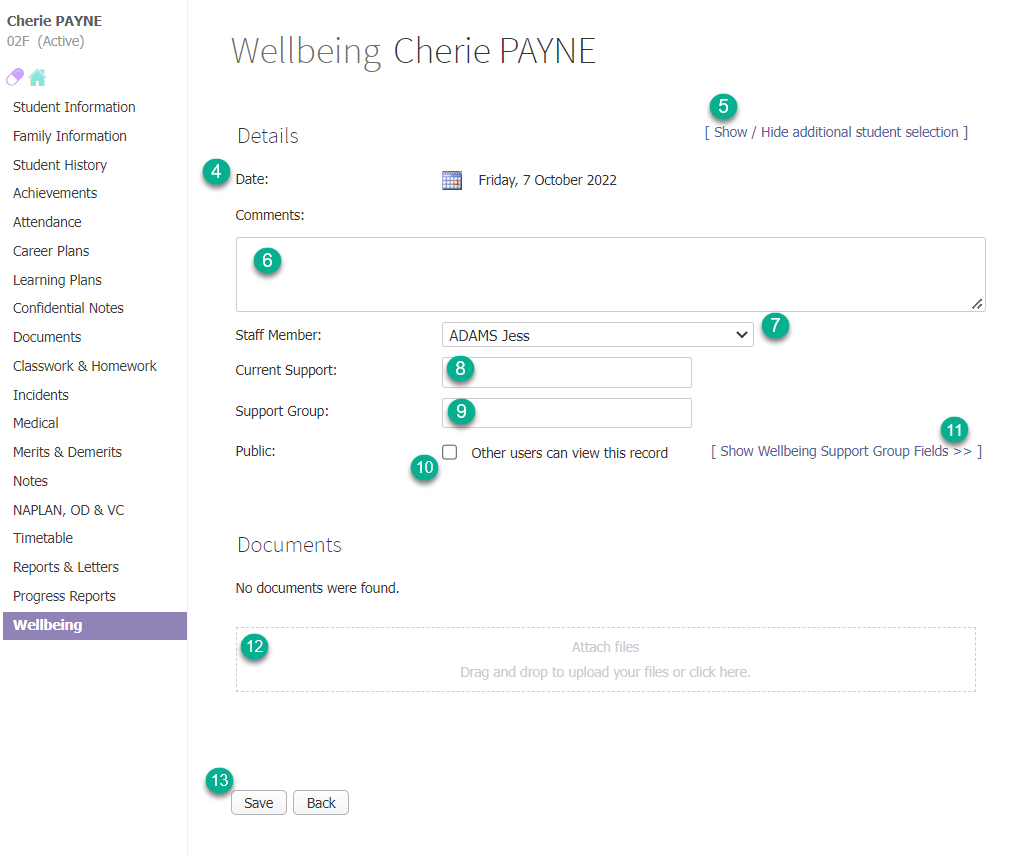
- If you are creating a wellbeing note that applies to multiple students, you can click the [ Show / Hide additional student selection ] text and select one or more students to add to this note. All information is duplicated across to all students added to the same note.
- Add any Comments you wish to add in the text box.
- Choose a Staff Member for this record by choosing from the dropdown list.
- Enter any Current Support details in the text box if applicable.
- Enter a Support Group in the text box if applicable.
- This record is a private record. To make it Public to staff that have permission to view public wellbeing notes, tick the checkbox that says Other users can view this record. If this checkbox is unticked, only those with permission to view ALL wellbeing notes will be able to see it.
- Wellbeing notes have a series of built-in fields to enter more specific information into. Click the text to [ Show Wellbeing Support Group Fields >> ] to see these and enter any text applicable.
- Attach any files to the wellbeing note if required, by clicking in the Upload area and browsing to your file, or by dragging and dropping files into the area.
- Click the Save button.
- If there are automated email notifications set up for wellbeing notes, these will be sent to recipients as determined by your messaging settings.
Viewing and editing wellbeing notes
You can view or edit existing wellbeing items by following the simple process below.
- Choose a student from the search bar and click on their name to go to their student dashboard.
- Click on the Wellbeing item in the left hand menu.
- In the Wellbeing Notes section, select the applicable month or year from the dropdown lists at the top right.
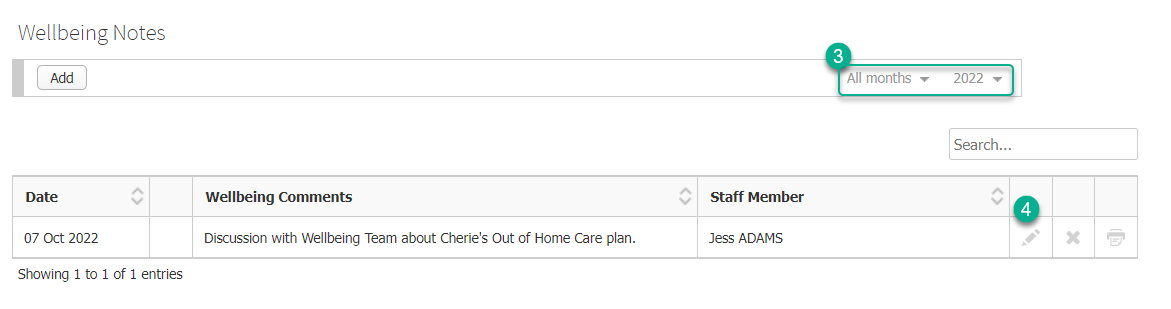
- Click the Pencil icon next to a wellbeing note to view or edit it. You can use the Search bar at the top right of the table to find specific notes, or sort any of the columns in the table with up or down arrows in the column header.
- Edit your wellbeing item as needed.
- Click the Save button, or the Back button if you are viewing only.
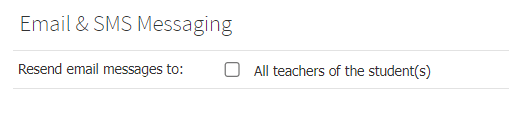
- If you are editing a wellbeing note and there are automated email notifications set up for wellbeing notes, these will be sent to staff as determined by your messaging settings if you tick the checkbox to Resend email messages to: the applicable recipients.
Deleting wellbeing notes
It is not recommended that you delete wellbeing notes, as it is of great benefit to have a full timeline of a student’s wellbeing history. However, under the circumstances that deleting a record is necessary, follow the simple process below.
- Choose a student from the search bar and click on their name to go to their student dashboard.
- Click on the Wellbeing item in the left hand menu.
- In the Wellbeing Notes section, select the applicable month or year from the dropdown lists at the top right.
- Click the Delete icon next to a wellbeing note to delete it.

- Click OK.
Printing wellbeing notes
- Choose a student from the search bar and click on their name to go to their student dashboard.
- Click on the Wellbeing item in the left hand menu.
- In the Wellbeing Notes section, select the applicable month or year from the dropdown lists at the top right.
- Click the Print icon next to a wellbeing note to print it.

- The software will generate a PDF document of the record, which can then be saved to your computer or printed.
Viewing the wellbeing notes report
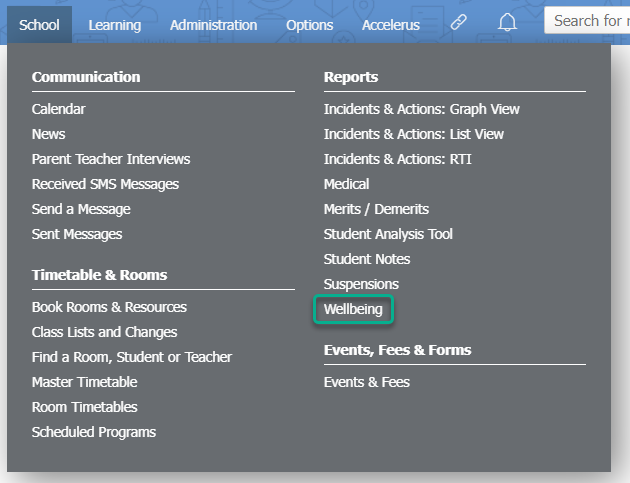
- Go to School > Reports > Wellbeing.
- Choose the date range you want the report for by selecting one of the Date filters available.
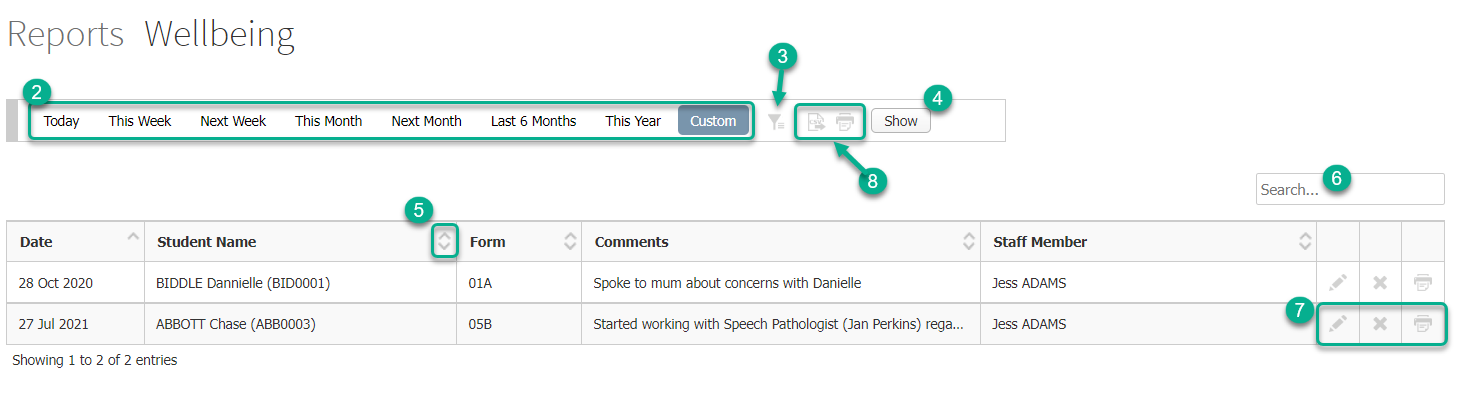
- For more filtering options select the Filter icon.
- Click on the Show button.
- You can sort data in your report by any column using the up or down arrows.
- You can search within your report using the report’s Search bar.
- You can view/edit, delete or print any wellbeing note using the icons at the end of each row.
- You can export your report data to CSV or PDF using the icons at the top of the report screen.
Adjusting Wellbeing options for your school
You can customise some of the options staff can select in the Information section of the student Wellbeing page to suit your school’s needs.
Note: You will only be able to do this if you have the relevant permissions assigned.
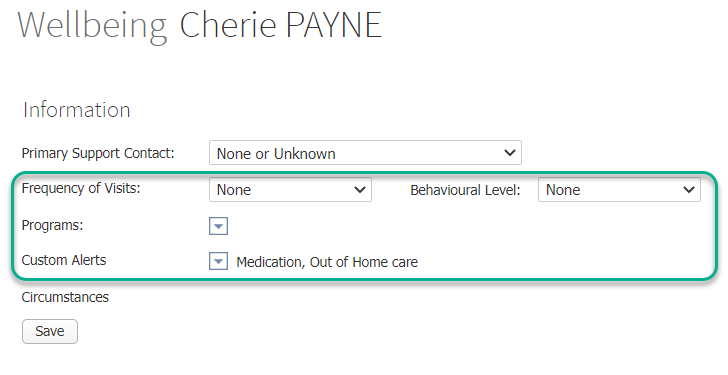
To add, edit or delete options from the dropdown lists shown above, use the following steps.
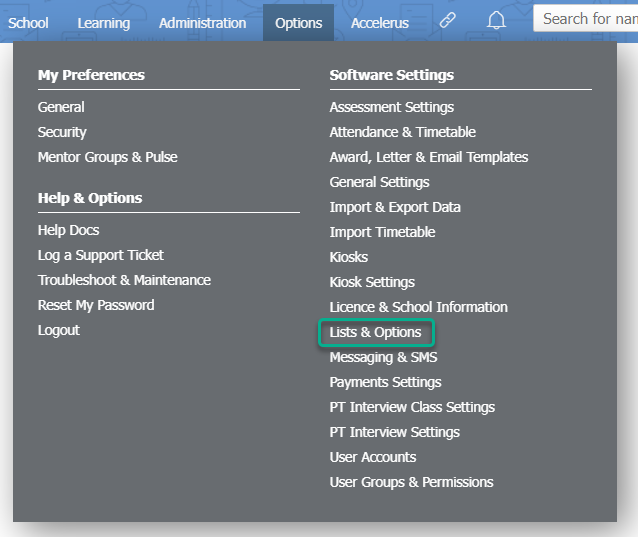
- Go to Options > Software Settings > Lists & Options.
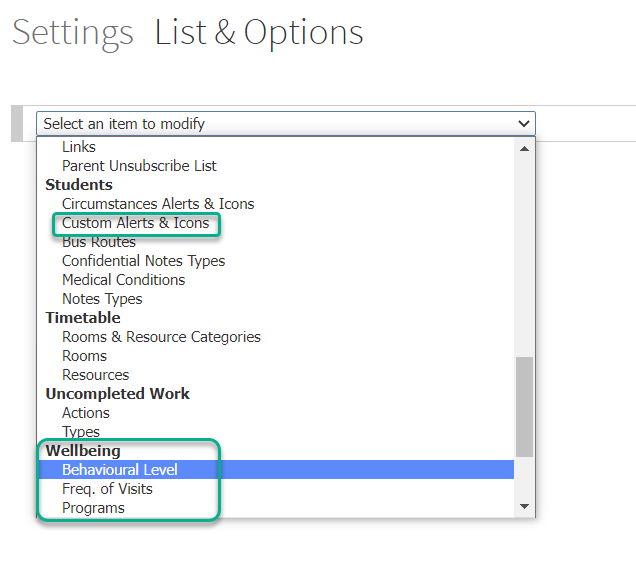
- Use the dropdown list to select the list you wish to access. You can edit options under the Students subheading for Custom Alerts & Icons, as well as options under the Wellbeing subheading for Behavioural Level, Freq. of Visits, and Programs.
- For whichever list you have selected, you can add a new item by entering a name into the Item column, then clicking the Add button.
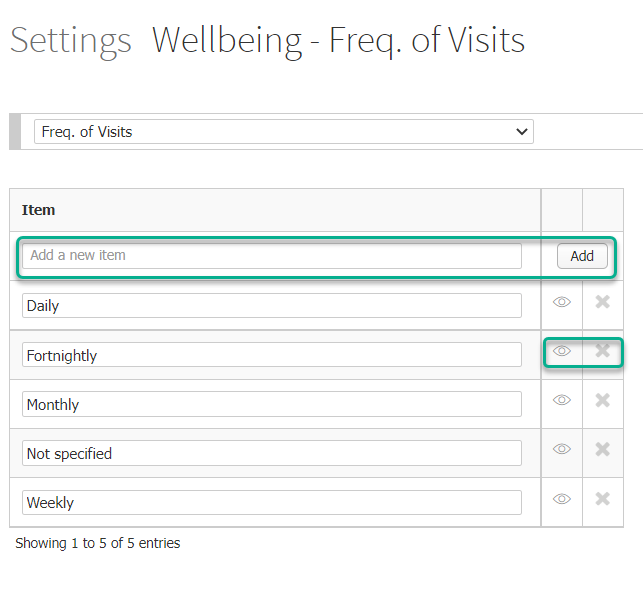
- You can use the Eye icon to hide/unhide options from the list, or the X icon to delete. We recommend that you hide rather than delete options in most cases, as deleting options that you have already added to a student record in the past will cause data integrity issues.
- If you are editing the Custom Alerts & Icons list, you can also add an icon and/or a colour to the alert. See the related article ‘Custom Alerts & icons‘ for more information. You cannot add new Circumstance Alerts & icons, as these are determined by your SIS data, but you can edit their icons and/or colours in the same way.
Cara Menggunakan Informasi Kesejahteraan Siswa (Student Wellbeing)
Prestia dapat mencatat dan memantau seluruh informasi kesejahteraan dan kesejahteraan sosial (welfare) siswa Anda. Ini dapat mencakup masalah kesejahteraan, masalah keluarga, sesi konseling, kunjungan guru agama/rohaniwan, laporan dokter, program khusus, dan lainnya.
Rekomendasi: Mengingat sifat data yang umumnya sensitif dan rahasia, kami menyarankan Anda untuk memastikan bahwa hanya staf terbatas yang diberikan hak akses ke menu ini.
Setiap siswa dapat memiliki kontak pendukung utama (primary support contact) yang ditugaskan kepada mereka, serta informasi lain seperti frekuensi kunjungan dan program yang diikuti. Anda juga dapat menambahkan peringatan kustom (custom alerts) sendiri yang akan muncul di samping nama siswa di setiap halaman, bersama dengan peringatan utama lainnya yang diimpor dari sistem administrasi Student Information System (SIS) Anda (seperti pembatasan hak asuh, siswa berisiko, dan peringatan medis).
Melihat dan Mengedit Informasi Kesejahteraan Siswa
-
Pilih siswa dari bilah pencarian (search bar) dan klik nama mereka untuk membuka dasbor siswa.
-
Klik menu Wellbeing di sebelah kiri.
-
Pada bagian Information, Anda dapat memilih Primary Support Contact, Frequency of Visits, dan Behavioural Level dari opsi daftar pilihan (dropdown).
-
Di samping Programs, Anda dapat memilih semua program (seperti dukungan bahasa dan integrasi) yang diikuti siswa dengan mengklik panah dropdown dan mencentang kotak yang sesuai. Anda dapat menambahkan dan mengubah daftar ini sendiri (jika memiliki izin) dengan mengklik teks [ Edit List ] di bagian bawah daftar.
-
Di samping Custom Alerts, Anda dapat mencentang semua peringatan yang ingin ditampilkan di samping nama siswa (misalnya Medication, Out of home care) dengan mengklik panah dropdown dan mencentang kotak yang sesuai. Anda dapat menambahkan dan mengubah daftar ini sendiri (jika memiliki izin) dengan mengklik teks [ Edit List ] di bagian bawah daftar.
-
Peringatan yang berasal dari SIS Anda akan ditampilkan di samping Circumstances Alerts.
-
Klik tombol Save setelah selesai.
Menambahkan Catatan Kesejahteraan Baru
Anda dapat menambahkan catatan kesejahteraan spesifik beserta lampiran, riwayat kunjungan, data rahasia, diskusi, dan informasi lain yang diperlukan ke profil siswa.
-
Pilih siswa dari bilah pencarian dan klik nama mereka untuk membuka dasbor siswa.
-
Klik menu Wellbeing di sebelah kiri.
-
Pada bagian Wellbeing Notes, klik tombol Add.
-
Di bawah bagian Details, klik ikon Kalender di samping Date: dan pilih tanggal untuk catatan kesejahteraan tersebut.
-
Jika Anda membuat catatan kesejahteraan yang berlaku untuk beberapa siswa sekaligus, klik teks [ Show / Hide additional student selection ] dan pilih satu atau lebih siswa untuk ditambahkan ke catatan ini. Seluruh informasi akan digandakan ke semua siswa yang ditambahkan ke catatan yang sama.
-
Tambahkan komentar atau catatan pada kotak teks Comments.
-
Pilih anggota staf untuk rekaman ini melalui daftar dropdown Staff Member.
-
Masukkan rincian dukungan saat ini pada kotak teks Current Support jika ada.
-
Masukkan kelompok pendukung pada kotak teks Support Group jika ada.
-
Secara bawaan, rekam data ini bersifat pribadi/rahasia. Untuk membuatnya dapat diakses oleh staf lain yang memiliki izin melihat catatan umum, centang kotak Other users can view this record. Jika kotak ini tidak dicentang, hanya staf yang memiliki izin untuk melihat SELURUH catatan kesejahteraan (ALL wellbeing notes) yang dapat melihatnya.
-
Catatan kesejahteraan memiliki serangkaian kolom kustom bawaan untuk memasukkan informasi yang lebih spesifik. Klik teks [ Show Wellbeing Support Group Fields >> ] untuk menampilkan kolom tersebut dan isi sesuai kebutuhan.
-
Lampirkan berkas ke catatan kesejahteraan jika diperlukan dengan mengklik area Upload lalu memilih berkas Anda, atau dengan menyeret dan melepas (drag and drop) berkas ke area tersebut.
-
Klik tombol Save.
Catatan: Jika ada notifikasi email otomatis yang diatur untuk catatan kesejahteraan, email tersebut akan dikirimkan ke penerima sesuai dengan pengaturan pesan Anda.
Melihat dan Mengedit Catatan Kesejahteraan
Anda dapat melihat atau mengedit catatan kesejahteraan yang sudah ada dengan langkah-langkah berikut:
-
Pilih siswa dari bilah pencarian dan klik nama mereka untuk membuka dasbor siswa.
-
Klik menu Wellbeing di sebelah kiri.
-
Pada bagian Wellbeing Notes, pilih bulan atau tahun yang sesuai dari daftar dropdown di kanan atas.
-
Klik ikon Pensil di samping catatan kesejahteraan untuk melihat atau mengeditnya. Anda dapat menggunakan bilah pencarian di kanan atas tabel untuk menemukan catatan tertentu, atau mengurutkan kolom tabel menggunakan panah naik/turun di header kolom.
-
Edit data kesejahteraan sesuai kebutuhan.
-
Klik tombol Save, atau tombol Back jika Anda hanya ingin melihatnya saja.
-
Jika Anda mengedit catatan dan terdapat notifikasi email otomatis yang diaktifkan, notifikasi akan dikirim ulang ke staf yang ditentukan jika Anda mencentang kotak Resend email messages to: pada penerima yang sesuai.
Menghapus Catatan Kesejahteraan
Sangat tidak disarankan untuk menghapus catatan kesejahteraan, karena rekam jejak (timeline) riwayat kesejahteraan siswa secara lengkap sangatlah penting. Namun, jika dalam kondisi tertentu penghapusan data benar-benar diperlukan, ikuti langkah berikut:
-
Pilih siswa dari bilah pencarian dan klik nama mereka untuk membuka dasbor siswa.
-
Klik menu Wellbeing di sebelah kiri.
-
Pada bagian Wellbeing Notes, pilih bulan atau tahun yang sesuai dari daftar dropdown di kanan atas.
-
Klik ikon Hapus (tempat sampah) di samping catatan kesejahteraan yang ingin dihapus.
-
Klik OK.
Mencetak Catatan Kesejahteraan
-
Pilih siswa dari bilah pencarian dan klik nama mereka untuk membuka dasbor siswa.
-
Klik menu Wellbeing di sebelah kiri.
-
Pada bagian Wellbeing Notes, pilih bulan atau tahun yang sesuai dari daftar dropdown di kanan atas.
-
Klik ikon Printer di samping catatan kesejahteraan untuk mencetaknya.
-
Sistem akan membuat dokumen berformat PDF dari rekam data tersebut, yang kemudian dapat disimpan ke komputer Anda atau dicetak langsung.
Melihat Laporan Catatan Kesejahteraan
-
Buka School > Reports > Wellbeing.
-
Pilih rentang tanggal laporan yang Anda inginkan menggunakan salah satu filter tanggal (Date filters) yang tersedia.
-
Untuk opsi penyaringan lebih lanjut, klik ikon Filter.
-
Klik tombol Show.
-
Anda dapat mengurutkan data dalam laporan berdasarkan kolom mana saja menggunakan panah naik atau turun.
-
Anda dapat melakukan pencarian di dalam laporan menggunakan bilah pencarian (Search bar) laporan.
-
Anda dapat melihat/mengedit, menghapus, atau mencetak catatan kesejahteraan apa pun menggunakan ikon di ujung setiap baris.
-
Anda dapat mengekspor data laporan ke format CSV atau PDF menggunakan ikon di bagian atas layar laporan.
Menyesuaikan Opsi Kesejahteraan untuk Sekolah Anda
Anda dapat menyesuaikan beberapa opsi pilihan staf pada bagian Information di halaman Wellbeing siswa agar sesuai dengan kebutuhan sekolah Anda.
Catatan: Anda hanya dapat melakukan hal ini jika memiliki hak akses/izin yang sesuai.
Untuk menambah, mengedit, atau menghapus opsi dari daftar dropdown:
-
Buka Options > Software Settings > Lists & Options.
-
Gunakan daftar dropdown untuk memilih daftar yang ingin diakses. Anda dapat mengedit opsi di bawah subjudul Students untuk Custom Alerts & Icons, serta opsi di bawah subjudul Wellbeing untuk Behavioural Level, Freq. of Visits, dan Programs.
-
Pada daftar yang Anda pilih, Anda dapat menambahkan item baru dengan memasukkan nama pada kolom Item, lalu klik tombol Add.
-
Gunakan ikon Mata untuk menyembunyikan/menampilkan opsi dari daftar, atau ikon X untuk menghapus.
-
Rekomendasi: Kami menyarankan Anda untuk menyembunyikan (hide) daripada menghapus (delete) opsi dalam banyak kasus, karena menghapus opsi yang pernah ditambahkan ke rekam data siswa di masa lalu dapat menyebabkan masalah integritas data.
-
Jika Anda mengedit daftar Custom Alerts & Icons, Anda juga dapat menambahkan ikon dan/atau warna pada peringatan tersebut. Catatan: Anda tidak dapat menambahkan Circumstance Alerts & icons baru secara manual karena data ini terhubung langsung dari SIS Anda, namun Anda tetap dapat mengubah ikon dan/atau warnanya dengan cara yang sama.