
Prestia’s custom staff, student and contact data import feature
What data can I import?
You can import data for staff, students and/or parents/carers into Prestia in bulk using a CSV file. This can include anything at all that you have recorded in the staff, student or parent record in Prestia, including any custom fields you have created.
What data do I need in my CSV file?
CSV files for importing custom data have only two requirements:
- The first column must be the unique student, staff or contact code used in your Prestia database. You can find out what these codes are in your school by going to Administration > Reports > Contacts/Staff/Students.
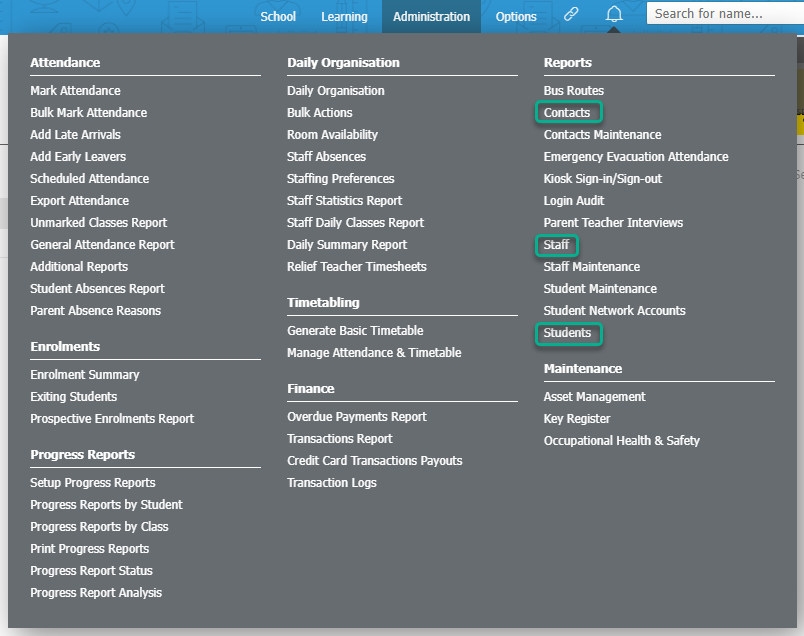
The user code will be in a column labelled either Contact Code, Staff Code, or Student Code, as seen in the example below from the Staff report: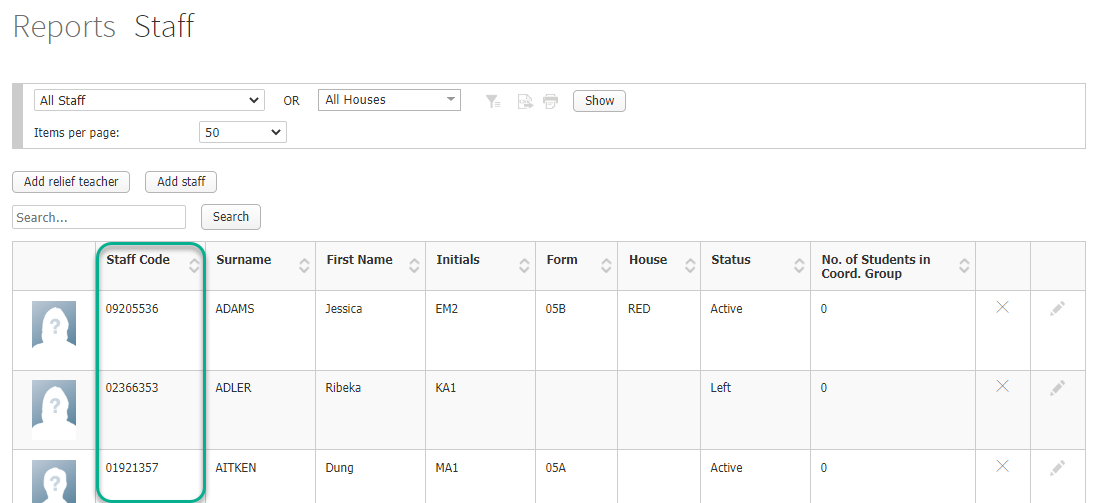
- All columns must have header titles that correspond to the field(s) you are importing.
For the user code, these are shown below:
- Contact code: ct_id
-
Staff code: sf_staffcode
- Student code: st_studentcode
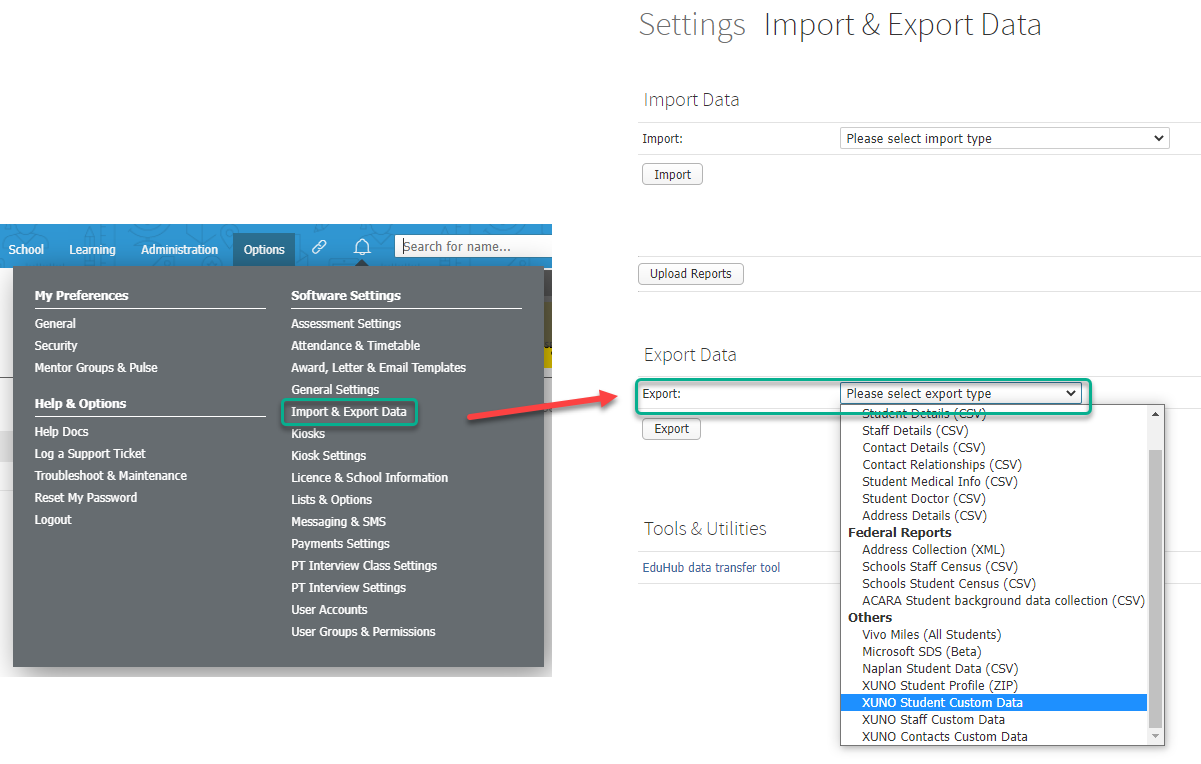
You can check the exported CSV to see what header to use for the field(s) you wish to import data for.
Importing your custom data
To import your CSV, follow these steps:
- Go to Options > Software Settings > Import & Export Data.
- Select the applicable option from the Import dropdown list (you may need to scroll to the bottom of the list).
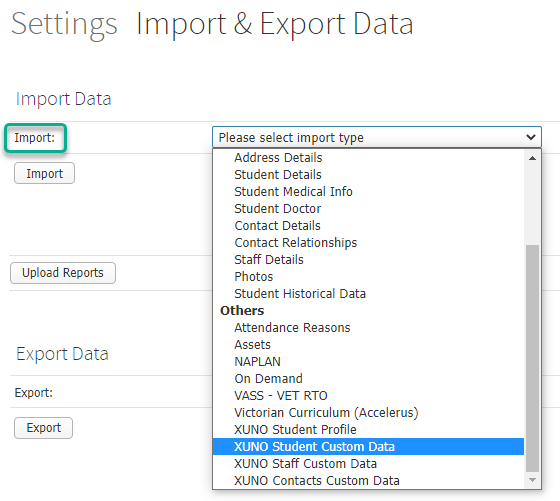
- Use the Choose file button to navigate to and select your CSV file.
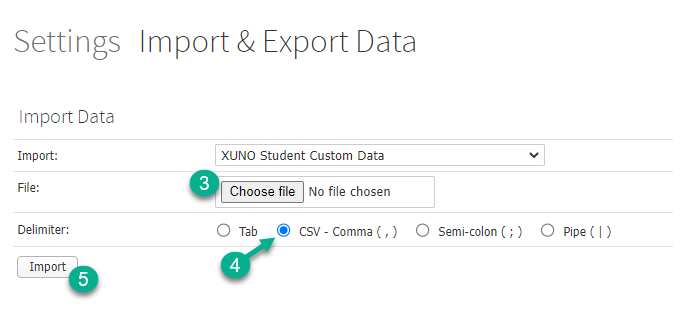
- Select CSV – Comma ( , ) as your Delimiter option.
- Click the Import button.
Fitur Impor Data Kustom Staf, Siswa, dan Kontak Prestia
Impor data dalam jumlah besar (bulk) dengan mudah menggunakan fungsionalitas impor data kustom yang andal dari Prestia. Anda dapat mengimpor sekumpulan data apa pun untuk staf, siswa, maupun orang tua/wali di Prestia, selama Anda memiliki setidaknya satu kolom yang berisi kode pengguna yang unik.
Data Apa Saja yang Bisa Saya Impor?
Anda dapat mengimpor data staf, siswa, dan/atau orang tua/wali ke Prestia secara massal menggunakan file CSV. Ini dapat mencakup informasi apa pun yang tercatat dalam rekam data staf, siswa, atau orang tua di Prestia, termasuk bidang kustom (custom fields) yang telah Anda buat.
Data Apa yang Saya Perlukan dalam File CSV?
File CSV untuk mengimpor data kustom hanya memiliki dua persyaratan:
-
Kolom pertama harus berupa kode unik siswa, staf, atau kontak yang digunakan dalam basis data Prestia Anda. Anda dapat mengetahui kode-kode ini di sekolah Anda dengan membuka menu Administration > Reports > Contacts/Staff/Students.
Kode pengguna akan berada dalam kolom berlabel Contact Code, Staff Code, atau Student Code, seperti yang terlihat pada contoh laporan Staf.
-
Semua kolom harus memiliki judul header yang sesuai dengan bidang (field) yang Anda impor.
Untuk kode pengguna, ketentuannya adalah sebagai berikut:
-
Kode kontak:
ct_id -
Kode staf:
sf_staffcode -
Kode siswa:
st_studentcode
Untuk kolom lainnya, Anda perlu mengunduh/mengekspor CSV dari Prestia untuk memeriksa nama bidangnya jika Anda tidak yakin. Untuk melakukannya, buka Options > Software Settings > Import & Export Data, lalu gunakan daftar drop-down Export untuk mengekspor Prestia Student Custom Data, Prestia Staff Custom Data, atau Prestia Contacts Custom Data.
Anda dapat memeriksa CSV yang diekspor tersebut untuk melihat judul header apa yang harus digunakan pada bidang yang ingin Anda impor datanya.
-
Mengimpor Data Kustom Anda
Navigasi ke Options > Software Settings > Import & Export Data.
Pilih opsi yang sesuai dari daftar drop-down Import (Anda mungkin perlu menggulir hingga ke bagian paling bawah daftar).
Gunakan tombol Choose file untuk mencari dan memilih file CSV Anda.
Pilih CSV – Comma ( , ) sebagai opsi Delimiter Anda.
Klik tombol Import.